
Use and Care Manual


4
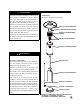
Picture Qty Description
Used in
Step(s)
6 Large Bolt 4
5 Medium Bolt 1 & 3
4 Small Bolt
4 Large Screw 2
9 Small Screw 8
9
Large Flat
Washer
6 & 9
9
Small Flat
Washer
8
2
Large Flange
Nut
1
6
Small Flange
Nut
4
4 Large Nut 2
9 Cap Nut 8
3 Wing Nut 9
3 Reflector Stud 6
1 Wrench
1 / 3 / 4 /
7 / 8
Additional Requirements
The following items are not included, but are necessary for
the proper assembly of your heater. Do NOT attempt to
assemble without proper tools.
. 7/16” open-end wrench.
.Philips screwdriver w/ medium blade.
. Adjustable opening wrench.
. Leak Detection Solution(Instructions on how to make
solution are included in step )
Note: You must follow all steps to properly assemble
heater.
(For models without Wheels , skip to Step 2)
Step 1 – Attach Wheel Assembly to Base
. Line up holes in Wheel Bracket with corresponding
holes in Base, Insert 2 Medium Bolts through holes,
finger tighten 2 Large Flange Nuts.
. Be sure that the Wheel Assembly is parallel to the
base, and fully tighten bolts.
Wheel Assembly
(For models without Bucket , skip to Step 3)
Step 2 – Attach Bucket to Base
Bucket
. Slip 4 Large Screw through holes of Base.
2 Req’d Medium Bolts
2 Req’d Large Flange Nuts
4 Req’d Large Screws 4 Req’d Large Nuts
Hardware Installation process
(GS4400-P4)