D ® EasyCut 400 Art. 8846 ComfortCut 450 Art. 8847 PowerCut 500 Art.
GB GARDENA Turbotrimmer EasyCut 400 / 480 / ComfortCut 450 / PowerCut 500 Welcome to the Garden of GARDENA... Translation of the original instructions from German. Please read these operating instructions carefully and observe the information they contain. Use these operating instructions to familiarise yourself with the GARDENA Turbotrimmer, its proper use and the notes on safety.
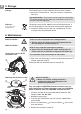
GB DANGER ! Risk of injury to other people ! V Keep other people out of the area where you are working. Check your Trimmer before each use v Always visually inspect your Trimmer before each use. v Check that the ventilation slots are not obstructed in any way. Do not use your Trimmer if the safety devices (push button, safety cover) and / or the filament cassette are damaged or worn. v Never bypass the safety devices. v Inspect the area to be cut before you begin work.
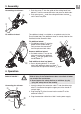
GB 3. Assembly 1. Push the cover 3 into the guide of the cutting head from behind 2 until the connection locks into place on both sides. Assembling the trimmer : 3 2. Push plant guard 1 onto the cutting head from the front until it locks into place. 2 2 1 Fit additional wheel : The additional wheel is available as an optional extra for the EasyCut 400 / 480. The additional wheel is already fitted on the ComfortCut 450 / PowerCut 500.
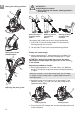
GB Setting the working position : A C ATTENTION ! Overloading of the motor. V When trimming with wheels, working position 2 must be set. B Working position 1 : Trimming without wheels D Working position 2 : Trimming with wheels The angle of the handle can be set to 3 working positions. 1. Push slider B up and set the handle working position (see scale D). 2. Let the slider Setting the trimmer to body height : C to the required B lock into the required working position.
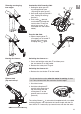
ComfortCut 450 / PowerCut 500 : 1. Setting the plant guard H to parking position (see “Adjusting the plant guard” ). 2. Set handle angle to position 3 (see “Setting the working position” ). GB Trimming overhanging lawn edges : J P z I 3. Push slider I upwards, turn handle J through 90° and let slider I lock into P on place (see arrows z articulated fork and handle holder). H EasyCut 400 / 480 : v Open clamping lever E, turn upper part of handle through 180° and close clamping lever E again.
GB 5. Storage Storage : The Turbotrimmer must be stored out of the reach of children. v Store your Turbotrimmer in a dry place where it is protected from frost. Recommendation : The trimmer can be hung up by the handle. The cutting head is not put under any unnecessary strain if the trimmer is stored hanging up. The product must not be added to normal household waste. It must be disposed of in line with local environmental regulations.
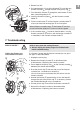
GB 5. Remove any dirt. 6. Pull approximately 15 cm of the filaments T out of the new filament cassette S through the hole in the plastic ring U. W T X S 7. First thread the filament T through the metal sleeve then around the guide pin W. 8. Insert the filament cassette holder V. X and S into the filament cassette 9. Fit the cassette cover Q on the filament cassette holder so that you hear both locking clips R click into place.
GB Fault Possible cause Remedy The Turbotrimmer no longer cuts Filament worn or too short. v Lengthen the filament – see 4. Operation “Filament feed (Tip mechanism for automatic filament feed )”. Filament cassette empty. v Replace the filament cassette – see 6. Maintenance “Replacing the filament cassette” ). Filament drawn into the cassette or stuck together. v Pull the filament out of the filament cassette (see above). A In the event of other faults please contact GARDENA Service.
GB 10. Service / Warranty GARDENA guarantees this product for 2 years (from date of purchase). This guarantee covers all serious defects of the unit that can be proved to be material or manufacturing faults. Under warranty we will either replace the unit or repair it free of charge if the following conditions apply: • The unit must have been handled properly and in keeping with the requirements of the operating instructions.
D Produkthaftung Wir weisen ausdrücklich darauf hin, dass wir nach dem Produkthaftungsgesetz nicht für durch unsere Geräte hervorgerufene Schäden einzustehen haben, sofern diese durch unsachgemäße Reparatur verursacht oder bei einem Teileaustausch nicht unsere Original GARDENA Teile oder von uns freigegebene Teile verwendet werden und die Reparatur nicht vom GARDENA Service oder dem autorisierten Fachmann durchgeführt wird. Entsprechendes gilt für Ergänzungsteile und Zubehör.
D EG-Konformitätserklärung Der Unterzeichnete Husqvarna AB, 561 82 Huskvarna, Sweden bestätigt, dass die nachfolgend bezeichneten Geräte in der von uns in Verkehr gebrachten Ausführung die Anforderungen der harmonisierten EU-Richtlinien, EU-Sicherheitsstandards und produktspezifischen Standards erfüllen. Bei einer nicht mit uns abgestimmten Änderung der Geräte verliert diese Erklärung ihre Gültigkeit.
Bezeichnung des Gerätes : Description of the unit : Désignation du matériel : Omschrijving van het apparaat : Produktbeskrivning : Beskrivelse af enhederne : Laitteiden nimitys : Descrizione del prodotto : Descripción de la mercancía : Descrição do aparelho : Opis urz№dzenia : A kйszьlйk megnevezйse : Oznaиenн pшнstroje : Označenie prístroja : Oνομασ α της συσκευ ς : Oznaka naprave : Descrierea articolelor : Обозначение на уредите : Seadmete nimetus : Gaminio pavadinimas : Iekārtu apzīmējums : Turbotrimmer
Deutschland / Germany GARDENA GmbH Central Service Hans-Lorenser-Straße 40 D-89079 Ulm Produktfragen: (+ 49) 731 490 - 123 Reparaturen: (+ 49) 731 490 - 290 service@gardena.com China Husqvarna (China) Machinery Manufacturing Co., Ltd. No. 1355, Jia Xin Rd., Ma Lu Zhen, Jia Ding Dist., Shanghai 201801 Phone: (+ 86) 21 59159629 Domestic Sales www.gardena.com.cn Albania COBALT Sh.p.k. Rr. Siri Kodra 1000 Tirana Colombia Husqvarna Colombia S.A. Calle 18 No.