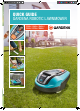
QUICK GUIDE GARDENA ROBOTIC LAWNMOWER R38Li / R40Li / R45Li / R50Li / R70Li / R80Li 1157872-26,QG,R38Li,R40Li,R45Li,R50Li,R70Li,GB.indd 9 2015-12-04 11.
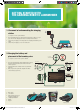
GETTING STARTED WITH THE GARDENA ROBOTIC LAWNMOWER 1. Placement of and connecting the charging station 3 See chapter 3.2 in the Operator’s Manual 1. Place the charging station at a central position in the work area, with a lot of open space in front of the charging station and on a relatively horizontal surface. 2. Connect the power supply’s low voltage cable to the charging station and the power supply. 3. Connect the power supply to a 100-240 V wall socket. 2 1 2.
. Connecting the boundary wire 1 2 3 See chapter 3.5 in the Operator’s Manual 1. 2. 3. 4. Open the connector and lay the wire ends in the recesses on each connector. Press the connectors together using a pair of pliers. Cut off any surplus boundary wire. Cut 1 to 2 cm above the connectors. Press the connectors onto the contact pins, marked A, on the charging station. It is important that the right-hand wire is connected to the right-hand contact pin, and the left-hand wire to the left-hand pin. 5.
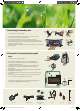
5. Starting and stopping 1 2 3 4 5 GARDENA See chapter 4.3 and 4.4 in the Operator’s Manual Starting 1. Open the cover by pressing the STOP button. 2. Set the main switch to position 1. When you do this for the first time, a start up sequence starts where you select a four digit PIN code among other things. 3. Press the START button. 4. Close the cover. Start 1 1 2 3 4 5 6 7 8 9 0 Stopping Press the STOP button. 6. Adjust the robotic lawnmower to suit your garden See chapter 6.3, 6.