Quick guide SILENO city, smart SILENO city gardena.com P01 QG_EN_3.
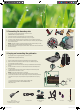
GETTING STARTED WITH THE GARDENA ROBOTIC LAWNMOWER 1. Installing the charging station See chapters 3.2 and 3.3 in the supplied operator’s manual or on the GARDENA website (www.gardena.com). 1. 2. 3. 4. 3 Place the charging station on a flat, level surface where there is open space. Connect the low voltage cable to the charging station and the power supply. Connect the power supply to a 100-240 V wall socket. Press the ON/OFF button to turn the robotic lawnmower on.
. Connecting the boundary wire 2 1 See chapter 3.6 in the supplied operator’s manual or on the GARDENA website (www.gardena.com). 1. 2. 3. 4. Open the connector and lay the boundary wire in the connector. Press the connector and the wire together by using a pair of pliers. Cut off any surplus boundary wire. Cut off the wire 1 to 2 cm after the connectors. Press the boundary wire connectors onto the contact pins marked L (left) and R (right) on the charging station.
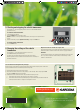
5. Starting and stopping the robotic lawnmower See chapters 4.1 - 4.5 in the supplied operator’s manual or on the GARDENA website (www.gardena.com). To start the robotic lawnmower 1. Open the hatch to the keypad. 2. Press the ON/OFF button. The display is lit up. NOTE: The first time, a start-up sequence begins where, for example, a four-digit PIN code is chosen. 3. Enter the PIN code by using the up/down arrow keys, and press the OK button. 2 To stop the robotic lawnmower 1. Press the STOP button. 6.