
Installation Guide


VISIT WWW.GARDENIQUEDECOR.COM FOR PRODUCT INFORMATION AND TIPS.
2
EN
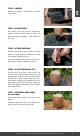
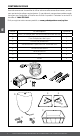
STEP 1 - PLAN AND DIG
Layout and mark appropriate basin area.
Dig a hole approximately 8” deep x 21” long
x 15” wide. Ensure basin fits and level basin
within excavated area.
STEP 2 - ASSEMBLE LID
Place both lid pieces on the floor, smooth
side down. Attach included screws on either
side of the center lid hole and fasten tightly.
Attach assembled lid to basin, clipping into
place.
OVERVIEW
STEP BY STEP INSTALLATION
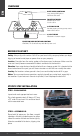
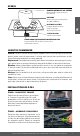
Safety. Always dig with caution. Call 811 or your local utility company before you begin
digging to locate buried pipes or power lines on your property.
Location. Consider how the water garden will enhance your landscape. Make sure the
area won’t easily become covered with debris and obstruct the fountain.
Elevation. Your water feature should not be built on a slope or grade. If it is located at the
lowest elevation of the yard, you will have rainwater run-o that can muddy the water.
Leveling. For locations where ground is hard, use sand to help level and fill in gaps.
Water. To ensure continuous operation, regularly top o your water level, especially in
hot weather. If your feature is close to a sprinkler, it can help keep the basin full.
BEFORE YOU START
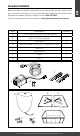
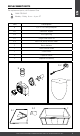
FOUNTAIN TOPPER
Weatherproof resin
13 x 12 x 16 in.
3/4 IN. TUBING
Attached to fountain topper
FOUNTAIN PUMP WITH FLOW CONTROL
170 GPH, ETL Certified Pump with 10 ft. power cord
8 GALLON BASIN
Durable plastic and easy pump access
26.9 x 20.7 x 9.5 in.
BUILT-IN LED LIGHT RING
Long-lasting LED lights to
illuminate the water