08835.rev6 11/4/06 3:26 pm Page 1 Lean-to Greenhouse Assembly Instructions For 6ft x 4ft (1.93m x 1.
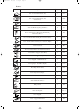
08835.
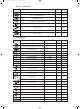
08835.
08835.rev6 11/4/06 3:26 pm Page 4 Introduction Safety Precautions when assembling a Gardman greenhouse: The wearing of protective gloves and stout footwear is essential when handling glass and recommended even for Polycarbonate which does not shatter but has sharp edges. Protective goggles are recommended whilst handling glass and the glazing spring clips. Assembly of the greenhouse frame is much easier with two people and essential for glazing with glass.
08835.rev6 11/4/06 3:26 pm Page 5 Before you start: IMPORTANT: Read the instructions completely before starting assembly. • Construct the base first so that the greenhouse can be securely mounted when completed. • Find someone to help you: it is much easier with someone to hold parts, pass tools etc. This is not very heavy work so would suit most able-bodied people. • Allow plenty of time: rushing often causes errors and the re-doing of incorrect assemblies.
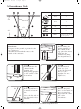
08835.rev6 11/4/06 3:26 pm Page 6 A Greenhouse Side 5 3 5 3 A2 Profile A3 4 4 G1 A1 2 1 Code Qty A1-6 1 A2-6 1 A3 2 G1 2 M610 1 Introduction Lay parts on the ground, as pictured at the top of this page. Assemble loosely with the nuts to the inside of the structure. Step 3 Before bolting the glazing uprights to the outside of the top gutter bar, insert bolts into the channels for fixing the diagonal braces. A2 A3 Step 1 Insert bolt into the channel in the upright (A3).
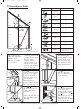
08835.rev6 11/4/06 3:26 pm Page 7 B Greenhouse Ends Profile Code Qty C3-3/C3-4 2 D4-1 1 C4-3/C4-4 2 G1 2 G1-1 2 B3-1/B3-2 2 H1 2 C1-1 2 G2 2 M610 Used for all sections so quantity not listed in this or other parts lists. 4 C4-4 1 7 D4 G1-1 6 C3-4 B3-2 G1 5 H1 2 C1-1 3 This is the right end viewed from inside. Reverse for left end. This section is the same for both ends until the door fitments are added. See section C.
08835.rev6 11/4/06 3:26 pm Page 8 C Adding the Door Running Gear Profile Code Qty C2-1 / C2-2 2 C5 1 E6 1 E9 2 E13 1 M640 1 M6-1 1 M610 Used for all sections so quantity not listed in this or other parts lists. C4 1 2 & 3 2 & 3 5 C5 C2 E6 6 C5 Door Stop Outside view Note: Door can be fitted at either end Step 1 Bolt the door frame top bars (C2) to the outside of the roof bars on both ends of the greenhouse C4 C2 C5 Step 5 Fit the support arm (E6) as shown.
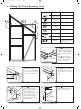
08835.rev6 11/4/06 3:26 pm Page 9 D Greenhouse Assembly & Roof Section Profile Code Qty C4-3/C4-4 1 D2 1 D3-1 2 D4 2 G3 4 M610 Used for all sections so quantity not listed in this or other parts lists. 5 4 4 1 & 3 5 1 & 3 D1 2 Outside view Step 4 Bolt the ridge bar to the underside of the end roof edge bars (C4) as shown. C4 Step 1 In this section, the three greenhouse walls are joined together and the roof added. This phase is best undertaken by two people.
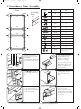
08835.rev6 11/4/06 3:26 pm Page 10 E Greenhouse Door Assembly Profile Door 3 3 E2 Assembly Parts E5 E4 2 2 E4 2 2 E1 E1 E3 1 1 Qty E1 2 E2 1 E3 1 E4 2 E5 2 619 14 619W 2 E12 2 M416 2 M4-1 2 M4-2 2 E10 2 E11 2 M610 Used for all sections so quantity not listed in this or other parts lists. Step 1 Push the plastic door base sliders into the door bottom bar as shown. Screw through the uprights into the bottom bar and the slider.
08835.rev6 11/4/06 3:26 pm Page 11 F Greenhouse Vent Assembly & Roof Completion Profile F1 F2 1 2 2 F3 Glass Qty F1 1 F2 1 F3 1 F4 2 F10 1 F12 2 66 6 M610 Used for all sections so quantity not listed in this or other parts lists. 1 F4 F4 Code Notes: • The assembly is slightly different for glass and • polycarbonate glazing. • Glazing sheets are from separate glazing packs. Step 1 Bolt the vent side bars loosely to the vent top bar as shown.
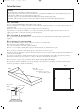
08835.rev6 11/4/06 3:26 pm Page 12 Glazing & Finishing NOTE: Glazing instructions are included in the glazing pack. Profile Code Qty G5 Code Qty 30m E14 1 A20 2 M10 1 G4 112 G5 Glazing Bead Profile Glazing Bead G5 must be applied to all glazing bars prior to glazing with polycarbonate or glass. Fit to bars as shown and trim to length. Note: Stretching can occur when fitting. Allow a few minutes to shrink back before trimming. Fit gutter end caps A20 as shown.