
Owner manual


Installation Instructions for
Model 19250 “Swinger” Ladders
Form 12.242
ASSEMBLY INSTRUCTIONS
1. Check parts against parts list.
2. Read Instructions completely before starting assembly.
Tools Required
1. Adjustable wrench to 1/2"
2. Screwdriver
3. Drill and Bits
4. Ruler
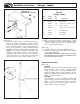
Refer to Fig. 1
1. Locate the area on your pontoon boat where the ladder is
to be mounted. It is recommended that the ladder be
placed near the side gate opening, such that when it is
opened, the ladder will be deployed in the gate opening.
Check the skirt edge where the ladder’s mounting
hardware will be placed. Make sure that the skirt edge
will support the load of a person. If necessary, add
fasteners to the extrusion at the indicated areas to
reinforce the ladder mounting points.
FIG. 1
FIG. 2
Write for
a Complete
Catalog
Phone: 651-459-9795
PO Box 8, 644 2nd Street E-mail: mail@garelick.com
St. Paul Park, Minnesota 55071 On the Web: www.garelick.com
12/02
(over)
Refer to Fig. 2
2. Position the pivot bracket (A) on the skirt edge where the
ladder is to be mounted. Mark and drill the four holes as
shown. NOTE: It is recommended to use a backing plate
for each piece of hardware that is attached to the skirt
edge extrusion (see illustration).
3. Secure the pivot bracket (A) to your boat with screws (B)
and locknuts (C).
Refer to Fig. 1
4. Attach the ladder to the mounted pivot bracket as shown
by aligning the holes and inserting a 1/4-20 x 1 3/4" s.s.
machine screw (D). Secure it in place with locknut (C).
5. Swing the ladder over to one side as shown and slide one
of the mounting brackets (E) onto the ladder’s rollpin as
illustrated. Center the ladder in the bracket and make sure
the rollpin is “bottomed out” in the bracket.
6. Position the bracket on the skirt edge with the ladder
attached. Make sure the ladder is square and level with
respect to the pivot bracket and boat. Mark and drill the
holes in the skirt edge. NOTE: It is recommended to use a
backing plate when installing this bracket (See Fig. 3).
7. Secure this bracket in place with screws (B) and
locknuts (C).
8. Swing the ladder over to the remaining side as shown and
repeat steps 1-3 for the remaining mounting bracket.