
User Manual


Approach
®
S6
Owner’s Manual
Getting Started
WARNING
See the Important Safety and Product Information guide in the
product box for product warnings and other important
information.
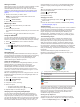
Keys
À
Select to turn on the backlight.
Hold to turn the device on and off.
Á
Select to measure a shot (Measuring a Shot, page 3).
Hold to reset the measurement.
Â
Select to open the menu for the current screen.
Ã
Select to enter your score for the hole (Keeping Score,
page 2).
Hold to view scores for all holes.
Ä
Select to use CourseView (Using CourseView, page 2).
Å
Select to return to the previous screen.
Turning on the Device
The device comes partially charged. You may need to charge
the device before playing golf (Charging the Device, page 1).
NOTE: The time of day and date are set automatically when you
go outdoors and the device locates satellites.
1
Hold , and follow the on-screen instructions.
2
Select Start Round.
3
Wait while the device locates satellites.
Status Icons
Battery level
GPS status
Alarm
Bluetooth
®
technology status
Charging the Device
WARNING
This device contains a lithium-ion battery. See the Important
Safety and Product Information guide in the product box for
product warnings and other important information.
NOTICE
To prevent corrosion, thoroughly clean and dry the contacts and
the surrounding area before charging or connecting to a
computer. Refer to the cleaning instructions in the appendix.
1
Plug the USB cable into a USB port on your computer.
2
Align the charger posts with the contacts on the back of the
device, and press the charger
À
until it clicks.
3
Charge the device completely.
Unlocking the Device
After a period of inactivity, the device goes into watch mode and
the screen is locked. The device displays the time and date, but
does not use GPS.
Select any key except to unlock the device.
Playing Golf
Before you can play golf, the device must locate satellite signals.
This may take 30–60 seconds.
1
Select > Start Round.
2
Select a course from the list of nearby courses.
3
Tap the screen to scroll through the data screens for each
hole.
TIP: You can select to return to the previous screen.
•
À
displays the hole information (Hole Information,
page 2).
•
Á
displays the layup and dogleg information (Viewing
Layup and Dogleg Distances and Saved Locations,
page 2).
•
Â
displays the PinPointer feature (Using PinPointer,
page 2).
•
Ã
displays the time of day.
The device automatically transitions when you move to the
next hole.
February 2016
Printed in Taiwan 190-01703-00_0C