Edge Explore 1000 ® Owner’s Manual September 2015 Printed in Taiwan 190-01944-00_0B
All rights reserved. Under the copyright laws, this manual may not be copied, in whole or in part, without the written consent of Garmin. Garmin reserves the right to change or improve its products and to make changes in the content of this manual without obligation to notify any person or organization of such changes or improvements. Go to www.garmin.com for current updates and supplemental information concerning the use of this product.
Table of Contents Introduction.....................................................................1 Situational Awareness ................................................................ 8 Training with Power Meters ........................................................ 8 Calibrating Your Power Meter ................................................ 8 Getting Started ............................................................................ 1 Charging the Device .......................................
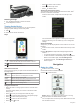
Introduction WARNING See the Important Safety and Product Information guide in the product box for product warnings and other important information. Always consult your physician before you begin or modify any exercise program. Getting Started When using your device the first time, you should complete these tasks to set up the device and learn about the basic features. 1 Charge the device (Charging the Device, page 1).
• Select • Select • Select to search near a location. to search by name. to delete an item. Viewing the Connections Screen The connections screen displays the status of the GPS, ANT+ sensors, and wireless connections. From the home screen, swipe down from the top of the screen. ® Releasing the Edge 1 Turn the Edge clockwise to unlock the device. 2 Lift the Edge off the mount. Turning On the Device The first time you turn on the device, you are prompted to configure system settings and the user profile.
5 If necessary, tap the screen to view the timer overlay. 6 Select to stop the timer. 7 Select End Ride > Save Ride. Acquiring Satellite Signals The device may need a clear view of the sky to acquire satellite signals. The time and date are set automatically based on the GPS position. 1 Go outdoors to an open area. The front of the device should be oriented toward the sky. 2 Wait while the device locates satellites. It may take 30–60 seconds to locate satellite signals. 6 Select View Map.
1 2 3 4 5 6 7 8 Select Courses > Round-Trip Course. Select Distance, and enter the total distance for the course. Select Start Location. Select an option: • To select your current location on the map, select Current Location. NOTE: If the device cannot acquire satellite signals for your current location, the device prompts you to use the last known location or to select the location on the map. • To select a location on the map, select Use Map, and select a location.
Setting the Search Location By default, the device searches for points of interest and other locations near your current location. You can set the device to search near a different location. 1 Select Where To? > Search Tools > . 2 Select a search area. 3 If necessary, select a location. 4 If necessary, select Use. Navigating to a Point of Interest You can search for specific types of locations. 1 From the home screen, select Where To? > Search Tools > POI Categories. 2 Select a category.
A message is sent to all emergency contacts. History History includes time, distance, calories, speed, lap data, elevation, and optional ANT+ sensor information. NOTE: History is not recorded while the timer is stopped or paused. When the device memory is full, a message appears. The device does not automatically delete or overwrite your history. Upload your history to Garmin Connect periodically to keep track of all your ride data.
Activity uploads to Garmin Connect: Automatically sends your activity to Garmin Connect as soon as you finish recording the activity. Device to device transfers: Allows you to wirelessly transfer files to another compatible Edge device. Social media interactions: Allows you to post an update to your favorite social media website when you upload an activity to Garmin Connect. Weather updates: Sends real-time weather conditions and alerts to your device.
3 Select a file. 4 Select Edit > Copy. 5 Open the portable device, drive, or volume for the device or memory card. 6 Browse to a folder. 7 Select Edit > Paste. The file appears in the list of files in the device memory or on the memory card. Deleting Files NOTICE If you do not know the purpose of a file, do not delete it. Your device memory contains important system files that should not be deleted. 1 2 3 4 Open the Garmin drive or volume. If necessary, open a folder or volume. Select a file.
4 Select the remote, and select Add. After the remote is paired, it connects to your device whenever the device is in range and turned on. Customizing the Action Key 1 From the Edge home screen, select > Sensors > Edge Remote > Sensor Details. 2 Select Single Press or Press and Hold. 3 Select a function for the action key. For example, you can set the action key to display the map or turn on the backlight. 5 Install the new battery into the back plate with the positive side facing down.
Fitness Goals Knowing your heart rate zones can help you measure and improve your fitness by understanding and applying these principles. • Your heart rate is a good measure of exercise intensity. • Training in certain heart rate zones can help you improve cardiovascular capacity and strength. • Knowing your heart rate zones can prevent you from overtraining and can decrease your risk of injury.
Shaded Relief: Shows detail relief on the map (if available) or turns off shading. Purchasing Additional Maps Before purchasing additional maps, you should determine the version of the maps that are loaded on your device. 1 Select > Activity Settings. 2 Select Map > Map Information. 3 Select a map. 4 Select . 5 Go to http://buy.garmin.com, or contact your Garmin dealer. Route Settings Select > Activity Settings > Routing. Routing Mode: Sets the transportation method to optimize your route.
3 Select a display speed. Changing the Start Notice This feature automatically detects when your device has acquired satellites and is moving. It is a reminder to start the timer so you can record your ride data. 1 Select > Activity Settings. 2 Select Start Notice. 3 Select an option: • Select Once. • Select Repeat > Repeat Delay to change the amount of time to delay the reminder. System Settings Select > System.
Device Care NOTICE Do not store the device where prolonged exposure to extreme temperatures can occur, because it can cause permanent damage. Never use a hard or sharp object to operate the touchscreen, or damage may result. Avoid chemical cleaners, solvents, and insect repellents that can damage plastic components and finishes. Secure the weather cap tightly to prevent damage to the USB port. Cleaning the Device 1 Wipe the device using a cloth dampened with a mild detergent solution. 2 Wipe it dry.
Appendix Data Fields Some data fields require ANT+ accessories to display data. Balance: The current left/right power balance. Balance - Avg.: The average left/right power balance for the current activity. Balance - Lap: The average left/right power balance for the current lap. Battery Level: The remaining battery power. Battery Status: The remaining battery power of a bike light accessory. Beam Angle Status: The headlight beam mode. Cadence: Cycling. The number of revolutions of the crank arm.
Zone % of Maximum Heart Rate Perceived Exertion Benefits 4 80–90% Fast pace and a bit Improved anaerobic uncomfortable, breathing capacity and forceful threshold, improved speed 5 90–100% Sprinting pace, unsustainable for long period of time, labored breathing Anaerobic and muscular endurance, increased power Software License Agreement BY USING THE DEVICE, YOU AGREE TO BE BOUND BY THE TERMS AND CONDITIONS OF THE FOLLOWING SOFTWARE LICENSE AGREEMENT. PLEASE READ THIS AGREEMENT CAREFULLY.
Index A accessories 8, 13 alerts 11 altimeter, calibrating 12 ANT+ sensors 2, 8 pairing 8 power meters 8 applications 6, 7 Auto Lap 11 Auto Pause 11 auto scroll 11 auto sleep 11 B back to start 4 backlight 2, 12 bands 13 battery charging 1, 13 maximizing 13 replacing 9 type 1 Bluetooth technology 6, 7, 10 C cadence, alerts 11 calendar 6 calibrating, power meter 8 calorie, alerts 11 charging 13 cleaning the device 13 computer, connecting 7 coordinates 5 courses 3, 4 creating 3, 4 deleting 3, 4 editing 3, 4
www.garmin.
z:.
Manuals • VejJedninger • Oppaat • Manuels • HandbOcher • ManuaJi • Manuales • Handleidingen • Brukerveiledninger Manuais • Handbocker• Manuals • Vejledninger • Oppaat • Manuels • Handbucher • ManuaH • Manuales • Handleidingen garm in.
= m = www.garmin.com/support TN + 32 2 672 52 54 +43 (0) 820 220230 0800 770 4960 1 ! 1 1-866-429-9296 +385 1 5508 272 +385 1 5508 271 +4548105050 + 331 55 69 33 99 (+52) 001-855-792-7671 +47 815 69 555 = Garmin®, the Garmin logo, ANT+®, and Edge®are trademarks of Garmin Ltd. or its subsidiaries, registered in the USA and other countries. Garmin Connect is a trademark of Garmin Ltd. or its subsidiaries. These trademarks may not be used without the express permission of Garmin.
So kommen Sie an das Benutzerhandbuch fi.ir lhr Gerat Getting Your Manuals from the Devi~e 1. Connect the device to your computer us1ng the USB cable. 2. Select the Garmin drive/volume > Documents folder. 3. Double-click the START HERE.html file. Obtention des manu~ls a pa~ir de l'.apJ?areil 1. Connectez l'appareil a votre ordmateur a I a1de du cable USB. · 2. Selectionnez le lecteur/volume Garmin, puis le dossier Documents. 3. Double-cliquez sur le fichier START HERE.html.
Hentning af vejledninger via enheden 1. Tilslut enheden til din computer med USB-kablet. Wyswietlanie podrf1CZnik6w uzytkownika z u rzctdzenia 2. Vaalg drevet/disken Garmin > mappen Documents. 1. Podh:tcz urz~dzenie do komputera za 3. 2. Wybierz kolejno: dysklwolumin Garmin > folder pomoc~ kabla USB. Dobbeltklik pa filen START HERE.html. Documents. Kayttooppaiden siirtaminen laitteesta 3. 1. Liita laite tietokoneeseen USB-kaapelilla. 2. Valitse Garmin-asema/-talt io > Documentskansio. 3.
Important Safety and Product Information ..................................................................................................... 2 Informations importantes sur le produit et Ia securite .................................................................................... 5 lnformazioni importanti sulla sicurezza e sui prodotto ................................................................................... 8 Wichtige Sicherheits- und Produktinformationen .....................................
Important Safety and Product Information Failure to avoid the following potentially hazardous situations could result in an accident or collision resulting in death or serious injury. Health Warnings • Always consult your physician before beginning or modifying any exercise program. If you have a pacemaker or other implanted electronic device, consult your physician before using a heart rate monitor.
Do not use a power and/or data cable that is not approved or supplied by Garmin. o Do not operate the device outside of the following temperature range: from -20° to 55°C (from -4° to 131 oF). o When storing the device for an extended time period, store within the following temperature range: from oo to 25°C (from 32° to ?rF). o Do not remove or attempt to remove the non-user-replaceable battery. o Contact your local waste disposal department to dispose of the device/ . ~~~~r.i~~ i~--~~~.O.r.~~-~~~ ~it.
derivative works based on the Software. You agree not to export or re-export the Software to any country in violation of the export control laws of the United States of America or the export control laws of any other applicable country. Map Data Information Garmin uses a combination of governmental and private data sources. Virtually all data sources contain some inaccurate or incomplete data. In some countries, complete and accurate map information is either not available or is prohibitively expensive.
distribution. Devices purchased in the United States or Canada must be returned to the Garmin service center in the United Kingdom, the United States, Canada, or Taiwan for service. Australian Purchases: Our goods come with guarantees that cannot be excluded under the Australian Consumer Law. You are entitled to a replacement or refund for a major failure and for compensation for any other reasonably foreseeable loss or damage.
@ 2013-2015 June 2015 Garmin Ltd.