Edge Explore 1000 ® Owner’s Manual
© 2015–2017 Garmin Ltd. or its subsidiaries All rights reserved. Under the copyright laws, this manual may not be copied, in whole or in part, without the written consent of Garmin. Garmin reserves the right to change or improve its products and to make changes in the content of this manual without obligation to notify any person or organization of such changes or improvements. Go to www.garmin.com for current updates and supplemental information concerning the use of this product.
Table of Contents Introduction.....................................................................1 Situational Awareness ................................................................ 8 Training with Power Meters ........................................................ 8 Calibrating Your Power Meter ................................................ 8 Getting Started ............................................................................ 1 Charging the Device .......................................
Introduction WARNING See the Important Safety and Product Information guide in the product box for product warnings and other important information. Always consult your physician before you begin or modify any exercise program. Getting Started When using your device the first time, you should complete these tasks to set up the device and learn about the basic features. 1 Charge the device (Charging the Device, page 1).
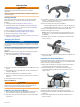
• • • • • Select Select Select Select Select to return to the home screen. and to scroll. to search near a location. to search by name. to delete an item. Viewing the Connections Screen The connections screen displays the status of the GPS, ANT+ sensors, and wireless connections. From the home screen, swipe down from the top of the screen. ® Releasing the Edge 1 Turn the Edge clockwise to unlock the device. 2 Lift the Edge off the mount.
4 Swipe the screen for additional data screens. You can swipe down from the top of the data screens to view the connections screen. 5 If necessary, tap the screen to view the timer overlay. 6 Select to stop the timer. 7 Select End Ride > Save Ride. Acquiring Satellite Signals The device may need a clear view of the sky to acquire satellite signals. The time and date are set automatically based on the GPS position. 1 Go outdoors to an open area. The front of the device should be oriented toward the sky.
Creating and Riding a Round-Trip Course The device can create a round-trip course based on a specified distance, starting location, and direction of navigation. 1 Select Courses > Round-Trip Course. 2 Select Distance, and enter the total distance for the course. 3 Select Start Location. 4 Select an option: • To select your current location on the map, select Current Location.
2 Select a location. 3 Select Ride. Setting the Search Location By default, the device searches for points of interest and other locations near your current location. You can set the device to search near a different location. 1 Select Where To? > Search > . 2 Select a search area. 3 If necessary, select a location. 4 If necessary, select Use. Navigating to a Point of Interest You can search for specific types of locations. 1 From the home screen, select Where To? > Search > POI Categories.
Sending a Status Update After an Incident Before you can send a status update to your emergency contacts, your device must detect an incident and send an automated emergency message to your emergency contacts. You can send a status update to your emergency contacts informing them you are not in need of assistance. 1 Swipe down from the top of the screen to view the connections screen. 2 Select Incident Detected > Send I'm Okay. A message is sent to all emergency contacts.
email or social media, allowing them to view your live data on a Garmin Connect tracking page. GroupTrack: Allows you to keep track of other riders in your group using LiveTrack directly on screen and in real time. Activity uploads to Garmin Connect: Automatically sends your activity to Garmin Connect as soon as you finish recording the activity. Device to device transfers: Allows you to wirelessly transfer files to another compatible Edge device.
2 3 4 5 6 7 as a second removable drive. On Mac computers, the device and memory card appear as mounted volumes. NOTE: Some computers with multiple network drives may not display device drives properly. See your operating system documentation to learn how to map the drive. On your computer, open the file browser. Select a file. Select Edit > Copy. Open the portable device, drive, or volume for the device or memory card. Browse to a folder. Select Edit > Paste.
Pairing the Remote with Your Edge Device The first time you connect the Edge remote to your Edge device, you must pair the remote with your device. 1 Bring the remote within 3 m (10 ft.) of the device. NOTE: Stay 10 m (33 ft.) away from other ANT+ sensors while pairing. > Sensors > Add 2 From the Edge home screen, select Sensor > Edge Remote. 3 On the remote, hold two keys simultaneously until the status LED starts alternating green and red, and release the keys. The remote searches for your device.
2 Enter your maximum and resting heart rate values. The zone values update automatically, but you can also edit each value manually. 3 Select Based On:. 4 Select an option: • Select BPM to view and edit the zones in beats per minute. • Select % Max. to view and edit the zones as a percentage of your maximum heart rate. • Select % HRR to view and edit the zones as a percentage of your resting heart rate.
Zoom Levels: Sets map items to draw or appear at or below the selected zoom level. Text Size: Sets the text size for map items. Detail: Sets the amount of detail shown on the map. Showing more detail may cause the map to redraw more slowly. Shaded Relief: Shows detail relief on the map (if available) or turns off shading. Purchasing Additional Maps Before purchasing additional maps, you should determine the version of the maps that are loaded on your device. > Activity Settings.
Using Auto Scroll You can use the Auto Scroll feature to automatically cycle through all of the training data screens while the timer is running. > Activity Settings. 1 Select Select Auto Features > Auto Scroll. 2 3 Select a display speed. Changing the Start Notice This feature automatically detects when your device has acquired satellites and is moving. It is a reminder to start the timer so you can record your ride data. > Activity Settings. 1 Select Select Start Notice.
*The device withstands pressure equivalent to a depth of 50 m. For more information, go to www.garmin.com/waterrating. Device Care NOTE: If you have already used Garmin Express to set up your device with Wi‑Fi connectivity, Garmin Connect can automatically download available software updates to your device when it connects using Wi‑Fi. NOTICE Do not store the device where prolonged exposure to extreme temperatures can occur, because it can cause permanent damage.
3 Scroll down to the eighth item in the list, and select it. 4 Select your language. Appendix Data Fields Some data fields require ANT+ accessories to display data. Balance: The current left/right power balance. Balance - Avg.: The average left/right power balance for the current activity. Balance - Lap: The average left/right power balance for the current lap. Battery Level: The remaining battery power. Battery Status: The remaining battery power of a bike light accessory.
Heart Rate Zone Calculations Zone % of Maximum Heart Rate Perceived Exertion Benefits 1 50–60% Relaxed, easy pace, rhythmic breathing Beginning-level aerobic training, reduces stress 2 60–70% Comfortable pace, slightly deeper breathing, conversation possible Basic cardiovascular training, good recovery pace 3 70–80% Moderate pace, more difficult to hold conversation Improved aerobic capacity, optimal cardiovascular training 4 80–90% Fast pace and a bit Improved anaerobic uncomfortable, brea
Index A accessories 8, 13 alerts 11 altimeter, calibrating 12 ANT+ sensors 2, 8 pairing 8 power meters 8 applications 6, 7, 9 Auto Lap 11 Auto Pause 11 auto scroll 12 auto sleep 11 B back to start 4 backlight 2, 12 bands 13 battery charging 1, 13 maximizing 13 replacing 9 type 1 Bluetooth technology 6, 7, 10 C cadence, alerts 11 calendar 6 calibrating, power meter 8 calorie, alerts 11 charging 13 cleaning the device 13 computer, connecting 7 Connect IQ 9 coordinates 5 courses 3, 4 creating 3, 4 deleting 3
support.garmin.