STRIKER™ Series Owner’s Manual December 2015 190-01950-00_0A
All rights reserved. Under the copyright laws, this manual may not be copied, in whole or in part, without the written consent of Garmin. Garmin reserves the right to change or improve its products and to make changes in the content of this manual without obligation to notify any person or organization of such changes or improvements. Go to www.garmin.com for current updates and supplemental information concerning the use of this product. Garmin and the Garmin logo are trademarks of Garmin Ltd.
Table of Contents Deleting a Saved Route .............................................................. 6 Deleting All Saved Routes .......................................................... 6 Introduction.....................................................................1 Track ................................................................................ 6 Device Overview ......................................................................... 1 Contacting Garmin® Product Support ................
Introduction WARNING See the Important Safety and Product Information guide in the product box for product warnings and other important information. Adjusting the Color Mode 1 Select Settings > System > Display > Color Mode. TIP: Press from any screen to access the color settings. 2 Select an option. Setting the Beeper You can set when the device makes sounds. 1 Select Settings > System > Beeper.
Sonar 9 Enter a name for the combination. TIP: • Select to save. • Hold to clear data. • Select or to change letter case. 10 Use the arrow keys to resize the windows. 11 Use the arrow keys to select a home screen location. Adding a Custom Layout to the Home Screen of the STRIKER 4 The full screen page, the split frequency page, and the flasher page are visual representations of the area beneath your boat. You can customize these sonar views.
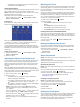
Å Æ Ç Logs Distance from the side of the vessel Water between the vessel and the bottom Split-Screen Frequency You can view two frequencies from the split frequency screen. 1 Select Settings > My Vessel > Transducer Type. 2 Select the type of transducer you are using. Creating a Waypoint on the Sonar Screen Using Your Present Location 1 From a sonar view, select . 2 If necessary, edit the waypoint information. Pausing the Sonar Not all options are available on all models.
• To display lower-sensitivity sonar returns with less noise automatically, select Auto Low. Hiding Surface Noise You can hide or display the sonar returns near the surface of the water. Hiding surface noise helps reduce screen clutter. NOTE: Setting the surface noise to show or hide on one screen applies that setting to all screens. This feature may not be available with all transducers. From a sonar screen, select > Sonar Setup > Noise Reject > Surface Noise.
Waypoints 1 From a sonar view, select > Sonar Setup > Scroll Speed. 2 Select an option: • To adjust the scroll speed automatically using speed-overground, select Auto. The Auto setting selects a scroll rate to match the boat speed, so targets in the water are drawn with the correct aspect ratio and appear less distorted. When viewing DownVü or SideVü sonar views, it is recommend to use the Auto setting. • To use a very fast scroll speed, select Ultrascroll .
Routes A route is a sequence of waypoints or locations that leads you to your final destination. Creating and Navigating a Route Using the Waypoint Map Deleting All Saved Routes Select User Data > Manage Data > Clear User Data > Routes. Track A track is a recording of the current path of your boat. You can show your current track in waypoint map view. The starting point can be your present location or another location. 1 Select User Data > Routes > New > Use Waypoint Map.
Beeper: Turns on and off the tone that sounds for alarms and selections (Setting the Beeper, page 1). Auto Power: Turns on the device automatically when power is applied. System Information: Provides information about the device and the software version. System Information Select Settings > Settings > System Information. Event Log: Allows you to view a log of system events. Software Information: Provides information about the device and the software version.
Appendix 2 Measure the water temperature using a different thermometer or temperature sensor that is known to be accurate. 3 Subtract the water temperature measured in step 1 from the water temperature measured in step 2. This is the temperature offset. Enter this value in step 5 as a positive number if the sensor connected to the device measures the water temperature as being colder than it actually is.
To check the voltage, measure the female power and ground sockets of the power cable for DC voltage. If the voltage is less than 10 Vdc, the device will not turn on. My sonar does not work • Push the transducer cable all the way into the back of the device. Even if the cable seems to be connected, you should push firmly so that it is fully seated. • Check to make sure the sonar transmission is turned on.
Index data fields 3 deleting, all user data 6 device keys 1 registration 8 display settings 6 DownVü 2 safe height 7 satellite signals, acquiring 1 screen, brightness 1 settings 1, 2, 6, 7 system information 6 SideVü 2 software license agreement 8 sonar 2, 3 a-scope 5 alarms 7 appearance 2 bottom lock 4 depth line 5 depth scale 2, 4 DownVü 2 flasher 3 frequencies 3, 4 gain 3 interference 4 log 2 noise 3, 4 numbers 2 SideVü 2 surface noise 4 suspended targets 2, 5 views 2, 3 waypoint 3 zoom 3, 4 SOS 5 E
www.garmin.