
Owner's Manual


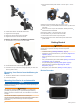
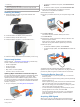

Table Of Contents
- Owners Manual
- Table of Contents
- Installation
- Mounting Your Device in a Motorcycle
- Removing Your Device from the Motorcycle Mount
- Mounting Your Device in an Automobile
- Getting Started
- Rider Awareness Features and Alerts
- Navigating to Your Destination
- Finding and Saving Locations
- Using the Map
- Bluetooth Connected Features
- Bluetooth Feature Requirements
- Pairing Your Phone and Headset
- Bluetooth Feature Status Icons
- Setting Up Bluetooth Features for Your Apple Device
- Setting Up Bluetooth Features for Your Smartphone with Android™
- Enabling or Disabling Bluetooth Features for Your Headset
- Smartphone Link
- Garmin Live Services
- Smart Notifications
- Hands-Free Calling
- Disconnecting a Bluetooth Device
- Deleting a Paired Phone
- Traffic
- Using the Apps
- Customizing the Device
- Device Information
- Device Maintenance
- Troubleshooting
- The suction cup will not stay on my windshield
- My device is not acquiring satellite signals
- The device does not charge in my vehicle
- My battery does not stay charged for very long
- My device does not appear as a removable drive on my computer
- My device does not appear as a portable device on my computer
- My device does not appear as either a portable device or a removable drive or volume on my computer
- My phone will not connect to the device
- Specs
- Appendix
- Index
- Installation Instructions
- Quick Start Manual
- Warranty

in the status bar indicates the satellite signal strength. The time
required to acquire satellite signals varies based on several
factors, including how far you are from the location where you
last used your navigation device, whether you have a clear view
of the sky, and how long it has been since you last used your
navigation device. The first time you turn on your navigation
device, it may take several minutes to acquire satellite signals.
1
Turn on the device.
2
Wait while the device locates satellites.
3
If necessary, go outdoors to an open area, away from tall
buildings and trees.
When turns green, the device has acquired satellite signals
and is ready for navigation.
Status Bar Icons
The status bar is located at the top of the main menu. The status
bar icons display information about features on the device. You
can select some icons to change settings or view additional
information.
GPS signal status. Hold to view GPS accuracy and acquired
satellite information (Viewing GPS Signal Status, page 23).
Bluetooth technology status. Select to view the Bluetooth
settings (Bluetooth Settings, page 20).
Connected to hands-free calling. Select to place a phone call
(Hands-Free Calling, page 16).
Active vehicle profile. Select to view the vehicle profile
settings.
Current time. Select to set the time (Setting the Time,
page 21).
Battery charge level.
Connected to the Smartphone Link app. Select to view
connected device and subscription information (Pairing Your
Phone and Headset, page 13).
Temperature. Select to view the weather forecast (Viewing
the Weather Forecast, page 19).
Fuel status. Select to view fuel tracking information.
Using the On-Screen Buttons
On-screen buttons allow you to navigate the pages, menus, and
menu options on your device.
• Select to return to the previous menu screen.
• Hold to quickly return to the main menu.
• Select or to scroll through lists or menus.
• Hold or to scroll faster.
• Select to see a context-based menu of options for the
current screen.
Adjusting the Volume
Before you can adjust the volume, you must connect your
device to a powered mount or a headset using Bluetooth
wireless technology.
1
Select Volume.
2
Select an option:
• Use the slider bar to adjust the volume.
• Select to mute the device.
• Select for additional options.
Adjusting the Screen Brightness
1
Select Settings > Display > Brightness.
2
Use the slider bar to adjust the brightness.
Transportation Modes
Routing and navigation are calculated differently based on your
transportation mode. The current transportation mode is
indicated by an icon in the status bar.
Automobile mode
Motorcycle mode
Off-road mode
Choosing a Transportation Mode
Select .
Using the On-Screen Keyboard
See "Language and Keyboard Settings" to change the keyboard
layout (Language and Keyboard Settings, page 21).
• Select to delete a search entry.
• Select to delete a character.
• Select to change the keyboard language mode.
• Select to enter special characters, such as punctuation
marks.
• Select to change character capitalization.
Using the Large Button Keyboard
You can enable additional keyboard languages or layouts in the
language and keyboard settings (Language and Keyboard
Settings, page 21).
• Select or to view more characters.
• Select to switch to other keyboard languages and layouts.
Rider Awareness Features and Alerts
NOTICE
The rider alerts and speed limit features are for information only
and do not replace your responsibility to abide by all posted
speed limit signs and to use safe driving judgment at all times.
Garmin is not responsible for any traffic fines or citations you
receive for failing to follow all applicable traffic laws and signs.
Your device provides features that can help encourage safer
riding and increase efficiency, even when you are riding in a
familiar area. The device plays an audible tone or message and
displays information for each alert. You can enable or disable
the audible tone or message for each type of alert. Not all alerts
are available in all areas.
School zone or nearby school: The device plays a tone and
displays the distance to and speed limit (if available) for an
upcoming school or school zone.
Speed limit reduction: The device plays a tone and displays
the upcoming reduced speed limit so you can be prepared to
reduce your speed.
Speed limit exceeded: The device plays a tone and displays a
red border on the speed limit icon when you exceed the
posted speed limit for the current road.
Railroad crossing: The device plays a tone and displays the
distance to an upcoming railroad crossing.
Animal crossing: The device plays a tone and displays the
distance to an upcoming animal crossing area.
Curve: The device plays a tone and displays the distance to a
curve in the road.
Slower traffic: The device plays a tone and displays the
distance to slower traffic when you approach slower traffic at
a higher speed. Your device must be receiving traffic
information to use this feature (Receiving Traffic Data Using
Smartphone Link, page 16).
4 Rider Awareness Features and Alerts