
Product Manual


Introduction
WARNING
See the Important Safety and Product Information guide in the
product box for product warnings and other important
information.
Always consult your physician before you begin or modify any
exercise program.
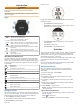
Keys
À
LIGHT
Hold to turn the device on.
Hold to view the controls menu.
Select to turn the backlight on and off.
Á
START
STOP
Select to start and stop the timer.
Select to choose an option or to acknowledge a message.
Â
BACK
Select to record a lap, rest, or transition during an activity.
Select to return to the previous screen.
Ã
DOWN Select to scroll through the widgets, data screens, options,
and settings.
Hold to manually change sports during an activity.
Ä
UP Select to scroll through the widgets, data screens, options,
and settings.
Hold to view the menu.
GPS Status and Status Icons
The GPS status ring and icons temporarily overlay each data
screen. For outdoor activities, the status ring turns green when
GPS is ready. A flashing icon means the device is searching for
a signal. A solid icon means the signal was found or the sensor
is connected.
GPS GPS status
Battery status
Smartphone connection status
Wi‑Fi
®
technology status
Heart rate status
Foot pod status
Running Dynamics Pod status
Speed and cadence sensor status
Power meter status
tempe
™
sensor status
VIRB
®
camera status
Going for a Run
The first fitness activity you record on your device can be a run,
ride, or any outdoor activity. You may need to charge the device
before starting the activity (Charging the Device, page 26).
1
Select START, and select an activity.
2
Go outside, and wait while the device locates satellites.
3
Select START to start the timer.
4
Go for a run.
5
After you complete your run, select STOP to stop the timer.
6
Select an option:
• Select Resume to restart the timer.
• Select Save to save the run and reset the timer. You can
select the run to view a summary.
• Select Resume Later to suspend the run and continue
recording later.
• Select Lap to mark a lap.
• Select Discard > Yes to delete the run.
Activities
Your device can be used for indoor, outdoor, athletic, and fitness
activities. When you start an activity, the device displays and
records sensor data. You can save activities and share them
with the Garmin Connect
™
community.
You can also add Connect IQ
™
activity apps to your device using
your Garmin Connect account (Connect IQ Features,
page 17).
For more information about activity tracking and fitness metric
accuracy, go to garmin.com/ataccuracy.
Starting an Activity
When you start an activity, GPS turns on automatically (if
required). When you stop the activity, the device returns to
watch mode.
1
From the watch face, select START.
2
Select an activity.
3
If necessary, follow the on-screen instructions to enter
additional information.
4
If necessary, wait while the device connects to your ANT+
®
sensors.
5
If the activity requires GPS, go outside, and wait while the
device locates satellites.
6
Select START to start the timer.
NOTE: The device does not record your activity data until
you start the timer.
Tips for Recording Activities
• Charge the device before starting an activity (Charging the
Device, page 26).
• Select to record laps.
• Select UP or DOWN to view additional data pages.
Introduction 1