
Manual


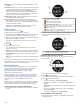
Table Of Contents
- Table of Contents
- Introduction
- Diving
- Activities
- Heart Rate Features
- Wrist-based Heart Rate
- Putting On the Heart Rate Monitor
- Running Dynamics
- Performance Measurements
- Turning Off Performance Notifications
- Automatically Detecting Performance Measurements
- Training Status
- About VO2 Max. Estimates
- Recovery Time
- Recovery Heart Rate
- Training Load
- Viewing Your Predicted Race Times
- About Training Effect
- Heart Rate Variability and Stress Level
- Performance Condition
- Lactate Threshold
- Getting Your FTP Estimate
- Training
- Clock
- Navigation
- Saving Your Location
- Projecting a Waypoint
- Navigating to a Destination
- Navigating to a Point of Interest
- Creating and Following a Course on Your Device
- Creating a Round-Trip Course
- Marking and Starting Navigation to a Man Overboard Location
- Navigating with Sight 'N Go
- Navigating to Your Starting Point During an Activity
- Navigating to the Starting Point of Your Last Saved Activity
- Stopping Navigation
- Map
- Compass
- Altimeter and Barometer
- History
- Connected Features
- Connect IQ Features
- Customizing Your Device
- Widgets
- Activities and App Settings
- Removing an Activity or App
- Changing the Order of an Activity in the Apps List
- Watch Face Settings
- Sensors Settings
- Map Settings
- GroupTrack Settings
- Navigation Settings
- System Settings
- Viewing Device Information
- ANT+ Sensors
- Device Information
- Device Maintenance
- Troubleshooting
- My device is in the wrong language
- Is my smartphone compatible with my device?
- My phone will not connect to the device
- Can I use my Bluetooth sensor with my watch?
- Resetting Your Device
- Restoring All Default Settings
- Resetting Your Tissue Load
- Acquiring Satellite Signals
- The temperature reading is not accurate
- Maximizing the Battery Life
- Activity Tracking
- Getting More Information
- Appendix
- Index

À
Your current heart rate zone (About Heart Rate Zones,
page 14).
NOTE: You can view only wrist heart rate monitor data during a
dive.
Gray: Zone 1.
Blue: Zone 2.
Green: Zone 3.
Orange: Zone 4.
Red: Zone 5.
Á
Your central nervous system (CNS) oxygen toxicity level during
a single-gas or multi-gas dive.
Green: 0 to 79% CNS oxygen toxicity.
Yellow: 80 to 99% CNS oxygen toxicity.
Red: 100% or greater CNS oxygen toxicity.
Using the Dive Stopwatch
1
Start a Gauge dive.
2
Scroll to the stopwatch screen.
3
Select > Reset Avg. Depth to set the average depth to
your current depth.
4
Select > Start Stopwatch.
5
Select an option:
• To stop using the stopwatch, select > Stop Stopwatch.
• To restart the stopwatch, select > Reset Stopwatch.
Diving with the Map
You can view the map during apnea surface intervals.
1
During an apnea dive activity, scroll to the map.
2
Select , and select an option:
• To pan or zoom the map, select Pan/Zoom.
TIP: You can select to toggle between panning up and
down, panning left and right, or zooming. You can hold
to select the point indicated by the crosshairs.
• To mark your location, select Save Location.
TIP: You can select DOWN to change the icon.
Viewing the Surface Interval Widget
The widget displays your surface interval time, tissue load, and
central nervous system (CNS) oxygen toxicity percentage.
1
From the watch face, select UP.
2
Select to view tissue details and oxygen tolerance units
(OTU).
Viewing the Dive Log Widget
The widget displays a brief summary of your last recorded dive.
1
From the surface interval widget, select UP.
2
Select to view more information about a dive.
3
Select a dive.
4
Select an option:
• To view additional information about the activity, select
Details.
• To view additional information about one of multiple apnea
dives in the activity, select Dives, and select a dive.
• To view the activity on a map, select Map.
NOTE: The device shows your entry and exit locations if
you waited for GPS signals before and after the dive.
• To view the depth profile of the activity, select Depth
Profile.
• To view the temperature profile of the activity, select
Temperature Profile.
Dive Planning
You can plan for future dives using your device. The device can
calculate no-decompression limit (NDL) times or create
decompression plans. When planning a dive, the device uses
your residual tissue load from recent dives in the calculations.
Calculating NDL Time
You can calculate the no-decompression limit (NDL) time or
maximum depth for a future dive. These calculations are not
saved or applied to your next dive.
1
Select > Plan Dive > Compute NDL.
2
Enter an oxygen percentage.
3
Select an option:
• To calculate the NDL time, select Enter Depth, and enter
the planned depth for your dive.
• To calculate the maximum depth, select Enter Time, and
enter your planned dive time.
The NDL countdown clock, depth, and maximum operating
depth (MOD) appear.
4
Select DOWN.
5
Select an option:
• To exit, select Done.
• To add intervals to your dive, select Add Repeat Dive,
and follow the on-screen instructions.
Creating a Decompression Plan
You can create decompression plans and save them for future
dives.
1
Select > Plan Dive > Deco Plans > Add New.
2
Enter a name for the decompression plan.
3
Select an option:
• Select PO2 to enter the maximum partial pressure of
oxygen, in bar.
NOTE: The device uses the PO2 value for gas switching.
• Select Conservatism to enter your level of conservatism
for decompression calculations.
• Select Gases to enter your gas blends.
• Select Bottom Depth to enter the maximum dive depth.
• Select Bottom Time to enter the time at the bottom depth.
4
Select Save.
Viewing and Applying a Decompression Plan
You can replace the current dive settings with the settings from
a decompression plan.
1
Select > Plan Dive > Deco Plans.
2
Select a decompression plan.
4 Diving