
Owner's Manual


Fatigue warning: The device plays a tone and suggests
upcoming rest stops after you have been driving for more
than two hours without stopping.
Enabling or Disabling Audible Driver Alerts
You can enable or disable the audible tone for some types of
driver alerts. The visual alert appears even when the tone is
disabled.
1
Select Settings > Driver Assistance > Audible Driver
Alerts.
2
Select or clear the check box next to each alert.
Red Light and Speed Cameras
NOTICE
Garmin is not responsible for the accuracy of or the
consequences of using a red light or speed camera database.
NOTE: This feature is not available for all regions or product
models.
Information about red light and speed camera locations is
available in some areas for some product models. The device
alerts you when you approach a reported speed or red light
camera.
• Live red light and safety camera data is available as a
subscription from Garmin Live Services using the
Smartphone Link app (Garmin Live Services, page 12).
• You must purchase a subscription to download and store
safety camera data on your device. Go to garmin.com
/speedcameras to check availability and compatibility, or to
purchase a subscription or one-time update. You can
purchase a new region or extend an existing subscription at
any time.
• In some regions, some product bundles include pre-loaded
red light and speed camera data with lifetime updates.
• You can use the Garmin Express
™
software (garmin.com
/express) to update the camera database stored on your
device. You should update your device frequently to receive
the most up-to-date camera information.
Navigating to Your Destination
Routes
A route is a path from your current location to one or more
destinations.
• The device calculates a recommended route to your
destination based on the preferences you set, including the
route calculation mode (Changing the Route Calculation
Mode, page 5) and avoidances (Avoiding Delays, Tolls,
and Areas, page 5).
• The device can automatically avoid roads that are not
appropriate for the active vehicle profile.
• You can start navigating to your destination quickly using the
recommended route, or you can select an alternate route
(Starting a Route, page 3).
• If there are specific roads you need to use or avoid, you can
customize the route (Shaping Your Route, page 5).
• You can add multiple destinations to a route (Adding a
Location to Your Route, page 5).
Starting a Route
1
Select Where To?, and search for a location (Finding and
Saving Locations, page 6).
2
Select a location.
3
Select an option:
• To start navigating using the recommended route, select
Go!.
• To choose an alternate route, select , and select a route.
Alternate routes appear to the right of the map.
• To edit the course of the route, select > Edit Route, and
add shaping points to the route (Shaping Your Route,
page 5).
The device calculates a route to the location and guides you
using voice prompts and information on the map (Your Route on
the Map, page 3). A preview of the major roads in your route
appears at the edge of the map for several seconds.
If you need to stop at additional destinations, you can add the
locations to your route (Adding a Location to Your Route,
page 5).
Starting a Route by Using the Map
You can start route by selecting a location from the map.
1
Select View Map.
2
Drag and zoom the map to display the area to search.
3
If necessary, select to filter the displayed points of interest
by category.
Location markers ( or a blue dot) appear on the map.
4
Select an option:
• Select a location marker.
• Select a point, such as a street, intersection, or address
location.
5
Select Go!.
Going Home
The first time you start a route home, the device prompts you to
enter your home location.
1
Select Where To? > Go Home.
2
If necessary, enter your home location.
Editing Your Home Location
1
Select Where To? > > Set Home Location.
2
Enter your home location.
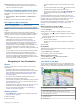
Your Route on the Map
As you travel, the device guides you to your destination using
voice prompts and information on the map. Instructions for your
next turn or exit, or other actions appear across the top of the
map.
À
Next action in the route. Indicates the next turn, exit, or other action
and the lane in which you should travel, if available.
Á
Distance to the next action.
Â
Name of the street or exit associated with the next action.
Ã
Route highlighted on the map.
Ä
Next action in the route. Arrows on the map indicate the location of
upcoming actions.
Å
Vehicle speed.
Navigating to Your Destination 3