
User Manual
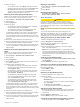


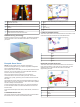
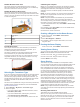
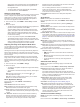
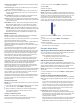

Table Of Contents
- Table of Contents
- Introduction
- Customizing the Chartplotter
- ActiveCaptain App
- Charts and 3D Chart Views
- Navigation Chart and Fishing Chart
- Zooming In and Out of the Chart
- Panning the Chart with the Keys
- Selecting an Item on the Map Using the Device Keys
- Chart Symbols
- Measuring a Distance on the Chart
- Creating a Waypoint on the Chart
- Navigating to a Point on the Chart
- Viewing Location and Object Information on a Chart
- Viewing Details about Navaids
- Heading Line and Angle Markers
- Premium Charts
- Automatic Identification System
- Chart and 3D Chart View Settings
- Supported Maps
- Navigation Chart and Fishing Chart
- Garmin Quickdraw Contours Mapping
- Mapping a Body of Water Using the Garmin Quickdraw Contours Feature
- Adding a Label to a Garmin Quickdraw Contours Map
- Garmin Quickdraw Community
- Garmin Quickdraw Contours Settings
- Navigation with a Chartplotter
- Basic Navigation Questions
- Destinations
- Courses
- Stopping Navigation
- Waypoints
- Routes
- Auto Guidance
- Setting and Following an Auto Guidance Path
- Creating an Auto Guidance Path
- Filtering a List of Routes and Auto Guidance Paths
- Reviewing an Auto Guidance Path
- Adjusting an Auto Guidance Path
- Canceling an Auto Guidance Calculation in Progress
- Setting a Timed Arrival
- Adjusting the Distance from Shore
- Auto Guidance Path Configurations
- Tracks
- Showing Tracks
- Setting the Color of the Active Track
- Saving the Active Track
- Viewing a List of Saved Tracks
- Editing a Saved Track
- Saving a Track as a Route
- Browsing for and Navigating a Recorded Track
- Deleting a Saved Track
- Deleting All Saved Tracks
- Retracing the Active Track
- Clearing the Active Track
- Managing the Track Log Memory During Recording
- Configuring the Recording Interval of the Track Log
- Boundaries
- Sonar Fishfinder
- Stopping the Transmission of Sonar Signals
- Changing the Sonar View
- Traditional Sonar View
- Garmin ClearVü Sonar View
- SideVü Sonar View
- Panoptix Sonar Views
- Selecting the Transducer Type
- Creating a Waypoint on the Sonar Screen
- Pausing the Sonar Display
- Viewing Sonar History
- Sonar Sharing
- Adjusting the Level of Detail
- Adjusting the Color Intensity
- Sonar Recordings
- Traditional, Garmin ClearVü, and SideVü Sonar Setup
- Panoptix Sonar Setup
- Autopilot
- Sailing Features
- Gauges and Graphs
- Tide, Current, and Celestial Information
- Digital Selective Calling
- Media Player
- Opening the Media Player
- Selecting the Media Source
- Playing Music
- Adjusting the Volume
- VHF Radio
- Radio
- DAB Playback
- SiriusXM Satellite Radio
- Setting the Device Name
- Updating the Media Player Software
- Device Configuration
- Sharing and Managing User Data
- Connecting to a Garmin Device to Share User Data
- Selecting a File Type for Third-Party Waypoints and Routes
- Copying User Data from a Memory Card
- Copying User Data to a Memory Card
- Copying Built-In Maps to a Memory Card
- Copying Waypoints, Routes, and Tracks from HomePort to a Chartplotter
- Backing Up Data to a Computer
- Restoring Backup Data to a Chartplotter
- Saving System Information to a Memory Card
- Clearing Saved Data
- Appendix
- Index
RealVü 3D Down Sonar View
This sonar view shows a three-dimensional view of what is
below the transducer and can be used when you are stationary
and want to see what is around your boat.
RealVü 3D Historical Sonar View
This sonar view provides a three-dimensional view of what is
behind your boat as you are moving and shows the entire water
column in 3D, from the bottom to the top of the water. This view
is used for finding fish.
À
Color legend
Á
Boat
Â
Range
Ã
Bottom
Ä
Structure
Å
Fish
FrontVü Sonar View
The Panoptix FrontVü sonar view increases your situational
awareness by showing obstructions under the water, up to
91 meters (300 feet) in front of the boat.
The ability to effectively avoid forward collisions with FrontVü
sonar decreases as your speed rises above 8 knots.
To see the FrontVü sonar view, you must install and connect a
compatible transducer, such as a PS21 transducer. You may
need to update the transducer software.
Selecting the Transducer Type
If you are connecting a transducer that was not included with the
device, you may need to set the transducer type to make the
sonar function properly. Before connecting the transducer, you
should select the transducer type. The transducer name should
be listed on the label on the transducer cable, near the
connector.
This device is compatible with a range of accessory transducers,
including Garmin ClearVü transducers, which are available at
garmin.com/transducers.
1
Select Settings > My Vessel > Transducer Type.
2
Select an option:
• If you have a 200/77 kHz, dual-beam transducer, select
Dual Beam (200/77 kHz).
• If you have a 200/50 kHz, dual-frequency transducer,
select Dual Frequency (200/50 kHz).
• If you have another type of transducer, select it from the
list.
Calibrating the Compass
Before you can calibrate the compass, the transducer must be
installed on the shaft far enough away from the trolling motor to
avoid magnetic interference, and deployed in the water.
Calibration must be of sufficient quality to enable the internal
compass.
NOTE: To use the compass, you must mount the transducer on
the shaft. The compass does not work when you mount the
transducer on the motor.
NOTE: Compass calibration is available only for transducers
with an internal compass, such as the PS21-TR transducer.
You can begin turning your boat before calibrating, but you must
fully rotate your boat 1.5 times during calibration.
1
From an applicable sonar view, select MENU > Sonar Setup
> Installation.
2
If necessary, select Use AHRS to turn on the AHRS sensor.
3
Select Calibrate Compass.
4
Follow the on-screen instructions.
Creating a Waypoint on the Sonar Screen
1
From a sonar view, select MENU > Pause Sonar.
2
Select a location.
3
Select New Waypoint or SELECT.
4
If necessary, edit the waypoint information, such as the
waypoint name.
Pausing the Sonar Display
From a sonar view, select MENU > Pause Sonar.
Viewing Sonar History
You can scroll the sonar display to view historical sonar data.
NOTE: Not all transducers save historical sonar data.
1
From a sonar view, hold to scroll through the history.
2
From a sonar view, drag the screen to the right.
3
Select BACK to exit history.
Sonar Sharing
This feature may not be available on all chartplotter models.
You can view the sonar data from other chartplotters with a built-
in sonar module connected on the Garmin Marine Network.
Each chartplotter on the network can display sonar data from
every compatible sonar module and transducer on the network,
no matter where the chartplotters and transducers are mounted
on your boat. For example, from a transducer with Garmin
ClearVü mounted at the back of the boat, you can view the
sonar data using the 93sv mounted at the front of your boat.
When sharing sonar data, the values of some sonar settings,
such as Range and Gain, are synchronized across the devices
on the network. The values of other sonar settings, such as the
Appearance settings, are not synchronized and should be
configured on each individual device. In addition, the scroll rates
of the various traditional and Garmin ClearVü sonar views are
synchronized to make the split views more cohesive.
NOTE: Using multiple transducers simultaneously can create
cross talk, which can be removed by adjusting the Interference
sonar setting.
Selecting a Sonar Source
This feature may not be available with all models.
When you are using more than one sonar data source for a
particular sonar view, you can select the source to use for that
sonar view. For example, if you have two sources for Garmin
ClearVü, you can select the source to use from the Garmin
ClearVü sonar view.
20 Sonar Fishfinder