
User Manual

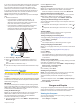


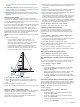
Table Of Contents
- Table of Contents
- Introduction
- Customizing the Chartplotter
- ActiveCaptain App
- Charts and 3D Chart Views
- Navigation Chart and Fishing Chart
- Zooming In and Out of the Chart
- Panning the Chart with the Keys
- Selecting an Item on the Map Using the Device Keys
- Chart Symbols
- Measuring a Distance on the Chart
- Creating a Waypoint on the Chart
- Navigating to a Point on the Chart
- Viewing Location and Object Information on a Chart
- Viewing Details about Navaids
- Heading Line and Angle Markers
- Premium Charts
- Automatic Identification System
- Chart and 3D Chart View Settings
- Supported Maps
- Navigation Chart and Fishing Chart
- Garmin Quickdraw Contours Mapping
- Mapping a Body of Water Using the Garmin Quickdraw Contours Feature
- Adding a Label to a Garmin Quickdraw Contours Map
- Garmin Quickdraw Community
- Garmin Quickdraw Contours Settings
- Navigation with a Chartplotter
- Basic Navigation Questions
- Destinations
- Courses
- Stopping Navigation
- Waypoints
- Routes
- Auto Guidance
- Setting and Following an Auto Guidance Path
- Creating an Auto Guidance Path
- Filtering a List of Routes and Auto Guidance Paths
- Reviewing an Auto Guidance Path
- Adjusting an Auto Guidance Path
- Canceling an Auto Guidance Calculation in Progress
- Setting a Timed Arrival
- Adjusting the Distance from Shore
- Auto Guidance Path Configurations
- Tracks
- Showing Tracks
- Setting the Color of the Active Track
- Saving the Active Track
- Viewing a List of Saved Tracks
- Editing a Saved Track
- Saving a Track as a Route
- Browsing for and Navigating a Recorded Track
- Deleting a Saved Track
- Deleting All Saved Tracks
- Retracing the Active Track
- Clearing the Active Track
- Managing the Track Log Memory During Recording
- Configuring the Recording Interval of the Track Log
- Boundaries
- Sonar Fishfinder
- Stopping the Transmission of Sonar Signals
- Changing the Sonar View
- Traditional Sonar View
- Garmin ClearVü Sonar View
- SideVü Sonar View
- Panoptix Sonar Views
- Selecting the Transducer Type
- Creating a Waypoint on the Sonar Screen
- Pausing the Sonar Display
- Viewing Sonar History
- Sonar Sharing
- Adjusting the Level of Detail
- Adjusting the Color Intensity
- Sonar Recordings
- Traditional, Garmin ClearVü, and SideVü Sonar Setup
- Panoptix Sonar Setup
- Autopilot
- Sailing Features
- Gauges and Graphs
- Tide, Current, and Celestial Information
- Digital Selective Calling
- Media Player
- Opening the Media Player
- Selecting the Media Source
- Playing Music
- Adjusting the Volume
- VHF Radio
- Radio
- DAB Playback
- SiriusXM Satellite Radio
- Setting the Device Name
- Updating the Media Player Software
- Device Configuration
- Sharing and Managing User Data
- Connecting to a Garmin Device to Share User Data
- Selecting a File Type for Third-Party Waypoints and Routes
- Copying User Data from a Memory Card
- Copying User Data to a Memory Card
- Copying Built-In Maps to a Memory Card
- Copying Waypoints, Routes, and Tracks from HomePort to a Chartplotter
- Backing Up Data to a Computer
- Restoring Backup Data to a Chartplotter
- Saving System Information to a Memory Card
- Clearing Saved Data
- Appendix
- Index

1
Select the DAB source.
2
Select Scan to scan for available DAB stations.
When scanning is complete, the first available station in the
first ensemble found begins playing.
NOTE: After the first scan is complete, you can select Scan
again to re-scan for DAB stations. When the re-scan is
complete, the system starts playing the first station in the
ensemble you were listening to when you started the re-scan.
Changing DAB Stations
1
Select the DAB source.
2
If necessary, select Scan to scan for local DAB stations.
3
Select or to change the station.
When you reach the end of the current ensemble, the stereo
automatically changes to the first available station in the next
ensemble.
Selecting a DAB Station from a List
1
From the DAB media screen, select Browse > Stations.
2
Select a station from the list.
Selecting a DAB Station from a Category
1
From the DAB media screen, select Browse > Categories.
2
Select a category from the list.
3
Select a station from the list.
DAB Presets
You can save your favorite DAB stations as presets for easy
access.
You can save up to 15 DAB-station presets.
Saving a DAB Station as a Preset
1
From the DAB media screen, select the station to save as a
preset.
2
Select Browse > Presets > Save Current.
Selecting a DAB Preset from a List
1
From the DAB media screen, select Browse > Presets >
View Presets.
2
Select a preset from the list.
Removing DAB Presets
1
From the DAB media screen, select Browse > Presets.
2
Select an option:
• To remove one preset, select Remove Preset, and select
the preset.
• To remove all presets, select Remove All Presets.
SiriusXM Satellite Radio
When you have a FUSION-Link
™
capable stereo and SiriusXM
Connect Tuner installed and connected to the chartplotter, you
may have access to SiriusXM satellite radio, depending on your
subscription.
Locating a SiriusXM Radio ID
Before you can activate your SiriusXM subscription, you must
have the radio ID of your SiriusXM Connect Tuner.
You can locate the SiriusXM Radio ID on the back of the
SiriusXM Connect Tuner, on the back of its packaging, or by
tuning your chartplotter to channel 0.
1
Select Media > Source > SiriusXM.
2
Tune to channel 0.
The SiriusXM radio ID does not include the letters I, O, S, or
F.
Activating a SiriusXM Subscription
1
With the SiriusXM source selected, tune to channel 1.
You should be able to hear the preview channel. If not, check
the SiriusXM Connect Tuner and antenna installation and
connections, and try again.
2
Tune to channel 0 to locate the Radio ID.
3
Contact SiriusXM listener care by phone at (866) 635-2349 or
go to www.siriusxm.com/activatenow to subscribe in the
United States.
4
Provide the Radio ID.
The activation process usually takes 10 to 15 minutes, but
can take up to an hour. For the SiriusXM Connect Tuner to
receive the activation message, it must be turned on and
receiving the SiriusXM signal.
5
If the service is not activated within the hour, go to
http://care.siriusxm.com/refresh or contact SiriusXM by phone
at 1-855-MYREFRESH (697-3373).
Customizing the Channel Guide
SiriusXM radio channels are grouped in categories. You can
select the categories of channels that appear in the channel
guide.
Select an option:
• If the media device is a FUSION-Link capable stereo,
select Media > Browse > Channel.
• If the media device is a GXM
™
antenna, select Media >
MENU > Category.
Saving a SiriusXM Channel to the Presets List
You can save your favorite channels to the presets list.
1
Select Media.
2
Select the channel to save as a preset.
3
Select an option:
• If the media device is a FUSION-Link capable stereo,
select Browse > Presets.
• If the media device is a GXM antenna, select MENU >
Presets > Add Current Channel.
Unlocking SiriusXM Parental Controls
1
From the media screen, select Browse > Parental > Unlock.
2
Enter your passcode.
The default passcode is 0000.
Setting Parental Controls on SiriusXM Radio Channels
Before you can set parental controls, the parental controls must
be unlocked.
The parental control feature allows you to limit access to any
SiriusXM channels, including those with mature content. When
enabled, the parental control feature requires you to enter a
passcode to tune to the locked channels.
Select Browse > Parental > Lock/Unlock.
A list of channels appears. A checkmark indicates a locked
channel.
NOTE: When you view the channels after setting parental
controls, the display changes:
• indicates a locked channel.
• indicates an unlocked channel.
Changing a Parental Passcode on a SiriusXM Radio
Before you can change the passcode, the parental controls must
be unlocked.
1
From the media screen, select Browse > Parental > Change
PIN.
2
Enter your passcode and select Done.
3
Enter a new passcode.
4
Confirm the new passcode.
32 Media Player