
User Manual

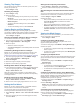


Table Of Contents
- Table of Contents
- Introduction
- Customizing the Chartplotter
- ActiveCaptain App
- Charts and 3D Chart Views
- Navigation Chart and Fishing Chart
- Zooming In and Out of the Chart
- Panning the Chart with the Keys
- Selecting an Item on the Map Using the Device Keys
- Chart Symbols
- Measuring a Distance on the Chart
- Creating a Waypoint on the Chart
- Navigating to a Point on the Chart
- Viewing Location and Object Information on a Chart
- Viewing Details about Navaids
- Heading Line and Angle Markers
- Premium Charts
- Automatic Identification System
- Chart and 3D Chart View Settings
- Supported Maps
- Navigation Chart and Fishing Chart
- Garmin Quickdraw Contours Mapping
- Mapping a Body of Water Using the Garmin Quickdraw Contours Feature
- Adding a Label to a Garmin Quickdraw Contours Map
- Garmin Quickdraw Community
- Garmin Quickdraw Contours Settings
- Navigation with a Chartplotter
- Basic Navigation Questions
- Destinations
- Courses
- Stopping Navigation
- Waypoints
- Routes
- Auto Guidance
- Setting and Following an Auto Guidance Path
- Creating an Auto Guidance Path
- Filtering a List of Routes and Auto Guidance Paths
- Reviewing an Auto Guidance Path
- Adjusting an Auto Guidance Path
- Canceling an Auto Guidance Calculation in Progress
- Setting a Timed Arrival
- Adjusting the Distance from Shore
- Auto Guidance Path Configurations
- Tracks
- Showing Tracks
- Setting the Color of the Active Track
- Saving the Active Track
- Viewing a List of Saved Tracks
- Editing a Saved Track
- Saving a Track as a Route
- Browsing for and Navigating a Recorded Track
- Deleting a Saved Track
- Deleting All Saved Tracks
- Retracing the Active Track
- Clearing the Active Track
- Managing the Track Log Memory During Recording
- Configuring the Recording Interval of the Track Log
- Boundaries
- Sonar Fishfinder
- Stopping the Transmission of Sonar Signals
- Changing the Sonar View
- Traditional Sonar View
- Garmin ClearVü Sonar View
- SideVü Sonar View
- Panoptix Sonar Views
- Selecting the Transducer Type
- Creating a Waypoint on the Sonar Screen
- Pausing the Sonar Display
- Viewing Sonar History
- Sonar Sharing
- Adjusting the Level of Detail
- Adjusting the Color Intensity
- Sonar Recordings
- Traditional, Garmin ClearVü, and SideVü Sonar Setup
- Panoptix Sonar Setup
- Autopilot
- Sailing Features
- Gauges and Graphs
- Tide, Current, and Celestial Information
- Digital Selective Calling
- Media Player
- Opening the Media Player
- Selecting the Media Source
- Playing Music
- Adjusting the Volume
- VHF Radio
- Radio
- DAB Playback
- SiriusXM Satellite Radio
- Setting the Device Name
- Updating the Media Player Software
- Device Configuration
- Sharing and Managing User Data
- Connecting to a Garmin Device to Share User Data
- Selecting a File Type for Third-Party Waypoints and Routes
- Copying User Data from a Memory Card
- Copying User Data to a Memory Card
- Copying Built-In Maps to a Memory Card
- Copying Waypoints, Routes, and Tracks from HomePort to a Chartplotter
- Backing Up Data to a Computer
- Restoring Backup Data to a Chartplotter
- Saving System Information to a Memory Card
- Clearing Saved Data
- Appendix
- Index
(Synchronizing the Fuel Data with the Actual Vessel Fuel,
page 28).
Set Total Fuel Onboard: Sets the combined amount of fuel in
all the fuel tanks on your vesselSynchronizing the Fuel Data
with the Actual Vessel Fuel, page 28.
Set Gauge Limits: Sets the upper and lower limits of various
gauges (Customizing Engine Gauge and Fuel Gauge Limits,
page 34).
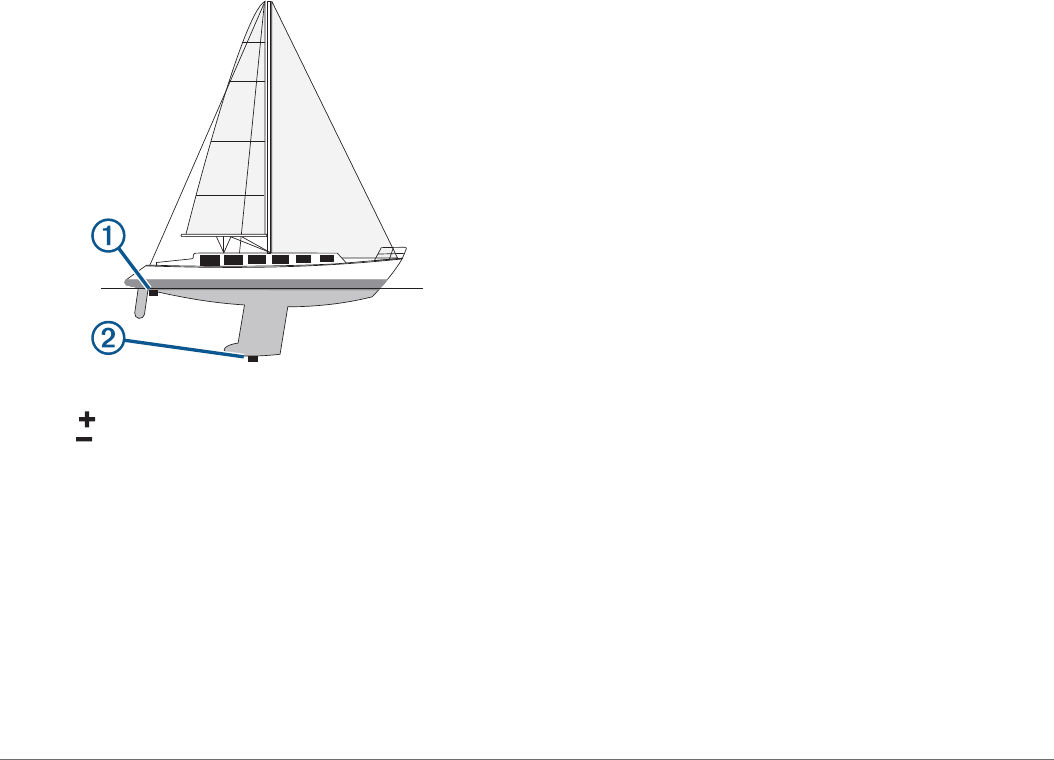
Setting the Keel Offset
You can enter a keel offset to compensate the water depth
reading for the transducer installation location. This allows you
to view the depth of the water below the keel or the true depth of
the water, depending on your needs.
If you want to know the water depth below the keel or the lowest
point of your boat and the transducer is installed at the water
line or anywhere above the end of the keel, measure the
distance from the transducer location to the keel of the boat.
If you want to know the true water depth and the transducer is
installed below the water line, measure the distance from the
bottom of the transducer up to the water line.
NOTE: This option is only available when you have valid depth
data.
1
Measure the distance:
• If the transducer is installed at the water line
À
or
anywhere above the end of the keel, measure the
distance from the transducer location to the keel of the
boat. Enter this value as a positive number.
• If the transducer is installed at the bottom of the keel
Á
and you want to know the true depth of the water,
measure the distance from the transducer to the water
line. Enter this value in as a negative number.
2
Select Settings > My Vessel > Keel Offset.
3
Select if the transducer is installed at the water line, or
select if the transducer is installed at the bottom of the
keel.
4
Enter the distance measured in step 1.
5
Use the arrow keys to enter the keel offset measured in step
1.
Setting the Water Temperature Offset
Before you can set the water temperature offset, you must have
a NMEA 0183 water-temperature sensor or a temperature-
capable transducer to measure water temperature.
The temperature offset compensates for the temperature
reading from a temperature sensor.
1
Measure the water temperature using the temperature sensor
or temperature-capable transducer that is connected to the
chartplotter.
2
Measure the water temperature using a different temperature
sensor or a thermometer that is known to be accurate.
3
Subtract the water temperature measured in step 1 from the
water temperature measured in step 2.
This is the temperature offset. Enter this value in step 5 as a
positive number if the sensor connected to the chartplotter
measures the water temperature as being colder than it
actually is. Enter this value in step 5 as a negative number if
the sensor connected to the chartplotter measures the water
temperature as being warmer than it actually is.
4
Select Settings > My Vessel > Temp. Offset.
5
Enter the temperature offset calculated in step 3.
Calibrating a Water Speed Device
If you have a speed-sensing transducer connected to the
chartplotter, you can calibrate that speed-sensing device to
improve the accuracy of water-speed data displayed by the
chartplotter.
1
Select Settings > My Vessel > Calibrate Water Speed.
2
Follow the on-screen instructions.
If the boat is not moving fast enough or the speed sensor is
not registering a speed, a message appears.
3
Select OK, and safely increase the boat speed.
4
If the message appears again, stop the boat, and ensure the
speed-sensor wheel is not stuck.
5
If the wheel turns freely, check the cable connections.
6
If you continue to get the message, contact Garmin product
support.
Setting the Fuel Capacity of the Vessel
1
Select Settings > My Vessel > Fuel Capacity.
2
Enter the combined total capacity of the fuel tanks.
Synchronizing the Fuel Data with the Actual Vessel
Fuel
You can synchronize the fuel levels in the chartplotter with the
actual fuel in the vessel when you add fuel to your vessel.
1
Select Gauges > Engine > MENU.
2
Select an option:
• After you have filled up all the fuel tanks on the vessel,
select Fill Up All Tanks. The fuel level is reset to
maximum capacity.
• After you have added less than a full tank of fuel, select
Add Fuel to Boat, and enter the amount added.
• To specify the total fuel in the vessel tanks, select Set
Total Fuel Onboard, and enter the total amount of fuel in
the tanks.
Customizing Engine Gauge and Fuel Gauge Limits
You can configure the upper and lower limits and the range of
desired standard operation of a gauge. When a value exceeds
the range of standard operation, the gauge becomes red.
NOTE: Not all options are available for all gauges.
1
Select a gauge.
2
Select Gauge Limits > Custom > Edit Limits.
3
Select an option:
• To set the minimum value of the standard operating
range, select Rated Min..
• To set the maximum value of the standard operating
range, select Rated Max..
• To set the lower limit of the gauge lower than the rated
minimum, select Scale Min..
34 Device Configuration