
User Manual


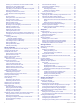


Table Of Contents
- Table of Contents
- Introduction
- Customizing the Chartplotter
- ActiveCaptain App
- Charts and 3D Chart Views
- Navigation Chart and Fishing Chart
- Zooming In and Out of the Chart
- Panning the Chart with the Keys
- Selecting an Item on the Map Using the Device Keys
- Chart Symbols
- Measuring a Distance on the Chart
- Creating a Waypoint on the Chart
- Navigating to a Point on the Chart
- Viewing Location and Object Information on a Chart
- Viewing Details about Navaids
- Heading Line and Angle Markers
- Premium Charts
- Automatic Identification System
- Chart and 3D Chart View Settings
- Supported Maps
- Navigation Chart and Fishing Chart
- Garmin Quickdraw Contours Mapping
- Mapping a Body of Water Using the Garmin Quickdraw Contours Feature
- Adding a Label to a Garmin Quickdraw Contours Map
- Garmin Quickdraw Community
- Garmin Quickdraw Contours Settings
- Navigation with a Chartplotter
- Basic Navigation Questions
- Destinations
- Courses
- Stopping Navigation
- Waypoints
- Routes
- Auto Guidance
- Setting and Following an Auto Guidance Path
- Creating an Auto Guidance Path
- Filtering a List of Routes and Auto Guidance Paths
- Reviewing an Auto Guidance Path
- Adjusting an Auto Guidance Path
- Canceling an Auto Guidance Calculation in Progress
- Setting a Timed Arrival
- Adjusting the Distance from Shore
- Auto Guidance Path Configurations
- Tracks
- Showing Tracks
- Setting the Color of the Active Track
- Saving the Active Track
- Viewing a List of Saved Tracks
- Editing a Saved Track
- Saving a Track as a Route
- Browsing for and Navigating a Recorded Track
- Deleting a Saved Track
- Deleting All Saved Tracks
- Retracing the Active Track
- Clearing the Active Track
- Managing the Track Log Memory During Recording
- Configuring the Recording Interval of the Track Log
- Boundaries
- Sonar Fishfinder
- Stopping the Transmission of Sonar Signals
- Changing the Sonar View
- Traditional Sonar View
- Garmin ClearVü Sonar View
- SideVü Sonar View
- Panoptix Sonar Views
- Selecting the Transducer Type
- Creating a Waypoint on the Sonar Screen
- Pausing the Sonar Display
- Viewing Sonar History
- Sonar Sharing
- Adjusting the Level of Detail
- Adjusting the Color Intensity
- Sonar Recordings
- Traditional, Garmin ClearVü, and SideVü Sonar Setup
- Panoptix Sonar Setup
- Autopilot
- Sailing Features
- Gauges and Graphs
- Tide, Current, and Celestial Information
- Digital Selective Calling
- Media Player
- Opening the Media Player
- Selecting the Media Source
- Playing Music
- Adjusting the Volume
- VHF Radio
- Radio
- DAB Playback
- SiriusXM Satellite Radio
- Setting the Device Name
- Updating the Media Player Software
- Device Configuration
- Sharing and Managing User Data
- Connecting to a Garmin Device to Share User Data
- Selecting a File Type for Third-Party Waypoints and Routes
- Copying User Data from a Memory Card
- Copying User Data to a Memory Card
- Copying Built-In Maps to a Memory Card
- Copying Waypoints, Routes, and Tracks from HomePort to a Chartplotter
- Backing Up Data to a Computer
- Restoring Backup Data to a Chartplotter
- Saving System Information to a Memory Card
- Clearing Saved Data
- Appendix
- Index
3
Select an area.
4
Select a function for the area.
5
Repeat these steps for each area of the page.
6
Select Data, and customize the data shown.
7
Select Next when you are done customizing the page.
8
Enter a name for the page, and select Done.
9
Use the arrow keys to resize the windows.
10
Select to BACK to exit.
Creating a New Combination Page with the ECHOMAP
Plus 40
You can create a custom combination page to suit your needs.
1
Select Combos > Customize > Add.
2
Select the first function.
3
Select the second function.
4
Select Split to choose the direction of the split screen
(optional).
5
Select Next.
6
Enter a name for the page.
TIP: Select SELECT to select the letter.
7
Use the arrow keys to resize the windows.
8
Use the arrow keys to select a location on the home screen.
9
Select BACK to exit.
Setting the Vessel Type
You can select your boat type to configure the chartplotter
settings and to use features customized for your boat type.
1
Select Settings > My Vessel > Vessel Type.
2
Select an option.
Adjusting the Backlight
1
Select Settings > System > Display > Backlight.
2
Adjust the backlight.
TIP: From any screen, press repeatedly to scroll through
the brightness levels. This can be helpful when the
brightness is so low you cannot see the screen.
Adjusting the Color Mode
1
Select Settings > System > Display > Color Mode.
TIP: Select > Display > Color Mode from any screen to
access the color settings.
2
Select an option.
ActiveCaptain App
CAUTION
This feature allows users to submit information. Garmin
®
makes
no representations about the accuracy, completeness or
timeliness of information submitted by users. Any use or reliance
on the information submitted by users is at your own risk.
NOTE: The ActiveCaptain feature is only available on models
that have Wi‑Fi
®
technology.
If you connect to a Wi‑Fi adpater The ActiveCaptain feature is
only available on models that have Wi‑Fi technology.
The ActiveCaptain app provides a connection to your
ECHOMAP Plus device, charts, maps, and the community for a
connected boating experience.
On your mobile device with the ActiveCaptain app, you can
download, purchase, and update maps and charts. You can use
the app to easily and quickly transfer user data, such as
waypoints and routes, connect to the Garmin Quickdraw
Contours Community, and update device software. You can also
plan your trip, and view and control the ECHOMAP Plus device
from the app.
You can connect to the ActiveCaptain community for up-to-date
feedback on marinas and other points of interest. The app can
push smart notifications, such as calls and texts, to your
chartplotter display when paired.
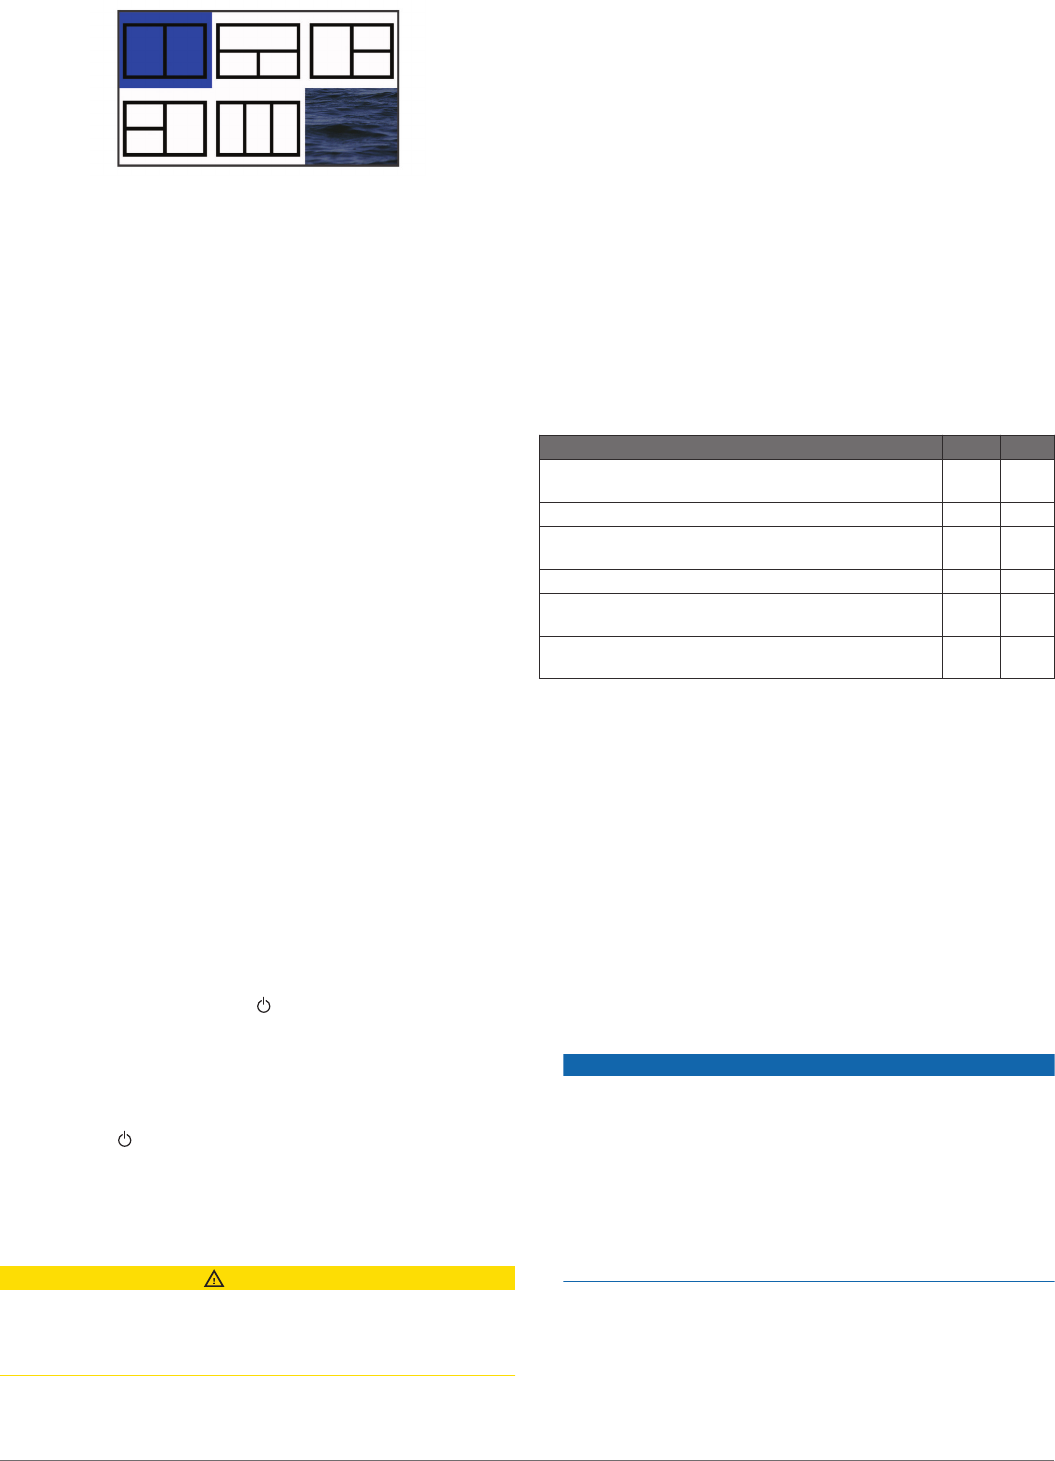
ActiveCaptain Roles
Your level of interaction with the ECHOMAP Plus device using
the ActiveCaptain app depends on your role.
Feature Owner Guest
Register device, built-in maps, and supplemental map
cards to account
Yes
Update software Yes Yes
Automatically transfer Garmin Quickdraw contours you
have downloaded or created
Yes
Push smart notifications Yes Yes
Begin navigating to a specific waypoint or navigating a
specific route
Yes Yes
Manually synchronize waypoints and routes with the
ECHOMAP Plus device
Yes Yes
Getting Started with the ActiveCaptain App
NOTE: The ActiveCaptain feature is only available on models
that have Wi‑Fi technology.
You can connect a mobile device to the ECHOMAP Plus device
using the ActiveCaptain app. The app provides a quick and easy
way for you to interact with your chartplotter and complete such
tasks as sharing data, registering, updating the device software,
and receiving mobile device notifications.
1
From the ECHOMAP Plus device, select ActiveCaptain.
2
From the ActiveCaptain page, select Wi-Fi Network > Wi-Fi
> On.
3
Enter a name and password for this network.
4
Insert a memory card in the ECHOMAP Plus device's card
slot (Inserting Memory Cards, page 2).
5
Select Create ActiveCaptain Memory Card.
NOTICE
You might be prompted to format the memory card.
Formatting the card deletes all information saved on the card.
This includes any saved user data, such as waypoints.
Formatting the card is recommended, but not required.
Before formatting the card, you should save the data from the
memory card onto the device internal memory (Copying User
Data from a Memory Card, page 37). After formatting the
card for the ActiveCaptain app, you can transfer the user
data back to the card (Copying User Data to a Memory Card,
page 37).
Be sure the card is inserted each time you want to use the
ActiveCaptain feature.
6
From the application store on your mobile device, install and
open the ActiveCaptain app.
7
Bring the mobile device within 32 m (105 ft.) of the
ECHOMAP Plus device.
ActiveCaptain App 3