
Owner's Manual
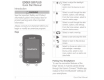
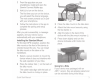

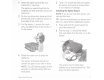
Table Of Contents
- Owners Manual
- Reset
- Table of Contents
- Introduction
- Training
- Navigation
- Bluetooth Connected Features
- ANT+ Sensors
- History
- Customizing Your Device
- Device Information
- Troubleshooting
- Resetting the Device
- Maximizing Battery Life
- Improving GPS Satellite Reception
- My device is in the wrong language
- Temperature Readings
- Replacement O-rings
- Viewing Device Information
- Updating the Software Using Garmin Connect Mobile
- Updating the Software Using Garmin Express
- Product Updates
- Getting More Information
- Specs
- Appendix
- Index
- Quick Start Manual
- Edge Remote Instructions
- Out-Front Mount Instructions
- Warranty

ANT+
Sensors
Your
device
can
be
used
with
wireless
ANT+
sensors.
For
more
information
about
compatibility
and
purchasing
optional
sensors,
go
to
http:/
/buy
.garmin
.com.
Putting
On
the
Heart
Rate
Monitor
NOTE:
If
you
do
not
have
a
heart
rate
monitor
,
you
can
skip
this
task.
You
should
wear
the
heart
rate
monitor
directly
on
your
skin,
just
below
your
sternum.
It
should
be
snug
enough
to
stay
in
place
during
your
activity
.
1
Snap
the
heart
rate
monitor
module
J )
onto
the
strap.
The
Garmin
·
logos
on
the
module
and
the
strap
should
be
right-side
up.
2
Wet
the
electrodes
:2)
and
the
contact
patches
®
on
the
back
of
the
strap
to
create
a
strong
connection
between
your
chest
and
the
transmitter.
6
3
Wrap
the
strap
around
your
chest,
and
connect
the
strap
hook
®
to
the
loop
@.
NOTE:
The
care
tag
should
not
fold
over.
The
Garmin
logos
should
be
right-side
up.
4
Bring
the
device
within
3m (10ft.)
of
the
heart
rate
monitor.
After
you
put
on
the
heart
rate
monitor,
it
is
active
and
sending
data.
Installing
the
Cadence
Sensor
NOTE:
If
you
do
not
have
this
sensor,
you
can
skip
this
task.
TIP:
Garmin
recommends
you
secure
your
bike
on
a
stand
while
installing
the
sensor.
Quick
Start
Man
ual