
Owner's Manual
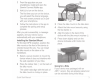
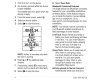

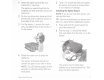
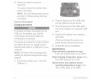
Table Of Contents
- Owners Manual
- Reset
- Table of Contents
- Introduction
- Training
- Navigation
- Bluetooth Connected Features
- ANT+ Sensors
- History
- Customizing Your Device
- Device Information
- Troubleshooting
- Resetting the Device
- Maximizing Battery Life
- Improving GPS Satellite Reception
- My device is in the wrong language
- Temperature Readings
- Replacement O-rings
- Viewing Device Information
- Updating the Software Using Garmin Connect Mobile
- Updating the Software Using Garmin Express
- Product Updates
- Getting More Information
- Specs
- Appendix
- Index
- Quick Start Manual
- Edge Remote Instructions
- Out-Front Mount Instructions
- Warranty

1
Select
the
band
size
that
fits
your
crank
arm
CD
securely.
The
band
you
select
should
be
the
smallest
one
that
stretches
across
the
crank
arm.
2
On
the
non-drive
side,
place
and
hold
the
flat
side
of
the
cadence
sensor
on
the
inside
of
the
crank
arm.
3
Pull
the
bands
@
around
the
crank
arm,
and
attach
them
to
the
hooks
(3)
on
the
sensor.
4
Rotate
the
crank
arm
to
check
for
clearance.
The
sensor
and
bands
should
not
contact
any
part
of
your
bike
or
shoe.
NOTE:
The
LED
flashes
green
for
five
seconds
to
indicate
activity
after
two
revolutions.
Quick
Start
Manual
5
Take
a
15
minute
test
ride
and
inspect
the
sensor
and
bands
to
ensure
there
is
no
evidence
of
damage.
Installing
the
Speed
Sensor
NOTE:
If
you
do
not
have
this
sensor,
you
can
skip
this
task.
TIP:
Garmin
recommends
you
secure
your
bike
on
a
stand
while
installing
the
sensor.
1
Place
and
hold
the
speed
sensor
on
top
of
the
wheel
hub.
2
Pull
the
strap
CD
around
the
wheel
hub,
and
attach
it
to
the
hook
C2)
on
the
sensor.
The
sensor
may
be
tilted
when
installed
on
an
asymmetrical
hub.
This
does
not
affect
operation.
7