EDGE 520 PLUS ® Owner’s Manual
© 2018 Garmin Ltd. or its subsidiaries All rights reserved. Under the copyright laws, this manual may not be copied, in whole or in part, without the written consent of Garmin. Garmin reserves the right to change or improve its products and to make changes in the content of this manual without obligation to notify any person or organization of such changes or improvements. Go to www.garmin.com for current updates and supplemental information concerning the use of this product.
Table of Contents Introduction.....................................................................1 Keys ............................................................................................ 1 Pairing Your Smartphone ........................................................... 1 Viewing the Status Page ............................................................ 1 Charging the Device ................................................................... 1 About the Battery ..............................
Downloading Connect IQ Features Using Your Computer .. 15 Profiles ...................................................................................... 15 Setting Up Your User Profile ................................................ 15 About Training Settings ............................................................ 15 Updating Your Activity Profile .............................................. 15 Customizing the Data Screens ............................................
Introduction WARNING See the Important Safety and Product Information guide in the product box for product warnings and other important information. Always consult your physician before you begin or modify any exercise program. Viewing the Status Page The status page displays the connection status of the GPS, ANT+ sensors, and your smartphone. Select an option: • From the home screen, select . • During a ride, select > Status Page. ® Keys The status page appears.
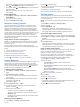
2 Place the rubber disk À on the back of the bike mount. The rubber tabs align with the back of the bike mount so it stays in place. 7 Press down slightly and turn the Edge device clockwise until 3 Place the bike mount on the bike stem. 4 Attach the bike mount securely using the two bands Á. 5 Align the tabs on the back of the device with the bike mount notches Â. 6 Press down slightly and turn the device clockwise until it locks into place. it locks into place.
3 From the home screen, select 4 Select an activity profile. 5 Select to start the timer. . 6 If necessary, use the 2 mm hex key to remove the two screws on the back side of the mount Ã, remove and rotate the connector, and replace the screws to change the orientation of the mount. 7 Replace and tighten the screw on the handlebar connector. NOTE: Garmin recommends tightening the screw so the mount is secure, with a maximum torque specification of 7 lbf-in. (0.8 N-m).
Strava™ Segments You can download Strava segments to your Edge 520 Plus device. Follow Strava segments to compare your performance with your past rides, friends, and pros who have ridden the same segment. To sign up for a Strava membership, go to the segments widget in your Garmin Connect account. For more information, go to www.strava.com. The information in this manual applies to both Garmin Connect segments and Strava segments.
• At any time, select to view the workout steps screen, and select > Stop Workout > OK to end the workout. • At any time, select > Stop Workout to stop the timer and end the workout. TIP: When you save your ride, your workout ends automatically. Deleting Workouts 1 Select Menu > Training > Workouts > Workout Options > Delete Multiple. 2 Select one or more workouts. 3 Select Delete Workouts > OK.
with a compatible power meter, the device displays the maximum power reading recorded during a 20-minute period. Viewing Your Personal Records Select Menu > My Stats > Personal Records. Reverting a Personal Record You can view the level of resistance À, your distance ahead of or behind Á, and your time ahead of or behind  the distance and time originally recorded for the course or activity. Setting Resistance 1 Select Menu > Training > Indoor Trainer > Set Resistance.
2 Select a location. 3 Select Edit. 4 Select a location detail. For example, select Change Elevation to enter a known altitude for the location. 5 Edit the value, and select . Deleting a Location 1 Select Menu > Navigation > Saved Locations. 2 Select a location. 3 Select Delete Location > OK. Setting Your Elevation If you have accurate elevation data for your present location, you can manually calibrate the altimeter on your device. 1 Go for a ride. 2 Select > Set Elevation.
• Disable Auto Zoom to zoom in or out manually. 5 If necessary, select Set Zoom Level. 6 Select an option: • To zoom in manually, select . • To zoom out manually, select . 7 Select to save the zoom level (optional). Map Settings Select Menu > Settings > Activity Profiles, select a profile, and select Navigation > Map. Orientation: Sets how the map is shown on the page. Auto Zoom: Automatically selects a zoom level for the map. When Off is selected, you must zoom in or out manually.
During an audio prompt, the Garmin Connect mobile app mutes the primary audio of the smartphone to play the announcement. You can customize the volume levels on the Garmin Connect Mobile app. 1 From the settings in the Garmin Connect Mobile app, select Garmin Devices. 2 Select your device. 3 Select Device Settings > Audio Prompts. Incident Detection and Assistance Features Incident Detection You can tap an icon on the map to view location and heading information for other riders in the GroupTrack session.
NOTE: When you enter emergency contacts, incident detection is automatically enabled on your device. 4 Enable GPS on your Edge device (Changing the Satellite Setting, page 16). Viewing Your Emergency Contacts Before you can view your emergency contacts on your device, you must set up your rider information and emergency contacts in the Garmin Connect Mobile app. Select Menu > Contacts. Your emergency contacts' names and phone numbers appear.
page 15), and set your maximum heart rate (Setting Your Heart Rate Zones, page 11). NOTE: The estimate may seem inaccurate at first. The device requires a few rides to learn about your cycling performance. 1 Ride at a steady, high intensity for at least 20 minutes outdoors. 2 After your ride, select Save Ride. 3 Select Menu > My Stats > VO2 Max.. Your VO2 max. estimate appears as a number and position on the color gauge. Purple Superior Blue Excellent Green Good Orange Fair Red Poor VO2 max.
The sensor may be tilted when installed on an asymmetrical hub. This does not affect operation. 3 Rotate the wheel to check for clearance. The sensor should not contact other parts of your bike. NOTE: The LED flashes green for five seconds to indicate activity after two revolutions. Installing the Cadence Sensor NOTE: If you do not have this sensor, you can skip this task. TIP: Garmin recommends you secure your bike on a stand while installing the sensor.
For more information, go to www.garmin.com/cyclingdynamics. Using Cycling Dynamics Before you can use cycling dynamics, you must pair the Vector power meter with your device (Pairing Your ANT+ Sensors, page 12). NOTE: Recording cycling dynamics uses additional device memory. 1 Go for a ride. 2 Scroll to the cycling dynamics screen to view your power phase data À, total power Á, and platform center offset Â.
Using the Weight Scale If you have an ANT+ compatible weight scale, the device can read the data from the weight scale. 1 Select Menu > Settings > Sensors > Add Sensor > Weight Scale. A message appears when the weight scale is found. 2 Stand on the scale when indicated. NOTE: If using a body composition scale, remove shoes and socks to ensure that all body composition parameters are read and recorded. 3 Step off the scale when indicated. TIP: If an error occurs, step off the scale. Step on when indicated.
Customizing Your Device Data Management NOTE: The device is not compatible with Windows 95, 98, Me, Windows NT , and Mac OS 10.3 and earlier. ® ® ® Connecting the Device to Your Computer NOTICE To prevent corrosion, thoroughly dry the USB port, the weather cap, and the surrounding area before charging or connecting to a computer. 1 Pull up the weather cap from the USB port. 2 Plug the small end of the USB cable into the USB port. 3 Plug the large end of the USB cable into a computer USB port.
• Select Default Ride Type to set the type of ride that is typical for this activity profile, such as commuting. TIP: After a ride that is not typical, you can manually update the ride type. Accurate ride type data is important for creating bike friendly courses. • Select Segments to turn on your enabled segments (Enabling Segments, page 4). • Select Alerts to customize your training alerts (Alerts, page 16).
Using Auto Pause You can use the Auto Pause feature to pause the timer automatically when you stop moving or when your speed drops below a specified value. This feature is helpful if your ride includes stop lights or other places where you need to slow down or stop. NOTE: History is not recorded while the timer is stopped or paused. 1 Select Menu > Settings > Activity Profiles. 2 Select a profile. 3 Select Auto Features > Auto Pause.
2 From your compatible Garmin watch, select Settings > Sensors & Accessories > Add New > Extended Display. 3 Follow the on-screen instructions on your Edge device and Garmin watch to complete the pairing process. The data screens from your paired watch appear on the Edge device when the devices are paired. NOTE: Normal Edge device functions are disabled while using Extended Display mode.
2 Twist the cover counter-clockwise until the marker points to unlocked and the cover is loose enough to remove. 3 Remove the cover and the battery Á. TIP: You can use a piece of tape  or a magnet to remove the battery from the cover. While connected to your Garmin Connect account, the device downloads several days of satellite data, allowing it to quickly locate satellite signals. • Take your device outside to an open area away from tall buildings and trees. • Remain stationary for a few minutes.
This provides easy access to these services for Garmin devices: • Software updates • Map updates • Data uploads to Garmin Connect • Product registration Getting More Information • Go to support.garmin.com for additional manuals, articles, and software updates. • Go to www.garmin.com/intosports. • Go to www.garmin.com/learningcenter. • Go to buy.garmin.com, or contact your Garmin dealer for information about optional accessories and replacement parts.
PCO - Lap: The average platform center offset for the current lap. Pedal Smoothness: The measurement of how evenly a rider is applying force to the pedals throughout each pedal stroke. Performance Condition: The performance condition score is a real-time assessment of your ability to perform. Power: The current power output in watts. Your device must be connected to a compatible power meter. Power - %FTP: The current power output as a percentage of functional threshold power. Power - 10s Avg.
VO2 Max. Standard Ratings These tables include standardized classifications for VO2 max. estimates by age and gender. Males Percentile 20–29 30–39 40–49 50–59 60–69 70–79 Superior 95 55.4 54 52.5 48.9 45.7 42.1 Excellent 80 51.1 48.3 46.4 43.4 39.5 36.7 Good 60 45.4 44 42.4 39.2 35.5 32.3 Fair 40 41.7 40.5 38.5 35.6 32.3 29.4 Poor 0–40 <41.7 <40.5 <38.5 <35.6 <32.3 <29.4 Females Percentile 20–29 30–39 40–49 50–59 60–69 70–79 Superior 95 49.6 47.
Tire Size Wheel Circumference (mm) 29 x 2.2 2298 29 x 2.
Index A accessories 10, 12, 20 alerts 16 altimeter, calibrating 7 ANT+ sensors 1, 10, 12, 13 fitness equipment 5, 6 pairing 5, 12 applications 8, 15 smartphone 1 assistance 9, 10 Auto Lap 16 Auto Pause 17 auto scroll 17 auto sleep 17 B backlight 1, 3, 17 bands 19 battery charging 1 maximizing 19 replacing 18 type 1 Bluetooth technology 8, 9, 17 C cadence 12 alerts 16 calendar 5 calibrating, power meter 12 calorie, alerts 16 cleaning the device 18 computer, connecting 15 Connect IQ 15 courses 7 deleting 7
support.garmin.