
Owner's Manual
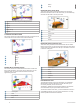
Table Of Contents
- Owner’s Manual
- Table of Contents
- Introduction
- Customizing the Chartplotter
- ActiveCaptain App
- Charts and 3D Chart Views
- Navigation Chart and Fishing Chart
- Premium Charts
- Automatic Identification System
- Chart View Settings
- Supported Maps
- Garmin Quickdraw Contours Mapping
- Mapping a Body of Water Using the Garmin Quickdraw Contours Feature
- Adding a Label to a Garmin Quickdraw Contours Map
- Garmin Quickdraw Community
- Garmin Quickdraw Contours Settings
- Navigation with a Chartplotter
- Basic Navigation Questions
- Destinations
- Waypoints
- Marking Your Present Location as a Waypoint
- Creating a Waypoint at a Different Location
- Marking an MOB Location
- Projecting a Waypoint
- Viewing a List of all Waypoints
- Editing a Saved Waypoint
- Moving a Saved Waypoint
- Browsing for and Navigating to a Saved Waypoint
- Deleting a Waypoint or an MOB
- Deleting All Waypoints
- Routes
- Auto Guidance
- Tracks
- Showing Tracks
- Setting the Color of the Active Track
- Saving the Active Track
- Viewing a List of Saved Tracks
- Editing a Saved Track
- Saving a Track as a Route
- Browsing for and Navigating a Recorded Track
- Deleting a Saved Track
- Deleting All Saved Tracks
- Retracing the Active Track
- Clearing the Active Track
- Managing the Track Log Memory During Recording
- Configuring the Recording Interval of the Track Log
- Boundaries
- Deleting All Saved Waypoints, Routes, and Tracks
- Sonar Fishfinder
- Stopping the Transmission of Sonar Signals
- Changing the Sonar View
- Traditional Sonar View
- Garmin ClearVü Sonar View
- SideVü Sonar View
- Panoptix Sonar Views
- Flasher View
- Selecting the Transducer Type
- Selecting a Sonar Source
- Creating a Waypoint on the Sonar Screen
- Pausing the Sonar Display
- Measuring Distance on the Sonar Screen
- Viewing Sonar History
- Sonar Sharing
- Adjusting the Level of Detail
- Adjusting the Color Intensity
- Sonar Recordings
- Traditional, Garmin ClearVü, and SideVü Sonar Setup
- Panoptix Sonar Setup
- Autopilot
- Sailing Features
- Gauges and Graphs
- Tide, Current, and Celestial Information
- Digital Selective Calling
- Media Player
- Opening the Media Player
- Selecting the Media Device and Source
- Playing Music
- Adjusting the Volume
- VHF Radio
- Radio
- DAB Playback
- SiriusXM® Satellite Radio
- Setting the Device Name
- Updating the Media Player Software
- Device Configuration
- Sharing and Managing User Data
- Connecting to a Garmin Device to Share User Data
- Selecting a File Type for Third-Party Waypoints and Routes
- Copying User Data from a Memory Card
- Copying User Data to a Memory Card
- Copying Built-In Maps to a Memory Card
- Copying Waypoints, Routes, and Tracks from HomePort to a Chartplotter
- Backing Up Data to a Computer
- Restoring Backup Data to a Chartplotter
- Saving System Information to a Memory Card
- Clearing Saved Data
- Appendix
- Index
- Quick Start Manual
- EchoMap Ultra 100/120 Series Installation Instructions
- EchoMap Ultra 100 Series Flush Mount Template
- Important Safety and Product Information

When you are using more than one sonar data source for a
particular sonar view, you can select the source to use for that
sonar view. For example, if you have two sources for Garmin
ClearVü, you can select the source to use from the Garmin
ClearVü sonar view.
1
Open the sonar view for which you will change the source.
2
Select Menu > Sonar Setup > Source.
3
Select the source for this sonar view.
Renaming a Sonar Source
You can rename a sonar source to easily identify that source.
For example, you use "Bow" as the name of the transducer on
the bow of your boat.
To rename a source, you must be in the applicable sonar view
for the source. For example, to rename the Garmin ClearVü
sonar source, you must open the Garmin ClearVü sonar view.
1
From the sonar view, select Menu > Sonar Setup > Source
> Rename Sources.
2
Enter the name.
Creating a Waypoint on the Sonar Screen
1
From a sonar view, drag the screen or select .
2
Select a location.
3
Select Mark.
4
If necessary, edit the waypoint information.
Pausing the Sonar Display
From a sonar view, select Menu > Pause Sonar.
Measuring Distance on the Sonar Screen
You can measure the distance between two points on the
SideVü sonar view.
1
From the SideVü sonar view, select .
2
Select a location on the screen.
3
Select .
A push pin appears on the screen at the selected location.
4
Select another location.
The distance and angle from the pin is listed in the upper-left
corner.
TIP: To reset the pin and measure from the current location of
the pin, select Set Reference.
Viewing Sonar History
You can scroll the sonar display to view historical sonar data.
NOTE: Not all transducers save historical sonar data.
1
From a sonar view, drag the screen to the right.
2
Select Back to exit history.
Sonar Sharing
You can view the sonar data from other compatible ECHOMAP
Ultra models and ECHOMAP Plus 7 and ECHOMAP Plus 9
models connected on the Garmin Marine Network.
Each chartplotter on the network can display sonar data from
every compatible transducer on the network, no matter where
the chartplotters and transducers are mounted on your boat. For
example, from one ECHOMAP Plus 93sv device mounted at the
back of the boat, you can view the sonar data from another
ECHOMAP Ultra device and Garmin ClearVü transducer
mounted at the front of your boat.
When sharing sonar data, the values of some sonar settings,
such as Range and Gain, are synchronized across the devices
on the network. The values of other sonar settings, such as the
Appearance settings, are not synchronized and should be
configured on each individual device. In addition, the scroll rates
of the various traditional and Garmin ClearVü sonar views are
synchronized to make the split views more cohesive.
NOTE: Using multiple transducers simultaneously can create
cross talk, which can be removed by adjusting the Interference
sonar setting.
Adjusting the Level of Detail
You can control the level of detail and noise shown on the sonar
screen either by adjusting the gain for traditional transducers or
by adjusting the brightness for Garmin ClearVü transducers.
If you want to see the highest intensity signal returns on the
screen, you can lower the gain or brightness to remove lower
intensity returns and noise. If you want to see all return
information, you can increase the gain or brightness to see more
information on the screen. This also increases noise, and can
make it more difficult to recognize actual returns.
1
From a sonar view, select Menu.
2
Select Gain or Brightness.
3
Select an option:
• To increase or decrease the gain or brightness manually,
select Up or Down.
• To allow the chartplotter to adjust the gain or brightness
automatically, select an automatic option.
Adjusting the Color Intensity
You can adjust the intensity of colors and highlight areas of
interest on the sonar screen by adjusting the color gain for
traditional transducers or the contrast for Garmin ClearVü and
SideVü/ClearVü transducers. This setting works best after you
have adjusted the level of detail shown on the screen using the
gain or brightness settings.
If you want to highlight smaller fish targets or create a higher
intensity display of a target, you can increase the color gain or
contrast setting. This causes a loss in the differentiation of the
high intensity returns at the bottom. If you want to reduce the
intensity of the return, you can reduce the color gain or contrast.
1
From a sonar view, select Menu.
2
Select an option:
• While in the Garmin ClearVü or SideVü sonar view, select
Contrast.
• While in a Panoptix LiveVü sonar view, select Color Gain.
• While in another sonar view, select Sonar Setup >
Appearance > Color Gain.
3
Select an option:
• To increase or decrease the color intensity manually,
select Up or Down.
• To use the default setting, select Default.
Sonar Recordings
Recording the Sonar Display
1
Insert a memory card into the card slot.
2
From a sonar view, select Menu > Sonar Setup > Sonar
Recording > Record Sonar.
15 minutes of sonar recording uses approximately 200 MB of
space of the inserted memory card. An individual recording
automatically ends after it reaches 4 GB in size. You can
record sonar data until the card reaches capacity.
Stopping the Sonar Recording
Before you can stop recording sonar, you must begin recording
it (Recording the Sonar Display, page 20).
From a sonar view, select Menu > Sonar Setup > Sonar
Recording > Stop Recording.
20 Sonar Fishfinder