
Owner's Manual


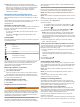

Table Of Contents
- Owner’s Manual
- Table of Contents
- Introduction
- Customizing the Chartplotter
- ActiveCaptain App
- Charts and 3D Chart Views
- Navigation Chart and Fishing Chart
- Premium Charts
- Automatic Identification System
- Chart View Settings
- Supported Maps
- Garmin Quickdraw Contours Mapping
- Mapping a Body of Water Using the Garmin Quickdraw Contours Feature
- Adding a Label to a Garmin Quickdraw Contours Map
- Garmin Quickdraw Community
- Garmin Quickdraw Contours Settings
- Navigation with a Chartplotter
- Basic Navigation Questions
- Destinations
- Waypoints
- Marking Your Present Location as a Waypoint
- Creating a Waypoint at a Different Location
- Marking an MOB Location
- Projecting a Waypoint
- Viewing a List of all Waypoints
- Editing a Saved Waypoint
- Moving a Saved Waypoint
- Browsing for and Navigating to a Saved Waypoint
- Deleting a Waypoint or an MOB
- Deleting All Waypoints
- Routes
- Auto Guidance
- Tracks
- Showing Tracks
- Setting the Color of the Active Track
- Saving the Active Track
- Viewing a List of Saved Tracks
- Editing a Saved Track
- Saving a Track as a Route
- Browsing for and Navigating a Recorded Track
- Deleting a Saved Track
- Deleting All Saved Tracks
- Retracing the Active Track
- Clearing the Active Track
- Managing the Track Log Memory During Recording
- Configuring the Recording Interval of the Track Log
- Boundaries
- Deleting All Saved Waypoints, Routes, and Tracks
- Sonar Fishfinder
- Stopping the Transmission of Sonar Signals
- Changing the Sonar View
- Traditional Sonar View
- Garmin ClearVü Sonar View
- SideVü Sonar View
- Panoptix Sonar Views
- Flasher View
- Selecting the Transducer Type
- Selecting a Sonar Source
- Creating a Waypoint on the Sonar Screen
- Pausing the Sonar Display
- Measuring Distance on the Sonar Screen
- Viewing Sonar History
- Sonar Sharing
- Adjusting the Level of Detail
- Adjusting the Color Intensity
- Sonar Recordings
- Traditional, Garmin ClearVü, and SideVü Sonar Setup
- Panoptix Sonar Setup
- Autopilot
- Sailing Features
- Gauges and Graphs
- Tide, Current, and Celestial Information
- Digital Selective Calling
- Media Player
- Opening the Media Player
- Selecting the Media Device and Source
- Playing Music
- Adjusting the Volume
- VHF Radio
- Radio
- DAB Playback
- SiriusXM® Satellite Radio
- Setting the Device Name
- Updating the Media Player Software
- Device Configuration
- Sharing and Managing User Data
- Connecting to a Garmin Device to Share User Data
- Selecting a File Type for Third-Party Waypoints and Routes
- Copying User Data from a Memory Card
- Copying User Data to a Memory Card
- Copying Built-In Maps to a Memory Card
- Copying Waypoints, Routes, and Tracks from HomePort to a Chartplotter
- Backing Up Data to a Computer
- Restoring Backup Data to a Chartplotter
- Saving System Information to a Memory Card
- Clearing Saved Data
- Appendix
- Index
- Quick Start Manual
- EchoMap Ultra 100/120 Series Installation Instructions
- EchoMap Ultra 100 Series Flush Mount Template
- Important Safety and Product Information

Introduction
WARNING
See the Important Safety and Product Information guide in the
product box for product warnings and other important
information.
Front View
Automatic backlight sensor
Power key
Zoom keys
Shortcut keys
Touchscreen
2 microSD
®
memory card slots; 32 GB max. card size
Connector View
POWER Power
12 PIN XDCR 12-pin transducer
LVS XDCR Panoptix
™
LiveScope
™
LVS12 12-pin transducer
NMEA 2000 NMEA 2000
®
network
NETWORK ECHOMAP network
Ground screw
Assigning a Shortcut Key
You can quickly open commonly used screens by assigning a
shortcut key. You can create a shortcut to screens such as
sonar screens and charts.
1
Open a page.
2
Hold a shortcut key, and select OK.
Tips and Shortcuts
• Press to turn on the chartplotter.
• From any screen, press repeatedly to scroll through the
brightness levels. This can be helpful when the brightness is
so low you cannot see the screen.
• Hold a numbered key to create a shortcut to a screen.
• Select Home from any screen to return to the Home screen.
• Select Menu to open additional settings about that screen.
• Select Menu to close the menu when finished.
• Press to open additional options, such as adjusting the
backlight and locking the touchscreen.
• Press , and select Power > Turn Off Device, or hold
until the Turn Off Device bar fills to turn off the chartplotter,
when available.
• Press , and select Power > Sleep Device to set the
chartplotter to standby mode, when available.
Downloading the Manuals from the Web
You can get the latest owner's manual and translations of
manuals from the Garmin
®
website.
1
Go to www.garmin.com/manuals/echomap_ultra.
2
Download the manual.
Garmin Support Center
Go to support.garmin.com for help and information, such as
product manuals, frequently asked questions, videos, software
updates, and customer support.
Inserting Memory Cards
You can use optional memory cards with the chartplotter. Map
cards allow you to view high-resolution satellite imagery and
aerial reference photos of ports, harbors, marinas, and other
points of interest. You can use blank memory cards to record
Garmin Quickdraw
™
Contours mapping, record sonar (with a
compatible transducer), transfer data such as waypoints and
routes to another compatible chartplotter or a computer, and use
the ActiveCaptain
®
app.
This device supports up to a 32 GB microSD memory card,
formatted to FAT32. Speed class 4 or greater required.
1
Open the access flap or door on the front of the
chartplotter.
2
Insert the memory card .
3
Press the card in until it clicks.
4
Close the door.
Acquiring GPS Satellite Signals
The device may need a clear view of the sky to acquire satellite
signals. The time and date are set automatically based on the
GPS position.
1
Turn on the device.
2
Wait while the device locates satellites.
It may take 30 to 60 seconds to acquire satellite signals.
When the device acquires satellite signals, appears at the
top of the Home screen.
If the device loses satellite signals, disappears and a
flashing question mark appears over on the chart.
Introduction 1