
Owner's Manual


Map Settings
You can customize how the map appears in the map app and
data screens.
Hold MENU, and select Map.
Orientation: Sets the orientation of the map. The North Up
option shows north at the top of the screen. The Track Up
option shows your current direction of travel at the top of the
screen.
User Locations: Shows or hides saved locations on the map.
Auto Zoom: Automatically selects the zoom level for optimal
use of your map. When disabled, you must zoom in or out
manually.
Navigation Settings
You can customize the map features and appearance when
navigating to a destination.
Customizing Map Features
1
Hold MENU.
2
Select Navigation > Data Screens.
3
Select an option:
• Select Map to turn on or off the map.
• Select Guide to turn on or off the guide screen that
displays the compass bearing or course to follow while
navigating.
• Select Elevation Plot to turn on or off the elevation plot.
• Select a screen to add, remove, or customize.
Heading Settings
You can set the behavior of the pointer that appears when
navigating.
Hold MENU, and select Navigation > Type.
Bearing: Points in the direction of your destination.
Course: Shows your relationship to the course line leading to
the destination (Course Pointer, page 32).
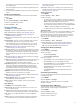
Course Pointer
The course pointer is most useful when you are navigating to
your destination in a straight line, such as when you are
navigating on water. It can help you navigate back to the course
line when you go off-course to avoid obstacles or hazards.
The course pointer indicates your relationship to the course
line leading to the destination. The course deviation indicator
(CDI) provides the indication of drift (right or left) from the
course. The dots tell you how far off course you are.
Setting Up a Heading Bug
You can set up a heading indicator to display on your data
pages while navigating. The indicator points to your target
heading.
1
Hold MENU.
2
Select Navigation > Heading Bug.
Setting Navigation Alerts
You can set alerts to help you navigate to your destination.
1
Hold MENU.
2
Select Navigation > Alerts.
3
Select an option:
• To set an alert for a specified distance from your final
destination, select Final Distance.
• To set an alert for the estimated time remaining until you
reach your final destination, select Final ETE.
• To set an alert when you stray from the course, select Off
Course.
• To enable turn-by-turn navigation prompts, select Turn
Prompts.
4
If necessary, select Status to turn on the alert.
5
If necessary, enter a distance or time value, and select .
Power Manager Settings
Hold MENU, and select Power Manager.
Battery Saver: Allows you to customize system settings to
extend battery life in watch mode (Customizing the Battery
Saver Feature, page 32).
Power Modes: Allows you to customize system settings, activity
settings, and GPS settings to extend battery life during an
activity (Customizing Power Modes, page 32).
Battery Percentage: Displays remaining battery life as a
percentage.
Battery Estimates: Displays remaining battery life as an
estimated number of days or hours.
Customizing the Battery Saver Feature
The battery saver feature allows you to quickly adjust system
settings to extend battery life in watch mode.
You can turn on the battery saver feature from the controls
menu (Viewing the Controls Menu, page 1).
1
Hold MENU.
2
Select Power Manager > Battery Saver.
3
Select Status to turn on the battery saver feature.
4
Select Edit, and select an option:
• Select Watch Face to enable a low-power watch face that
updates once per minute.
• Select Phone to disconnect your paired phone.
• Select Activity Tracking to turn off all-day activity
tracking, including steps, floors climbed, intensity minutes,
sleep tracking, and Move IQ events.
• Select Wrist Heart Rate to turn off the wrist heart rate
monitor.
• Select Pulse Oximeter to turn off all-day acclimation
mode.
• Select Backlight to turn off the backlight.
The watch displays the hours of battery life gained with each
setting change.
5
Select Low Battery Alert to receive an alert when the battery
is low.
Customizing Power Modes
Your device comes preloaded with several power modes,
allowing you to quickly adjust system settings, activity settings,
and GPS settings to extend battery life during an activity. You
can customize existing power modes and create new custom
power modes.
1
Hold MENU.
2
Select Power Manager > Power Modes.
3
Select an option:
• Select a power mode to customize.
• Select Add New to create a custom power mode.
4
If necessary, enter a custom name.
5
Select an option to customize specific power mode settings.
32 Customizing Your Device