
Owner's Manual


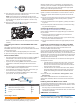


Table Of Contents
- EchoMap UHD Owner’s Manual
- Table of Contents
- Introduction
- Customizing the Chartplotter
- ActiveCaptain App
- Charts and 3D Chart Views
- Navigation Chart and Fishing Chart
- Zooming In and Out of the Chart
- Panning the Chart with the Keys
- Selecting an Item on the Map Using the Device Keys
- Chart Symbols
- Measuring a Distance on the Chart
- Creating a Waypoint on the Chart
- Navigating to a Point on the Chart
- Viewing Location and Object Information on a Chart
- Viewing Details about Navaids
- Heading Line and Angle Markers
- Premium Charts
- Automatic Identification System
- Chart Menu
- Supported Maps
- Navigation Chart and Fishing Chart
- Garmin Quickdraw Contours Mapping
- Mapping a Body of Water Using the Garmin Quickdraw Contours Feature
- Adding a Label to a Garmin Quickdraw Contours Map
- Garmin Quickdraw Community
- Garmin Quickdraw Contours Settings
- Navigation with a Chartplotter
- Basic Navigation Questions
- Destinations
- Waypoints
- Marking Your Present Location as a Waypoint
- Creating a Waypoint at a Different Location
- Marking an MOB Location
- Projecting a Waypoint
- Viewing a List of all Waypoints
- Editing a Saved Waypoint
- Moving a Saved Waypoint
- Browsing for and Navigating to a Saved Waypoint
- Deleting a Waypoint or an MOB
- Deleting All Waypoints
- Routes
- Auto Guidance
- Tracks
- Showing Tracks
- Setting the Color of the Active Track
- Saving the Active Track
- Viewing a List of Saved Tracks
- Editing a Saved Track
- Saving a Track as a Route
- Browsing for and Navigating a Recorded Track
- Deleting a Saved Track
- Deleting All Saved Tracks
- Retracing the Active Track
- Clearing the Active Track
- Managing the Track Log Memory During Recording
- Configuring the Recording Interval of the Track Log
- Boundaries
- Deleting All Saved Waypoints, Routes, and Tracks
- Sailing Features
- Sonar Fishfinder
- Stopping the Transmission of Sonar Signals
- Changing the Sonar View
- Traditional Sonar View
- Garmin ClearVü Sonar View
- SideVü Sonar View
- Panoptix Sonar Views
- Flasher View
- Selecting the Transducer Type
- Selecting a Sonar Source
- Creating a Waypoint on the Sonar Screen
- Pausing the Sonar Display
- Measuring Distance on the Sonar Screen
- Viewing Sonar History
- Sonar Sharing
- Adjusting the Level of Detail
- Adjusting the Color Intensity
- Sonar Recordings
- Traditional, Garmin ClearVü, and SideVü Sonar Setup
- Panoptix Sonar Setup
- Autopilot
- Force™ Trolling Motor Control
- Digital Selective Calling
- Gauges and Graphs
- Digital Switching
- Tide, Current, and Celestial Information
- Media Player
- Opening the Media Player
- Selecting the Media Source
- Playing Music
- Adjusting the Volume
- VHF Radio
- Radio
- DAB Playback
- SiriusXM Satellite Radio
- Setting the Device Name
- Updating the Media Player Software
- Device Configuration
- Sharing and Managing User Data
- Connecting to a Garmin Device to Share User Data
- Selecting a File Type for Third-Party Waypoints and Routes
- Copying User Data from a Memory Card
- Copying User Data to a Memory Card
- Copying Built-In Maps to a Memory Card
- Copying Waypoints, Routes, and Tracks from HomePort to a Chartplotter
- Backing Up Data to a Computer
- Restoring Backup Data to a Chartplotter
- Saving System Information to a Memory Card
- Clearing Saved Data
- Appendix
- Index
- EchoMap UHD Installation Instructions
- Printing a Mounting Template
- Template
- Garmin ClearVu Transducer Transom/Trolling Motor Mount Installation Instructions
- Important Safety and Product Information

Bail Mounting a Device with a Swivel Base
NOTICE
Only pan-head machine bolts or self-tapping screws should be
used to secure the swivel base. If you use screws with
countersunk heads, you may damage the mounting bracket.
Some models have the option of adding a swivel base to the bail
mount, so you can turn the device for a wider range of viewing
angles.
NOTE: The ECHOMAP UHD 9x models do not have a swivel
option.
1
Using the swivel base as a template, mark three pilot
holes .
2
Using a 3 mm (
1
/
8
in.) drill bit, drill the three pilot holes.
3
Using the included wood screws , secure the swivel base
to the mounting surface.
4
Place the bail-mount bracket on the swivel base, and
secure it using the swivel-mount knob .
5
Install the bail-mount knobs on the sides of the cradle.
6
Place the device in the bail-mount bracket and tighten the
bail-mount knobs.
7
Connect each cable to a port on the cradle, using the locking
bracket or locking rings to secure the cables to the cradle
(Connection Considerations, page 2).
Flush Mounting the Device
NOTICE
Be careful when cutting the hole to flush mount the device.
There is only a small amount of clearance between the case and
the mounting holes, and cutting the hole too large could
compromise the stability of the device after it is mounted.
Using a metal pry tool such as a screwdriver can damage the
trim caps and the device. Use a plastic pry tool when possible.
You can mount the device in your dashboard using the flush-
mount template and appropriate hardware.
1
Trim the template and make sure it fits in the location where
you want to mount the device.
2
Secure the template to the mounting location.
3
Using a 9.5 mm (
3
/
8
in.) drill bit, drill one or more of the holes
inside the corners of the solid line on the template to prepare
the mounting surface for cutting.
4
Using a jigsaw or rotary cutting tool, cut the mounting surface
along the inside of the solid line indicated on the template.
5
Place the device into the cutout to test the fit.
6
If necessary, use a file and sandpaper to refine the size of
the hole.
7
If your device has trim caps, use a pry tool, such as a flat
piece of plastic or a screwdriver, to carefully pry up the
corners of the trim caps , slide the pry tool to the center ,
and remove the trim caps.
8
Ensure the mounting holes on the device line up with the pilot
holes on the template.
9
If the mounting holes on the device do not line up with the
pilot holes on the template, mark the new pilot-hole locations
on your template.
10
Using a 3 mm (
1
/
8
in.) drill bit, drill the pilot holes.
11
Remove the template from the mounting surface.
12
Place the device in the cradle.
NOTE: You must use the cradle and locking bracket or
locking rings when you flush-mount the device.
13
If you will not have access to the back of the device after you
mount it, connect all necessary cables to the cradle and
secure the cables with the locking bracket or locking rings
before placing the device into the cutout (Connection
Considerations, page 2).
14
To prevent corrosion of the metal contacts, cover unused
connectors with weather caps.
15
Install the rubber gasket pieces on the back of the device.
The pieces of the rubber gasket have adhesive on the back.
Make sure you remove the protective liner before installing
them on the device.
16
Connect each cable to a port on the cradle, using the locking
bracket or locking rings to secure the cables to the cradle
(Connection Considerations, page 2).
17
Place the device and cradle into the cutout.
18
Secure the device to the mounting surface using the included
screws.
19
Install the trim caps by snapping them in place around the
edges of the device.
Connection Considerations
After connecting the cables to the cradle, tighten the locking
rings to secure each cable.
Connecting the Cables to the ECHOMAP UHD 6x
Cradle
The connectors on the cables are keyed to fit only in the correct
ports on the ECHOMAP UHD 6x cradle. The connected cables
are held in place by a locking bracket.
1
Slide the cable locking bracket up from the bottom, and
remove the bracket from the cradle.
2
Compare the divots on each cable connector to the keying
on each port to determine which cable corresponds to each
port.
2