
Owner's Manual
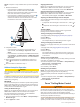
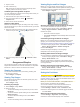

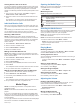
Table Of Contents
- Owner’s Manual
- Table of Contents
- Introduction
- Customizing the Chartplotter
- ActiveCaptain App
- Charts and 3D Chart Views
- Navigation Chart and Fishing Chart
- Premium Charts
- Automatic Identification System
- Chart Menu
- Supported Maps
- Garmin Quickdraw Contours Mapping
- Mapping a Body of Water Using the Garmin Quickdraw Contours Feature
- Adding a Label to a Garmin Quickdraw Contours Map
- Garmin Quickdraw Community
- Garmin Quickdraw Contours Settings
- Navigation with a Chartplotter
- Basic Navigation Questions
- Destinations
- Waypoints
- Marking Your Present Location as a Waypoint
- Creating a Waypoint at a Different Location
- Marking an MOB Location
- Projecting a Waypoint
- Viewing a List of all Waypoints
- Editing a Saved Waypoint
- Moving a Saved Waypoint
- Browsing for and Navigating to a Saved Waypoint
- Deleting a Waypoint or an MOB
- Deleting All Waypoints
- Routes
- Auto Guidance
- Tracks
- Showing Tracks
- Setting the Color of the Active Track
- Saving the Active Track
- Viewing a List of Saved Tracks
- Editing a Saved Track
- Saving a Track as a Route
- Browsing for and Navigating a Recorded Track
- Deleting a Saved Track
- Deleting All Saved Tracks
- Retracing the Active Track
- Clearing the Active Track
- Managing the Track Log Memory During Recording
- Configuring the Recording Interval of the Track Log
- Boundaries
- Deleting All Saved Waypoints, Tracks, Routes, and Boundaries
- Sonar Fishfinder
- Stopping the Transmission of Sonar Signals
- Changing the Sonar View
- Traditional Sonar View
- Garmin ClearVü Sonar View
- SideVü Sonar View
- Panoptix Sonar Views
- Flasher View
- Selecting the Transducer Type
- Selecting a Sonar Source
- Creating a Waypoint on the Sonar Screen
- Pausing the Sonar Display
- Measuring Distance on the Sonar Screen
- Viewing Sonar History
- Sonar Sharing
- Adjusting the Level of Detail
- Adjusting the Color Intensity
- Sonar Recordings
- Traditional, Garmin ClearVü, and SideVü Sonar Setup
- Panoptix Sonar Setup
- Autopilot
- Sailing Features
- Force® Trolling Motor Control
- Gauges and Graphs
- Digital Switching
- Tide, Current, and Celestial Information
- Digital Selective Calling
- Media Player
- Opening the Media Player
- Selecting the Media Source
- Playing Music
- Adjusting the Volume
- VHF Radio
- Radio
- DAB Playback
- SiriusXM® Satellite Radio
- Setting the Device Name
- Updating the Media Player Software
- Device Configuration
- Sharing and Managing User Data
- Appendix
- Index
- ECHOMAP Ultra Installation Instructions
- Transducer Installation Instructions
- Printing a Mounting Template
- ECHOMAP™ Ultra 120 Series Flush Mount Template
- Important Safety and Product Information

safely operating your boat. Avoid navigational hazards and
never leave the helm unattended.
Learn to operate the autopilot on calm and hazard-free open
water.
Use caution when operating the autopilot near hazards in the
water, such as docks, pilings, and other boats.
CAUTION
When using the autopilot features, be prepared for sudden
stops, acceleration, and turns.
When stowing or deploying the motor, be aware of the risk of
entrapment or pinching from moving parts, which can result in
injury.
When stowing or deploying the motor, be aware of slick surfaces
around the motor. Slipping when stowing or deploying the motor
may result in injury.
You can connect the Force trolling motor to the chartplotter to
view and control the motor using the chartplotter.
Connecting to a Trolling Motor
You can connect the chartplotter wirelessly to a compatible
Garmin Force trolling motor on your boat to control the trolling
motor from the chartplotter.
1
Turn on the chartplotter and the trolling motor.
2
Enable the Wi‑Fi network on the chartplotter (Setting Up the
Wi
‑
Fi Wireless Network, page 38).
3
If multiple chartplotters are connected on the Garmin Marine
Network, make sure this chartplotter is the host of the Wi‑Fi
network.
4
On the chartplotter, select Settings > Communications >
Wireless Devices > Garmin Trolling Motor.
5
On the trolling motor display panel, press three times to
enter pairing mode.
on the trolling motor display panel is solid blue as it
searches for a connection to the chartplotter, and turns green
when the connection is successful.
After the chartplotter and trolling motor connect successfully,
enable the trolling motor overlay bar to control the motor (Adding
the Trolling Motor Controls to Screens, page 29).
Adding the Trolling Motor Controls to
Screens
After you have connected the chartplotter to the Force trolling
motor, you must add the trolling motor control bar to screens to
control the trolling motor.
1
Open a screen from which you would like to control the
trolling motor.
2
Select an option:
• From a combination page or SmartMode
™
layout, select
Menu > Edit > Overlay Numbers.
• From a full screen, select Menu > Edit Overlays.
3
Select Top Bar or Bottom Bar.
4
Select Trolling Motor Bar.
Repeat these steps to add the trolling motor controls to all of the
screens from which you would like to control the trolling motor.
Trolling Motor Control Bar
The trolling motor control bar allows you to control a Force
trolling motor and see the status of the motor.
Select an item to engage it. The button illuminates when
selected. Select the item again to disengage it.
Trolling motor battery status.
Turns the propeller on and off.
Reduces the speed.
Speed indicator.
Increases the speed.
Enables the cruise control at the current speed over ground
(SOG).
Engages the propellor at full speed.
Trolling motor status.
Enables anchor lock, which uses the trolling motor to hold your
position.
Steers the trolling motor.
When in anchor lock, jogs the anchor lock position forward,
backward, left, or right.
Enables heading hold (set and maintain the current heading).
When the trolling motor is in heading hold, an autopilot bar
appears in the trolling motor bar.
Opens the trolling motor settings.
Trolling Motor Settings
From the trolling motor bar, select .
Calibrate: Calibrates the trolling motor compass (Calibrating the
Trolling Motor Compass, page 30) and sets the trolling
motor bow offset (Setting the Bow Offset, page 30).
Anchor Gain: Sets the response of the trolling motor when in
anchor lock mode. If you need the trolling motor to be more
responsive and move quicker, increase the value. If the
motor is moving too much, decrease the value.
Navigation Gain: Sets the response of the trolling motor when
navigating. If you need the trolling motor to be more
responsive and move quicker, increase the value. If the
motor is moving too much, decrease the value.
Heading Hold Mode: Sets the heading hold mode. The Vessel
Align option attempts to keep the boat pointing in the same
direction regardless of drift. The Navigate To option attempts
to navigate a straight line in the requested direction.
Arrival Mode: Sets the behavior of the trolling motor when you
reach the end of a route. With the Anchor Lock setting, the
trolling motor holds the position using the anchor lock feature
when the boat reaches the end of the route. With the Manual
setting, the propeller turns off when the boat reaches the end
of the route.
CAUTION
You are responsible for the safe operation of your boat.
When using the Manual setting for the Arrival Mode option,
you must be ready to take control of the boat.
Auto Power On: Turns on the trolling motor when you apply
power to the system.
Prop. Stow Side: Sets which side of the trolling motor the
propellor rotates to when stowing the trolling motor. This is
helpful when you store other items near the stowed propellor.
Shortcut Keys: Enables the shortcut keys on the trolling motor
remote control to work with this particular chartplotter. The
keys work with only one chartplotter at a time.
Restore Defaults: Resets the trolling motor settings to the
factory default values.
Assigning a Shortcut to the Trolling Motor Remote
Control Shortcut Keys
You can quickly open commonly used screens by assigning a
shortcut key on the trolling motor remote control. You can create
a shortcut to screens, such as sonar screens and charts.
NOTE: If you have more than one chartplotter on the network,
you can assign shortcut keys to one chartplotter only.
Force
®
Trolling Motor Control 29