
User Manual


Speed Sensor and Cadence Sensor
Instructions
WARNING
See the Important Safety and Product Information guide in the
product box for product warnings and other important
information.
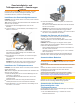
Installing the Speed Sensor
NOTE: If you do not have this sensor, you can skip this task.
TIP: Garmin
®
recommends you secure your bike on a stand
while installing the sensor.
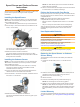
1
Place and hold the speed sensor on top of the wheel hub.
2
Pull the strap
À
around the wheel hub, and attach it to the
hook
Á
on the sensor.
The sensor may be tilted when installed on an asymmetrical
hub. This does not affect operation.
3
Rotate the wheel to check for clearance.
The sensor should not contact other parts of your bike.
NOTE: The LED flashes green for five seconds to indicate
activity after two revolutions.
Installing the Cadence Sensor
NOTE: If you do not have this sensor, you can skip this task.
TIP: Garmin recommends you secure your bike on a stand
while installing the sensor.
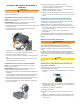
1
Select the band size that fits your crank arm
À
securely.
The band you select should be the smallest one that
stretches across the crank arm.
2
On the non-drive side, place and hold the flat side of the
cadence sensor on the inside of the crank arm.
3
Pull the bands
Á
around the crank arm, and attach them to
the hooks
Â
on the sensor.
4
Rotate the crank arm to check for clearance.
The sensor and bands should not contact any part of your
bike or shoe.
NOTE: The LED flashes green for five seconds to indicate
activity after two revolutions.
5
Take a 15 minute test ride and inspect the sensor and bands
to ensure there is no evidence of damage.
Pairing the Sensors with Your Device
Pairing is the process of connecting an ANT+™ wireless sensor,
like your speed sensor or cadence sensor, with a Garmin
ANT+
compatible device.
NOTE:
The pairing instructions differ for each Garmin
compatible device. See your owner's manual.
• Bring the
Garmin
compatible device within 3 m of the ANT+
sensor.
• Stay 10 m away from other ANT+ sensors while pairing.
After you pair the first time, your
Garmin compatible device
automatically recognizes the
ANT+ sensor each time it is
activated.
User Replaceable Batteries
WARNING
Do not use a sharp object to remove batteries.
Keep the battery away from children.
Never put batteries in mouth. If swallowed, contact your
physician or local poison control center.
Replaceable coin cell batteries may contain perchlorate
material. Special handling may apply. See
www.dtsc.ca.gov.hazardouswaste/perchlorate.
CAUTION
Contact your local waste disposal department to properly
recycle the batteries.
Replacing the Speed Sensor or Cadence
Sensor Battery
The LED flashes red to indicate a low battery level after two
revolutions.
1
Locate the circular battery cover
À
on the back of the
sensor.
2
Twist the cover counter-clockwise until the marker points to
unlocked and the cover is loose enough to remove.
3
Remove the cover and the battery
Á
.
4
Wait 30 seconds.
5
Insert the new battery with the positive side facing up.
NOTE: Do not damage or lose the O-ring gasket.
6
Twist the cover clockwise until the marker points to locked.
NOTE: The LED flashes red and green for a few seconds
after battery replacement. When the LED flashes green and
then stops flashing, the device is active and ready to send
data.
Limited Warranty
The
Garmin
standard limited warranty applies to this accessory.
For more information, go to www.garmin.com/support/warranty
.html.
3