INSTINCT 2 SERIES ® Owner’s Manual
© 2022 Garmin Ltd. or its subsidiaries All rights reserved. Under the copyright laws, this manual may not be copied, in whole or in part, without the written consent of Garmin. Garmin reserves the right to change or improve its products and to make changes in the content of this manual without obligation to notify any person or organization of such changes or improvements. Go to www.garmin.com for current updates and supplemental information concerning the use of this product.
Table of Contents Introduction......................................1 Getting Started........................................ 1 Buttons................................................. 2 Using the Watch.................................. 3 Clearing User Data with the Kill Switch Feature................................. 3 Instinct 2 Series Models......................... 3 Clocks.............................................. 4 Setting an Alarm......................................
Creating a Custom Activity............... 25 Activities and App Settings............... 26 Activity Alerts................................. 28 Enabling Auto Climb...................... 29 Changing the GPS Setting............. 30 Training.......................................... 30 Workouts............................................... 30 Following a Workout From Garmin Connect.............................................. 30 Starting a Workout............................
Calibrating the Barometric Altimeter......................................... 57 Barometer Settings........................... 57 Calibrating the Barometer............. 57 Wireless Sensors...................................58 Pairing Your Wireless Sensors......... 59 Running Dynamics............................ 59 Training with Running Dynamics.. 59 Tips for Missing Running Dynamics Data................................................ 60 inReach Remote................................
Projecting a Waypoint........................... 76 Navigation Settings............................... 76 Customizing Navigation Data Screens.............................................. 76 Heading Settings............................... 76 Setting Navigation Alerts.................. 76 Power Manager Settings................ 77 Customizing the Battery Saver Feature................................................... 77 Changing the Power Mode................... 77 Customizing Power Modes..................
Introduction WARNING See the Important Safety and Product Information guide in the product box for product warnings and other important information. Always consult your physician before you begin or modify any exercise program. Getting Started When using your watch the first time, you should complete these tasks to set it up and get to know the basic features. 1 Press CTRL to turn on the watch (Buttons, page 2). 2 Follow the on-screen instructions to complete the initial setup.
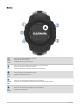
Buttons LIGHT CTRL Press to turn the backlight on and off. Press to turn the device on. Hold to view the controls menu. GPS Press to view the activity list and start or stop an activity. Press to choose an option in a menu. Hold to view GPS coordinates and save your location. BACK SET DOWN ABC UP MENU 2 Press to return to the previous screen. Hold to view the clock menu. Press to scroll through the glance loop and menus. Hold to view the altimeter, barometer, and compass (ABC) screen.
Using the Watch • Hold CTRL to view the controls menu (Controls, page 49). The controls menu provides quick access to frequently used functions, such as turning on do not disturb mode, saving a location, and turning the watch off. • From the watch face, press UP or DOWN to scroll through the glance loop (Glances, page 38). • From the watch face, press GPS to start an activity or open an app (Activities and Apps, page 7).
Clocks Setting an Alarm You can set multiple alarms. You can set each alarm to sound once or to repeat regularly. 1 From any screen, hold SET. 2 Select Alarms. 3 Enter the alarm time. 4 Select Repeat, and select when the alarm should repeat (optional). 5 Select Sound and Vibe, and select a type of notification (optional). 6 Select Backlight > On to turn on the backlight with the alarm (optional). 7 Select Label, and select a description for the alarm (optional).
Using the Stopwatch 1 2 3 4 From any screen, hold SET. Select Stopwatch. Press GPS to start the timer. Press SET to restart the lap timer . The total stopwatch time continues running. 5 Press GPS to stop both timers. 6 Press UP, and select an option. Syncing the Time with GPS Each time you turn on the device and acquire satellites, the device automatically detects your time zones and the current time of day.
Setting Alerts 1 From any screen, hold SET. 2 Select Alerts. 3 Select an option: • To set an alert to sound a specific number of minutes or hours before the actual sunset occurs, select Til Sunset > Status > On, select Time, and enter the time. • To set an alert to sound a specific number of minutes or hours before the actual sunrise occurs, select Til Sunrise > Status > On, select Time, and enter the time.
Starting a Trucker Health Activity You can follow preloaded workouts designed to be done during your driving breaks. 1 From the watch face, press GPS. 2 Select Trucker Health. 3 Select a workout type. 4 Select a workout duration. 5 If necessary, open the dēzl app to view exercise tutorials. 6 Press GPS to start the workout. After you begin a workout, the device displays each step of the workout, the time left for each step, and your current heart rate.
Starting an Activity When you start an activity, GPS turns on automatically (if required). 1 From the watch face, press GPS. 2 If this is the first time you are starting an activity, select the checkbox next to each activity to add to your favorites, and select Done. 3 Select an option: • Select an activity from your favorites. • Select , and select an activity from the extended activity list.
Running Going for a Track Run Before you go for a track run, make sure you are running on a standard-shape, 400 m track. You can use the track run activity to record your outdoor track data, including distance in meters and lap splits. 1 Stand on the outdoor track. 2 From the watch face, press GPS. 3 Select Track Run. 4 Wait while the watch locates satellites. 5 If you are running in lane 1, skip to step 11. 6 Press MENU. 7 Select the activity settings. 8 Select Lane Number. 9 Select a lane number.
Calibrating the Treadmill Distance To record more accurate distances for your treadmill runs, you can calibrate the treadmill distance after you run at least 1.5 km (1 mi.) on a treadmill. If you use different treadmills, you can manually calibrate the treadmill distance on each treadmill or after each run. 1 Start a treadmill activity (Starting an Activity, page 8). 2 Run on the treadmill until your watch records at least 1.5 km (1 mi.).
Tips for Swimming Activities • Press SET to record an interval during open water swimming. • Before starting a pool swimming activity, follow the on-screen instructions to select your pool size or enter a custom size. The watch measures and records distance by completed pool lengths. The pool size must be correct to display accurate distance. The next time you start a pool swimming activity, the watch uses this pool size.
Triathlon Training When you participate in a triathlon, you can use the triathlon activity to quickly transition to each sport segment, to time each segment, and to save the activity. 1 From the watch face, press GPS. 2 Select Triathlon. 3 Press GPS to start the activity timer. 4 Press SET at the beginning and end of each transition. The transition feature is on by default, and the transition time is recorded separately from the activity time.
Recording a Strength Training Activity You can record sets during a strength training activity. A set is multiple repetitions (reps) of a single move. 1 From the watch face, press GPS. 2 Select Strength. The first time you record a strength training activity, you must select which wrist your watch is on. 3 Press GPS to start the set timer. 4 Start your first set. The device counts your reps. Your rep count appears when you complete at least four reps.
Using an ANT+ Indoor Trainer ® Before you can use a compatible ANT+ indoor trainer, you must pair the trainer with your watch (Pairing Your Wireless Sensors, page 59). You can use your watch with an indoor trainer to simulate resistance while following a course, ride, or workout. While using an indoor trainer, GPS is turned off automatically. 1 From the watch face, press GPS. 2 Select Bike Indoor. 3 Press MENU. 4 Select Smart Trainer Options. 5 Select an option: • Select Free Ride to go for a ride.
Recording a Bouldering Activity You can record routes during a bouldering activity. A route is a climbing path along a boulder or small rock formation. 1 From the watch face, press GPS. 2 Select Bouldering. 3 Select a grading system. NOTE: The next time you start a bouldering activity, the watch uses this grading system. You can hold MENU, select the activity settings, and select Grading System to change the system. 4 Select the difficulty level for the route. 5 Press GPS to start the route timer.
Going Hunting You can save locations relevant to your hunt and view a map of saved locations. During a hunting activity, the device uses a GNSS mode that conserves battery life. 1 From the watch face, press GPS. 2 Select Hunt. 3 From the map, press GPS, and select Start Hunt. 4 Press GPS, and select an option: • To save your current location, select Save Location. • To view locations saved during this hunt activity, select Hunt Locations. • To view all previously saved locations, select Saved Locations.
Recording a Backcountry Skiing Activity The backcountry skiing activity lets you manually switch between climbing and descending tracking modes so you can accurately track your statistics. 1 From the watch face, press GPS. 2 Select Backcountry Ski. 3 Select an option: • If you are starting your activity on a climb, select Climbing. • If you are starting your activity moving downhill, select Descending. 4 Press GPS to start the activity timer.
Golfing Playing Golf Before you play a course for the first time, you must download it from the Garmin Connect app (Garmin Connect, page 64). Courses downloaded from the Garmin Connect app are updated automatically. Before you play golf, you should charge the watch (Charging the Watch, page 80). 1 From the watch face, press GPS. 2 Select Golf. 3 Go outside, and wait while the watch locates satellites. 4 Select a course from the list of available courses. 5 Select to keep score. 6 Select a tee box.
Golf Menu During a round, you can press GPS to open additional features in the golf menu. End Round: Ends the current round. Pause Round: Pauses the current round. You can resume the round at any time by starting a Golf activity. Change Hole: Allows you to manually change the hole. Move Flag: Allows you to move the pin location to get a more precise distance measurement (Moving the Flag, page 20).
Moving the Flag You can take a closer look at the green and move the pin location. 1 From the hole information screen, press GPS. 2 Select Move Flag. 3 Press UP or DOWN to move the pin location. 4 Press GPS. The distances on the hole information screen are updated to show the new pin location. The pin location is saved for only the current round. Changing Holes You can change holes manually from the hole view screen. 1 While playing golf, press GPS. 2 Select Change Hole. 3 Select a hole.
Keeping Score 1 From the hole information screen, press GPS. 2 Select Scorecard. The scorecard appears when you are on the green. 3 Press UP or DOWN to scroll through the holes. 4 Press GPS to select a hole. 5 Press UP or DOWN to set the score. Your total score is updated. Enabling Statistics Tracking The Stat Tracking feature enables detailed statistics tracking while playing golf. 1 From the hole information screen, hold MENU. 2 Select the activity settings. 3 Select Stat Tracking.
Jump Types The jumpmaster feature allows you to set the jump type to one of three types: HAHO, HALO, or Static. The jump type selected determines what additional setup information is required (Entering Jump Information, page 22). For all jump types, drop altitudes and opening altitudes are measured in feet above ground level (AGL). HAHO: High Altitude High Opening. The jumpmaster jumps from a very high altitude and opens the parachute at a high altitude.
Entering Wind Information for a Static Jump 1 2 3 4 Press GPS. Select Jumpmaster > Static > Wind. Enter a wind speed in knots and select Done. Enter a wind direction in degrees and select Done. Constant Settings Select Jumpmaster, select a jump type, and select Constant. Percent Max.: Sets the jump range for all jump types. A setting less than 100% decreases the drift distance to the DIP, and a setting greater than 100% increases the drift distance.
Viewing Tide Information WARNING Tide information is for information purposes only. It is your responsibility to heed all posted water-related guidance, to remain aware of your surroundings, and to use safe judgment in, on, and around the water at all times. Failure to heed this warning could result in serious personal injury or death. NOTE: This feature is only available on Instinct 2 - Surf Edition models.
Changing the Order of an Activity in the Apps List 1 2 3 4 5 Hold MENU. Select Activities & Apps. Select an activity. Select Reorder. Press UP or DOWN to adjust the position of the activity in the apps list. Customizing the Data Screens You can show, hide, and change the layout and content of data screens for each activity. 1 Hold MENU. 2 Select Activities & Apps. 3 Select the activity to customize. 4 Select the activity settings. 5 Select Data Screens. 6 Select a data screen to customize.
Activities and App Settings These settings allow you to customize each preloaded activity app based on your needs. For example, you can customize data pages and enable alerts and training features. Not all settings are available for all activity types. Hold MENU, select Activities & Apps, select an activity, and select the activity settings. 3D Distance: Calculates your distance traveled using your elevation change and your horizontal movement over ground.
Power Save Timeout: Sets the power-save timeout length for how long your watch stays in training mode, for example, when you are waiting for a race to start. The Normal option sets the watch to enter low-power watch mode after 5 minutes of inactivity. The Extended option sets the watch to enter low-power watch mode after 25 minutes of inactivity. The extended mode can result in shorter battery life between charges. Record Activity: Enables activity FIT file recording for golf activities.
Activity Alerts You can set alerts for each activity, which can help you to train toward specific goals, to increase your awareness of your environment, and to navigate to your destination. Some alerts are available only for specific activities. There are three types of alerts: event alerts, range alerts, and recurring alerts. Event alert: An event alert notifies you once. The event is a specific value. For example, you can set the watch to alert you when you burn a specified number of calories.
Setting an Alert 1 Hold MENU. 2 Select Activities & Apps. 3 Select an activity. NOTE: This feature is not available for all activities. 4 Select the activity settings. 5 Select Alerts. 6 Select an option: • Select Add New to add a new alert for the activity. • Select the alert name to edit an existing alert. 7 If necessary, select the type of alert. 8 Select a zone, enter the minimum and maximum values, or enter a custom value for the alert. 9 If necessary, turn on the alert.
Changing the GPS Setting For more information about GPS, go to garmin.com/aboutGPS. 1 Hold MENU. 2 Select Activities & Apps. 3 Select an activity. NOTE: This feature is not available for all activities. 4 Select the activity settings. 5 Select GPS. 6 Select an option: • Select Off to disable GPS for the activity. • Select Normal (GPS Only) to enable the GPS satellite system. • Select GPS + GLONASS (Russian satellite system) for more accurate position information in situations with poor sky visibility.
Starting a Workout Before you can start a workout, you must download a workout from your Garmin Connect account. 1 From the watch face, press GPS. 2 Select an activity. 3 Hold MENU. 4 Select Training > Workouts. 5 Select a workout. NOTE: Only workouts that are compatible with the selected activity appear in the list. 6 Select Do Workout. 7 Press GPS to start the activity timer.
Starting an Interval Workout 1 From the watch face, press GPS. 2 Select an activity. 3 Hold MENU. 4 Select Training > Intervals > Do Workout. 5 Press GPS to start the activity timer. 6 When your interval workout has a warm up, press SET to begin the first interval. 7 Follow the on-screen instructions. After you complete all of the intervals, a message appears.
Starting a PacePro Plan Before you can start a PacePro plan, you must download a plan from your Garmin Connect account. 1 From the watch face, press GPS. 2 Select an outdoor running activity. 3 Hold MENU. 4 Select Training > PacePro Plans. 5 Select a plan. 6 Press GPS. TIP: You can preview the splits, elevation plot, and the map before you accept the PacePro plan. 7 Select Accept Plan to start the plan. 8 If necessary, select to enable course navigation. 9 Press GPS to start the activity timer.
Using Virtual Partner ® Your Virtual Partner is a training tool designed to help you meet your goals. You can set a pace for the Virtual Partner and race against it. NOTE: This feature is not available for all activities. 1 Hold MENU. 2 Select Activities & Apps. 3 Select an activity. 4 Select the activity settings. 5 Select Data Screens > Add New > Virtual Partner. 6 Enter a pace or speed value. 7 Press UP or DOWN to change the location of the Virtual Partner screen (optional).
History History includes time, distance, calories, average pace or speed, lap data, and optional sensor information. NOTE: When the device memory is full, your oldest data is overwritten. Using History History contains previous activities you have saved on your watch. 1 From the watch face, hold MENU. 2 Select History > Activities. 3 Select an activity. 4 Press GPS. 5 Select an option: • To view additional information about the activity, select All Stats.
Restoring a Personal Record You can set each personal record back to the one previously recorded. 1 From the watch face, hold MENU. 2 Select History > Records. 3 Select a sport. 4 Select a record to restore. 5 Select Previous > . NOTE: This does not delete any saved activities. Clearing Personal Records 1 2 3 4 From the watch face, hold MENU. Select History > Records. Select a sport.
Customizing the Watch Face You can customize the watch face information and appearance. 1 From the watch face, hold MENU. 2 Select Watch Face. 3 Press UP or DOWN to preview the watch face options. 4 Press GPS. 5 Select an option: • To activate the watch face, select Apply. • To customize the data that appears on the watch face, select Customize, press UP or DOWN to preview the options, and press GPS.
Glances Your watch comes preloaded with glances that provide quick information (Viewing the Glance Loop, page 40). Some glances require a Bluetooth connection to a compatible phone. Some glances are not visible by default. You can add them to the glance loop manually (Customizing the Glance Loop, page 40). ® Name Description ABC Displays combined altimeter, barometer, and compass information.
Name Description Last run Last swim Moon phase Displays the moonrise and moonset times, along with the moon phase, based on your GPS position. Music controls Provides music player controls for your phone. My Love Rewards Displays your Love's rewards information on your Instinct 2 - dēzl Edition watch. NOTE: This feature is not available for all product models.
Viewing the Glance Loop Glances provide quick access to health data, activity information, built-in sensors, and more. When you pair your watch, you can view data from your phone, such as notifications, weather, and calendar events. 1 Press UP or DOWN. The watch scrolls through the glance loop and displays summary data for each glance. 2 Press GPS to view more information. 3 Select an option: • Press DOWN to view details about a glance. • Press GPS to view additional options and functions for a glance.
Performance Measurements These performance measurements are estimates that can help you track and understand your training activities and race performances. The measurements require a few activities using wrist-based heart rate or a compatible chest heart rate monitor. Cycling performance measurements require a heart rate monitor and a power meter. These estimates are provided and supported by Firstbeat Analytics™. For more information, go to garmin.com /performance-data/running.
Getting Your VO2 Max. Estimate for Cycling This feature requires a power meter and wrist-based heart rate or a compatible chest heart rate monitor. The power meter must be paired with your watch (Pairing Your Wireless Sensors, page 59). If you are using a chest heart rate monitor, you must put it on and pair it with your watch. For the most accurate estimate, complete the user profile setup (Setting Up Your User Profile, page 67) and set your maximum heart rate (Setting Your Heart Rate Zones, page 68).
Getting Your FTP Estimate Before you can get your functional threshold power (FTP) estimate, you must pair a chest heart rate monitor and power meter with your watch (Pairing Your Wireless Sensors, page 59), and you must get your VO2 max. estimate (Getting Your VO2 Max. Estimate for Cycling, page 42). The watch uses your user profile information from the initial setup and your VO2 max. estimate to estimate your FTP.
Performing a Guided Test to Determine Your Lactate Threshold This feature requires a Garmin chest heart rate monitor. Before you can perform the guided test, you must put on a heart rate monitor and pair it with your device (Pairing Your Wireless Sensors, page 59). The device uses your user profile information from the initial setup and your VO2 max. estimate to estimate your lactate threshold.
Training Status Levels Training status shows you how your training affects your fitness level and performance. Your training status is based on changes to your training load and VO2 max. over an extended time period. You can use your training status to help plan future training and continue improving your fitness level. Peaking: Peaking means that you are in ideal race condition. Your recently reduced training load is allowing your body to recover and fully compensate for earlier training.
Training Load Focus In order to maximize performance and fitness gains, training should be distributed across three categories: low aerobic, high aerobic, and anaerobic. Training load focus shows you how much of your training is currently in each category and provides training targets. Training load focus requires at least 7 days of training to determine if your training load is low, optimal, or high.
About Training Effect Training Effect measures the impact of an activity on your aerobic and anaerobic fitness. Training Effect accumulates during the activity. As the activity progresses, the Training Effect value increases. Training Effect is determined by your user profile information and training history, and heart rate, duration, and intensity of your activity. There are seven different Training Effect labels to describe the primary benefit of your activity.
Pausing and Resuming Your Training Status If you are injured or sick, you can pause your training status. You can continue to record fitness activities, but your training status, training load focus, recovery feedback, and workout recommendations are temporarily disabled. You can resume your training status when you are ready to start training again. For best results, you need at least two VO2 max. measurements each week (About VO2 Max. Estimates, page 41).
Controls The controls menu lets you quickly access watch features and options. You can add, reorder, and remove the options in the controls menu (Customizing the Controls Menu, page 50). From any screen, hold CTRL. Icon Name Description Alarm Clock Select to add or edit an alarm (Setting an Alarm, page 4). Altimeter Select to open the altimeter screen. Alt. Time Zones Select to view the current time of day in additional time zones (Adding Alternate Time Zones, page 5).
Icon Name Description Lock Keys Select to lock the buttons to prevent inadvertent presses. Moon Phase Select to view moonrise and moonset times, along with the moon phase, based on your GPS position. Music Controls Select to control music playback on your phone. Night Vision Select to reduce backlight intensity for compatibility with night vision goggles and disable the wrist heart rate monitor. NOTE: This feature is not available for all product models.
Music Playback Controls NOTE: Music playback controls may look different, depending on the selected music source. Select to view more music playback controls. Select to browse the audio files and playlists for the selected source. Select to adjust the volume. Select to play and pause the current audio file. Select to skip to the next audio file in the playlist. Hold to fast forward through the current audio file. Select to restart the current audio file.
Paying for a Purchase Using Your Watch Before you can use your watch to pay for purchases, you must set up at least one payment card. You can use your watch to pay for purchases in a participating location. 1 Hold CTRL. 2 Select . 3 Enter your four-digit passcode. NOTE: If you enter your passcode incorrectly three times, your wallet locks, and you must reset your passcode in the Garmin Connect app. Your most recently used payment card appears.
Wrist Heart Rate Your watch has a wrist-based heart rate monitor, and you can view your heart rate data on the heart rate glance (Viewing the Glance Loop, page 40). The watch is also compatible with chest heart rate monitors. If both wrist-based heart rate and chest heart rate data are available when you start an activity, your watch uses the chest heart rate data.
Wrist Heart Rate Monitor Settings Hold MENU, and select Sensors & Accessories > Wrist Heart Rate. Status: Enables or disables the wrist heart rate monitor. The default value is Auto, which automatically uses the wrist heart rate monitor unless you pair an external heart rate monitor. NOTE: Disabling the wrist heart rate monitor also disables the wrist-based pulse oximeter sensor. You can perform a manual reading from the pulse oximeter glance.
Pulse Oximeter The Instinct 2 watch has a wrist-based pulse oximeter to gauge the saturation of oxygen in your blood. Knowing your oxygen saturation can be valuable in understanding your overall health and help you determine how your body is adapting to altitude. Your watch gauges your blood oxygen level by shining light into the skin and checking how much light is absorbed. This is referred to as SpO2. On the watch, your pulse oximeter readings appear as an SpO2 percentage.
Compass Settings Hold MENU, and select Sensors & Accessories > Compass. Calibrate: Allows you to manually calibrate the compass sensor (Calibrating the Compass Manually, page 56). Display: Sets the directional heading on the compass to letters, degrees, or milliradians. North Ref.: Sets the north reference of the compass (Setting the North Reference, page 56).
Calibrating the Barometric Altimeter Your watch was already calibrated at the factory, and the watch uses automatic calibration at your GPS starting point by default. You can manually calibrate the barometric altimeter if you know the correct elevation. 1 Hold MENU. 2 Select Sensors & Accessories > Altimeter. 3 Select an option: • To calibrate automatically from your GPS starting point, select Auto Cal., and select an option. • To enter the current elevation manually, select Calibrate > Enter Manually.
Wireless Sensors Your watch can be paired and used with wireless ANT+ or Bluetooth sensors (Pairing Your Wireless Sensors, page 59). After the devices are paired, you can customize the optional data fields (Customizing the Data Screens, page 25). If your watch was packaged with a sensor, they are already paired. For information about specific Garmin sensor compatibility, purchasing, or to view the owner's manual, go to buy.garmin.com for that sensor.
Pairing Your Wireless Sensors The first time you connect a wireless sensor to your watch using ANT+ or Bluetooth technology, you must pair the watch and sensor. If the sensor has both ANT+ and Bluetooth technology, Garmin recommends that you pair using ANT+ technology. After they are paired, the watch connects to the sensor automatically when you start an activity and the sensor is active and within range. 1 If you are pairing a heart rate monitor, put on the heart rate monitor.
Tips for Missing Running Dynamics Data If running dynamics data does not appear, you can try these tips. • Make sure you have a running dynamics accessory, such as the HRM-Pro accessory. Accessories with running dynamics have on the front of the module. • Pair the running dynamics accessory with your watch again, according to the instructions. • If you are using the HRM-Pro accessory, pair it with your watch using ANT+ technology, rather than Bluetooth technology.
Controlling a VIRB Action Camera Before you can use the VIRB remote function, you must enable the remote setting on your VIRB camera. See the VIRB Series Owner's Manual for more information. 1 Turn on your VIRB camera. 2 Pair your VIRB camera with your Instinct watch (Pairing Your Wireless Sensors, page 59). The VIRB glance is automatically added to the glance loop. 3 Press UP or DOWN from the watch face to view the VIRB glance. 4 If necessary, wait while your watch connects to your camera.
Xero Laser Location Settings Before you can customize laser location settings, you must pair a compatible Xero device (Pairing Your Wireless Sensors, page 59). Hold MENU, and select Sensors & Accessories > XERO Laser Locations > Laser Locations. During Activity: Enables the display of laser location information from a compatible, paired Xero device during an activity. Share Mode: Allows you to share laser location information publicly or broadcast it privately. Map represents your location on the map.
Pairing Your Phone with Your Watch To use the connected features of the Instinct watch, it must be paired directly through the Garmin Connect app, instead of from the Bluetooth settings on your phone. 1 From the app store on your phone, install and open the Garmin Connect app. 2 Bring your phone within 10 m (33 ft.) of your watch. 3 Select an option to enable pairing mode on your watch: • During the initial setup, select when you are prompted to pair with your smartphone.
Replying to a Text Message NOTE: This feature is available only for compatible Android phones. When you receive a text message notification on your watch, you can send a quick reply by selecting from a list of messages. You can customize messages in the Garmin Connect app. NOTE: This feature sends text messages using your phone. Regular text message limits and charges from your carrier and phone plan may apply. Contact your mobile carrier for more information about text message charges or limits.
Plan your training: You can choose a fitness goal and load one of the day-by-day training plans. Track your progress: You can track your daily steps, join a friendly competition with your connections, and meet your goals. Share your activities: You can connect with friends to follow each other's activities or post links to your activities on your favorite social networking sites. Manage your settings: You can customize your watch and user settings on your Garmin Connect account.
Using Garmin Connect on Your Computer The Garmin Express™ application connects your watch to your Garmin Connect account using a computer. You can use the Garmin Express application to upload your activity data to your Garmin Connect account and to send data, such as workouts or training plans, from the Garmin Connect website to your watch. You can also install software updates and manage your Connect IQ apps. 1 Connect the watch to your computer using the USB cable. 2 Go to garmin.com/express.
Garmin Golf™ App The Garmin Golf app allows you to upload scorecards from your compatible Garmin device to view detailed statistics and shot analyses. Golfers can compete with each other at different courses using the Garmin Golf app. More than 42,000 courses have leaderboards that anyone can join. You can set up a tournament event and invite players to compete. The Garmin Golf app syncs your data with your Garmin Connect account.
Setting Your Heart Rate Zones The watch uses your user profile information from the initial setup to determine your default heart rate zones. You can set separate heart rate zones for sport profiles, such as running, cycling, and swimming. For the most accurate calorie data during your activity, set your maximum heart rate. You can also set each heart rate zone and enter your resting heart rate manually. You can manually adjust your zones on the watch or using your Garmin Connect account. 1 Hold MENU.
Heart Rate Zone Calculations Zone % of Maximum Heart Rate Perceived Exertion Benefits 1 50–60% Relaxed, easy pace, rhythmic breathing Beginning-level aerobic training, reduces stress 2 60–70% Comfortable pace, slightly deeper breathing, conversation possible Basic cardiovascular training, good recovery pace 3 70–80% Moderate pace, more difficult to hold conversation Improved aerobic capacity, optimal cardiovascular training 4 80–90% Fast pace and a bit uncomfortable, breathing forceful Im
Safety and Tracking Features CAUTION The safety and tracking features are supplemental features and should not be relied on as a primary method to obtain emergency assistance. The Garmin Connect app does not contact emergency services on your behalf. NOTICE To use the safety and tracking features, the Instinct 2 watch must be connected to the Garmin Connect app using Bluetooth technology. Your paired phone must be equipped with a data plan and be in an area of network coverage where data is available.
Requesting Assistance NOTE: Your paired phone must be equipped with a data plan and be in an area of network coverage where data is available. Before you can request assistance, you must set up emergency contacts (Adding Emergency Contacts, page 70). Your emergency contacts must be able to receive emails or text messages (standard text messaging rates may apply). 1 Hold CTRL. 2 When you feel three vibrations, release the button to activate the assistance feature. The countdown screen appears.
Earning Intensity Minutes Your Instinct 2 watch calculates intensity minutes by comparing your heart rate data to your average resting heart rate. If heart rate is turned off, the watch calculates moderate intensity minutes by analyzing your steps per minute. • Start a timed activity for the most accurate calculation of intensity minutes. • Wear your watch all day and night for the most accurate resting heart rate.
Navigating to the Starting Point of a Saved Activity You can navigate back to the starting point of a saved activity in a straight line or along the path you traveled. This feature is available only for activities that use GPS. 1 From the watch face, press GPS. 2 Select an activity. 3 Hold MENU. 4 Select Navigation > Activities. 5 Select an activity. 6 Select Back to Start, and select an option: • To navigate back to the starting point of your activity along the path you traveled, select TracBack.
Navigating with Sight 'N Go You can point the device at an object in the distance, such as a water tower, lock in the direction, and then navigate to the object. 1 From the watch face, press GPS. 2 Select an activity. 3 Hold MENU. 4 Select Navigation > Sight 'N Go. 5 Point the top of the watch at an object, and press GPS. Navigation information appears. 6 Press GPS to begin navigation.
Creating a Course on Garmin Connect Before you can create a course on the Garmin Connect app, you must have a Garmin Connect account (Garmin Connect, page 64). 1 From the Garmin Connect app, select or . 2 Select Training > Courses > Create Course. 3 Select a course type. 4 Follow the on-screen instructions. 5 Select Done. NOTE: You can send this course to your device (Sending a Course to Your Device, page 75).
Projecting a Waypoint You can create a new location by projecting the distance and bearing from your current location to a new location. NOTE: You may need to add the Project Wpt. app to the activities and apps list. 1 From the watch face, press GPS. 2 Select Project Wpt.. 3 Press UP or DOWN to set the heading. 4 Press GPS. 5 Press DOWN to select a unit of measure. 6 Press UP to enter the distance. 7 Press GPS to save. The projected waypoint is saved with a default name.
Power Manager Settings Hold MENU, and select Power Manager. Battery Saver: Allows you to customize system settings to extend battery life in watch mode (Customizing the Battery Saver Feature, page 77). Power Modes: Allows you to customize system settings, activity settings, and GPS settings to extend battery life during an activity (Customizing Power Modes, page 77).
Restoring a Power Mode You can reset a preloaded power mode to the factory default settings. 1 Hold MENU. 2 Select Power Manager > Power Modes. 3 Select a preloaded power mode. 4 Select Restore > . System Settings Hold MENU, and select System. Language: Sets the language displayed on the watch. Time: Adjusts the time settings (Time Settings, page 78). Backlight: Adjusts the screen settings (Changing the Screen Settings, page 79).
Changing the Screen Settings 1 2 3 4 Hold MENU. Select System > Backlight. Select Night Vision to reduce the backlight intensity for compatibility with night vision goggles (optional). Select an option: • Select During Activity. • Select General Use. • Select During Sleep. 5 Select an option: • Select Brightness to set the brightness level of the screen. NOTE: If you enable night vision mode, you cannot adjust the brightness level. • Select Keys to turn on the screen for button presses.
Viewing E-label Regulatory and Compliance Information The label for this device is provided electronically. The e-label may provide regulatory information, such as identification numbers provided by the FCC or regional compliance markings, as well as applicable product and licensing information. 1 Hold MENU. 2 From the system menu, select About. Device Information Charging the Watch WARNING This device contains a lithium-ion battery.
Tips for Solar Charging To maximize the battery life of your watch, follow these tips. • When you are wearing the watch, avoid covering the face with your sleeve. • When you are not wearing the watch, point the face toward sunlight. NOTE: The watch protects itself from overheating and stops charging automatically if the internal temperature exceeds the solar charging temperature threshold (Specifications, page 81).
Cleaning the Watch CAUTION Some users may experience skin irritation after prolonged use of the watch, especially if the user has sensitive skin or allergies. If you notice any skin irritation, remove the watch and give your skin time to heal. To help prevent skin irritation, ensure the watch is clean and dry, and do not overtighten the watch on your wrist. NOTICE Even small amounts of sweat or moisture can cause corrosion of the electrical contacts when connected to a charger.
Changing the Spring Bar Bands You can replace the bands with new Instinct 2 bands or compatible QuickFit 22 bands. 1 Use the pin tool to push in the watch pin. ® 2 Remove the band from the watch.
3 Select an option: • To install Instinct 2 bands, align one side of the new band with the holes on the watch, push in the exposed watch pin, and press the band into place. NOTE: Make sure the band is secure. The watch pin should align with the holes on the watch. • To install QuickFit 22 bands, remove the watch pin from the Instinct 2 band, replace the watch pin on the watch, and press the new band into place.
NOTE: Make sure the band is secure. The latch should close over the watch pin. 4 Repeat the steps to change the other band. Data Management NOTE: The device is not compatible with Windows 95, 98, Me, Windows NT , and Mac OS 10.3 and earlier. ® ® ® Deleting Files NOTICE If you do not know the purpose of a file, do not delete it. Your device memory contains important system files that should not be deleted. 1 2 3 4 Open the Garmin drive or volume. If necessary, open a folder or volume. Select a file.
Is my phone compatible with my watch? The Instinct 2 watch is compatible with phones using Bluetooth technology. Go to garmin.com/ble for Bluetooth compatibility information. My phone will not connect to the watch If your phone will not connect to the watch, you can try these tips. • Turn off your phone and your watch, and turn them back on again. • Enable Bluetooth technology on your phone. • Update the Garmin Connect app to the latest version.
Tips for Maximizing the Battery Life To extend the life of the battery, you can try these tips. • Change the power mode during an activity (Changing the Power Mode, page 77). • Turn on the battery saver feature from the controls menu (Controls, page 49). • Reduce the screen timeout (Changing the Screen Settings, page 79). • Reduce the screen brightness (Changing the Screen Settings, page 79). • Use UltraTrac satellite mode for your activity.
My daily step count does not appear The daily step count is reset every night at midnight. If dashes appear instead of your step count, allow the device to acquire satellite signals and set the time automatically. My step count does not seem accurate If your step count does not seem accurate, you can try these tips. • Wear the watch on your non-dominant wrist. • Carry the watch in your pocket when pushing a stroller or lawn mower.
Appendix Data Fields NOTE: Not all data fields are available for all activity types. Some data fields require ANT+ or Bluetooth accessories to display data. Some data fields appear in more than one category on the watch. TIP: You can also customize the data fields from the watch settings in the Garmin Connect app. Cadence Fields Name Description Avg. Cadence Cycling. The average cadence for the current activity. Avg. Cadence Running. The average cadence for the current activity. Cadence Cycling.
Elevation Fields Name Description Avg. Ascent The average vertical distance of ascent since the last reset. Avg. Descent The average vertical distance of descent since the last reset. Elevation The altitude of your current location above or below sea level. Glide Ratio The ratio of horizontal distance traveled to the change in vertical distance. GPS Elevation The altitude of your current location using GPS. Grade The calculation of rise (elevation) over run (distance).
Heart Rate Fields Name Description %HRR The percentage of heart rate reserve (maximum heart rate minus resting heart rate). Aerobic TE The impact of the current activity on your aerobic fitness level. Anaerobic TE The impact of the current activity on your anaerobic fitness level. Avg. %HRR The average percentage of heart rate reserve (maximum heart rate minus resting heart rate) for the current activity. Average HR The average heart rate for the current activity. Avg HR %Max.
Name Description Move % Heart Rate Reserve The average percentage of heart rate reserve (maximum heart rate minus resting heart rate) for the current move. Move Heart Rate The average heart rate in the current move. Move Heart Rate %Max. The average percentage of maximum heart rate for the current move. Time in Zone The time elapsed in each heart rate zone. Lengths Fields Name Description Interval Lengths The number of pool lengths completed during the current interval.
Name Description VMG The speed at which you are closing on a destination along a route. You must be navi gating for this data to appear. V Dist to Dest The elevation distance between your current position and the final destination. You must be navigating for this data to appear. Vert Spd to Tgt The rate of ascent or descent to a predetermined altitude. You must be navigating for this data to appear. Other Fields Name Description Active Calories The calories burned during the activity.
Pace Fields Name Description 500m Pace The current rowing pace per 500 meters. Avg. 500m Pace The average rowing pace per 500 meters for the current activity. Average Pace The average pace for the current activity. Int. Pace The average pace for the current interval. Lap 500m Pace The average rowing pace per 500 meters for the current lap. Lap Pace The average pace for the current lap. LL 500m Pace The average rowing pace per 500 meters for the last lap.
Power Fields Name Description % FTP The current power output as a percentage of functional threshold power. 3s Avg. Balance The 3-second moving average of the left/right power balance. 3s Avg. Power The 3-second moving average of power output. 10s Avg Balance The 10-second moving average of the left/right power balance. 10s Avg. Power The 10-second moving average of power output. 30s Avg Balance The 30-second moving average of the left/right power balance. 30s Avg.
Name Description NP The Normalized Power for the current activity. Pedal Smooth. The measurement of how evenly a rider is applying force to the pedals throughout each pedal stroke. PCO The platform center offset. Platform center offset is the location on the pedal platform where force is applied. Power Cycling. The current power output in watts. Power to Weight The current power measured in watts per kilogram.
Run Dynamics Name Description Avg. GCT Bal. The average ground contact time balance for the current session. Avg GCT The average amount of ground contact time for the current activity. Avg. Stride Len. The average stride length for the current session. Avg. Vert. Osc. The average amount of vertical oscillation for the current activity. Avg. Vert. Ratio The average ratio of vertical oscillation to stride length for the current session.
Speed Fields Name Description Avg. Moving Speed The average speed when moving for the current activity. Avg. Overall Speed The average speed for the current activity, including both moving and stopped speeds. Avg. Speed The average speed for the current activity. Avg. Nautical SOG The average speed of travel in knots for the current activity, regardless of the course steered and temporary variations in heading. Nautical Avg. Speed The average speed in knots for the current activity.
Stroke Fields Name Description Avg Dist Per Stk Swimming. The average distance traveled per stroke during the current activity. Avg Dist Per Stk Paddle sports. The average distance traveled per stroke during the current activity. Avg. Strk Rate Paddle sports. The average number of strokes per minute (spm) during the current activity. Avg. Strk Rate Swimming. The average number of strokes per minute (spm) during the current activity. Avg.
Swolf Fields Name Description Average Swolf The average swolf score for the current activity. Your swolf score is the sum of the time for one length plus the number of strokes for that length (Swim Terminology, page 10). In open water swimming, 25 meters is used to calculate your swolf score. Int. Swolf The average swolf score for the current interval. Lap Swolf The swolf score for the current lap. L. Lap Swolf The swolf score for the last completed lap. Last Len.
Color Gauges and Running Dynamics Data In the Garmin Connect activity, the running dynamics data displays as colored graphs. The color zones are based on percentiles and show you how your running dynamics data compare to those of other runners. Garmin has researched many runners of all different levels. The data values in the red or orange zones are typical for less experienced or slower runners. The data values in the green, blue, or purple zones are typical for more experienced or faster runners.
Vertical Oscillation and Vertical Ratio Data NOTE: In the Garmin Connect activity, the running dynamics data displays as colored graphs. The data ranges for vertical oscillation and vertical ratio are slightly different depending on the sensor and whether it is positioned at the chest (HRM-Pro, HRM-Run™, or HRM-Tri™ accessories) or at the waist (Running Dynamics Pod accessory).
FTP Ratings These tables include classifications for functional threshold power (FTP) estimates by gender. Males Watts per Kilogram (W/kg) Superior 5.05 and greater Excellent From 3.93 to 5.04 Good From 2.79 to 3.92 Fair From 2.23 to 2.78 Untrained Less than 2.23 Females Watts per Kilogram (W/kg) Superior 4.30 and greater Excellent From 3.33 to 4.29 Good From 2.36 to 3.32 Fair From 1.90 to 2.35 Untrained Less than 1.
Wheel Size and Circumference Your speed sensor automatically detects your wheel size. If necessary, you can manually enter your wheel circumference in the speed sensor settings. The tire size is marked on both sides of the tire. This is not a comprehensive list. You can also measure the circumference of your wheel or use one of the calculators available on the internet. Tire Size Wheel Circumference (mm) 20 × 1.
Tire Size Wheel Circumference (mm) 27 × 1-1/4 2161 27 × 1-3/8 2169 29 x 2.1 2288 29 x 2.2 2298 29 x 2.
support.garmin.