
Installation Instructions


Connecting the Device to a Transducer
NOTE: The device goes into simulator mode if the connection is
not secure between the device and transducer.
Go to www.garmin.com or contact your local Garmin dealer to
determine the appropriate type of transducer for your needs.
1
Follow the instructions provided with your transducer to
correctly install it on your boat.
2
Route the transducer cable to the back of your device, away
from sources of electrical interference.
3
Connect the transducer cable to the appropriate port on your
device.
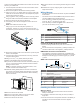
Connecting the Cables to the Cradle
The connectors on the cables are keyed to fit only in the correct
ports on the device or cradle. The connected cables are held in
place by a locking bracket.
1
Remove the cable locking bracket from the cradle.
2
Compare the divots
À
on each cable connector to the keying
on each port to determine which cable corresponds to each
port.
3
Securely connect each cable to a port.
4
Place the locking bracket
Á
over the cables and slide the
bracket down to lock the cables in place.
There is an audible click when the locking bracket is installed
correctly.
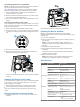
Installing the Device in the Cradle
If your device uses a cradle and you have connected the cables
to the cradle, you can quickly place the device in the cradle
without plugging in any cables.
1
Place the base of the device in the bottom of the cradle.
2
Tilt the device toward the cradle until it fastens in place.
There is an audible click when the device is secured in the
cradle.
Removing the Device from the Cradle
1
Press the release lever
À
on the cradle until the device is
released.
2
Tilt the device forward, and lift it out of the cradle.
Updating the Device Software
Before you can update the software, you must obtain a
software-update memory card or load the latest software onto a
memory card.
1
Turn on the chartplotter.
2
After the home screen appears, insert the memory card into
the card slot.
NOTE: In order for the software update instructions to
appear, the device must be fully booted before the card is
inserted.
3
Follow the on-screen instructions.
4
Wait several minutes while the software update process
completes.
The device returns to normal operation after the software
update process is complete.
5
Remove the memory card.
NOTE: If the memory card is removed before the device
restarts fully, the software update is not complete.
Specifications
Device Specification Measurement
echoMAP 70 Dimensions (W x H x D) 25 x 13.9 x 5.1 cm (9.8 x 5.5 x
2 in.)
Display size (W x H) 15.2 x 9.1 cm (6.0 x 3.6 in.)
Weight 0.77 kg (1.7 lbs.)
Power input From 10 to 18 Vdc
Max. power usage 20 W
Compass-safe distance 65 cm (25.6 in.)
echoMAP 90 Dimensions (W x H x D) 28.8 x 16.3 x 5.1 cm (11.3 x 6.4
x 2 in.)
Display size (W x H) 19.8 x 11.2 cm (4.4 x 7.8 in.)
Weight 1 kg (2.3 lbs.)
Power input From 10 to 20 Vdc
Max. power usage 11 W
Compass-safe distance 55 cm (21.7 in.)
All Models Temperature range From -15 to 55°C (from 5 to
131°F)
Material Polycarbonate plastic
Water rating IEC 60529 IPX7
Transmit power (RMS)** 500 W
Maximum depth*** 701 m (2300 ft) at 77 kHz
Frequencies**** • Traditional: 50, 77, or 200
kHz
• DownVü: 260 or 455 kHz
3