
Operation Manual


5
Select
Notification, and select a type of notification
(optional).
6
Select
Frequency, and select when the alarm should repeat.
7
Select Backlight > On to turn on the backlight with the alarm.
Starting the Countdown Timer
1
Hold UP
.
2
Select Clock
> Timer
.
3
Enter the time.
4
If necessary, select Restart > On to automatically restart the
timer after it expires.
5
If necessary, select Notification, and select a type of
notification.
6
Select
Start Timer.
Using the Stopwatch
1
Hold UP
.
2
Select Clock
> Stopwatch
.
3
From the clock, select
START.
Setting Sunrise and Sunset Alerts
You can set the sunrise and sunset alerts to sound a specific
number of minutes or hours before the actual sunrise or sunset
occurs.
1
Hold
UP.
2
Select Clock >
Alerts
.
3
Select an option:
• Select Til Sunset >
Status > On
.
• Select Til Sunrise >
Status > On
.
4
Select
Time, and enter the time.
Navigation
Projecting a Waypoint
You can create a new location by projecting the distance and
bearing from your current location to a new location.
1
If necessary, add the project waypoint app to the apps list
(Activity App Settings, page 17).
2
Select START
> Project Wpt.
.
3
Select
UP or DOWN to set the heading.
4
Select START
.
5
Select
DOWN to select a unit of measure.
6
Select
UP to enter the distance.
7
Select
START to save.
The projected waypoint is saved with a default name.
Saving Your Location
You can save your current location to navigate back to it later.
1
Hold UP.
2
Select
Save Location.
3
Follow the on-screen instructions.
Editing Your Saved Locations
You can delete a saved location or edit its name, elevation, and
position information.
1
Hold UP.
2
Select Navigation
> Saved Locations
.
3
Select a saved location.
4
Select an option to edit the location.
Editing Your Saved Locations
You can delete a saved location or edit its name, elevation, and
position information.
1
Hold UP
.
2
Select Navigation > Saved Locations.
3
Select a saved location.
4
Select an option to edit the location.
Deleting All Saved Locations
You can delete all of your saved locations at once.
1
Hold UP
.
2
Select Navigation
> Saved Locations > Delete All
.
Navigating to a Destination
You can use your device to navigate to a destination or follow a
course. When you start navigating, you can choose the activity
to be used while traveling to your destination, such as hiking,
running, or biking. If you are already recording an activity when
you start navigation, the device continues to record the current
activity while navigating.
1
Hold
UP.
2
Select
Navigation.
3
Select a category.
4
Respond to the on-screen prompts to choose a destination.
5
Select Go To.
6
Select an activity.
Navigation information appears.
7
Select
START to begin navigation.
8
Select
UP or DOWN to view additional data pages (optional).
Navigating with Sight 'N Go
You can point the device at an object in the distance, such as a
water tower, lock in the direction, and then navigate to the
object.
1
Hold UP
.
2
Select Navigation
> Sight 'N Go
.
3
Point the top of the watch at an object and select
START.
4
Select an activity.
Navigation information appears.
5
Select START to begin navigation.
6
Select
UP or DOWN to view additional data pages (optional).
Compass
The device has a 3-axis compass with automatic calibration.
The compass features and appearance change depending on
your activity, whether GPS is enabled, and whether you are
navigating to a destination. You can change the compass
settings manually (
Compass Settings, page 19). To open the
compass settings quickly, you can select START
from the
compass widget.
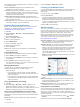
Map
represents your location on the map. Location names and
symbols appear on the map. When you are navigating to a
destination, your route is marked with a line on the map.
• Map navigation (Panning and Zooming the Map, page 13)
• Map settings (Customizing Map Features, page 20)
Panning and Zooming the Map
1
While navigating, select UP
or DOWN to view the map.
2
Hold
UP.
Navigation 13