
Installation Instructions
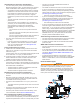


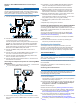

Item Description
À
Fuse
Á
Battery
Â
9 ft. (2.7 m) no extension
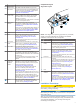
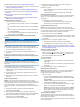
Item Description
À
Splice
Á
10 AWG (5.26 mm²) extension wire
Â
Fuse
Ã
8 in. (20.3 cm)
Ä
Battery
Å
8 in. (20.3 cm)
Æ
Up to 15 ft. (4.6 m)
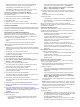
Item Description
À
Splice
Á
8 AWG (8.36 mm²) extension wire
Â
Fuse
Ã
8 in. (20.3 cm)
Ä
Battery
Å
8 in. (20.3 cm)
Æ
Up to 23 ft. (7 m)
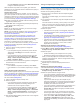
Item Description
À
Splice
Á
6 AWG ( 13.29 mm²) extension wire
Â
Fuse
Ã
8 in. (20.3 cm)
Ä
Battery
Å
8 in. (20.3 cm)
Æ
Up to 36 ft. (11 m)
Drive Unit Installation
The drive unit (sold separately) must be connected to your
rudder control so the GHP Reactor Mechanical autopilot can
steer your boat. When you purchase a drive unit sold by Garmin,
it will include the correct cables, connectors, and instructions.
If a drive unit is installed on your boat already, you can use a
drive unit power cable (sold separately) to adapt your drive unit
for use with the autopilot system.
If you connect the autopilot system to a drive unit not sold by
Garmin, you must also provide rudder-feedback information by
installing and connecting a Garmin rudder-feedback sensor
(recommended) or by connecting to an existing rudder-feedback
sensor on your boat using a rudder feedback cable (sold
separately).
Installing a Garmin Drive Unit
Follow the installation instructions provided with your Garmin
drive unit to mount it and connect it to your rudder control and
autopilot system.
Corrosion Blocker
NOTICE
To ensure long life of all parts, apply corrosion blocker to the
drive unit at least twice yearly.
A marine-rated corrosion blocker should be applied to the drive
unit after all connections are made.
Connecting to an Existing Drive Unit
You must install a drive unit power cable to use a drive unit not
sold by Garmin with the GHP Reactor Mechanical autopilot. This
cable is sold separately.
These instructions do not apply to a solenoid-type drive unit
(Connecting to a Solenoid Drive Unit).
1
If necessary, use the installation instructions provided with
the drive unit to install it on your boat.
2
If your drive unit has cables connected, disconnect the
cables.
3
Consult the documentation provided by the manufacturer of
your drive unit to identify the connections on your drive unit.
4
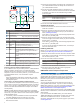
Connect the drive unit power cable (not included) to your
drive unit, based on the wire colors and functions in the table.
The drive unit power cable cannot be extended.
Wire Color Function
Red Drive unit positive (+)
Black Drive unit negative (-)
Blue Clutch power (cut and tape this wire if your drive unit
has no clutch)
White Clutch ground (cut and tape this wire if your drive unit
has no clutch)
5
Connect the drive unit power cable to the ECU.
Connecting to a Solenoid Drive Unit
You must install the solenoid power cable to use a solenoid
drive unit with the GHP Reactor Mechanical autopilot system.
This cable is sold separately.
These instructions apply only to solenoid-type drive units.
1
If necessary, use the installation instructions provided with
the solenoid drive unit to install it on your boat.
2
If your solenoid drive unit has cables connected, disconnect
the cables.
3
Consult the documentation provided by the manufacturer of
your solenoid drive unit to identify the connections on your
drive unit.
4
Connect the solenoid power cable (not included) to your
solenoid drive unit, based on the diagram and tables.
The solenoid power cable is 0.8 m (2.6 ft.) long, and cannot
be extended.
5