
Installation Instructions


radar power cable. Both fuses must be in place for the radar
to function properly.
4
Connect the power cable to the POWER port on the radar.
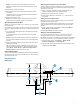
Connecting Directly to Power
WARNING
When connecting the power cable, do not remove the in-line
fuse holder. To prevent the possibility of injury or product
damage caused by fire or overheating, the appropriate fuse
must be in place as indicated in the product specifications. In
addition, connecting the power cable without the appropriate
fuse in place will void the product warranty.
Some radar models do not require a voltage converter unit. If
your model is packaged without a voltage converter, it should be
connected directly to power.
Item Description
À
To the Garmin Marine Network
Á
15 A fuse holder
Â
To the boat battery (10 to 32 Vdc)
Water ground connection
1
Route the power cable to the radar and boat battery.
2
Connect the power cable to the boat battery.
3
Connect the power cable to the POWER port on the radar.
Power Cable Extensions
Connecting the power cable directly to the battery is
recommended. If it is necessary to extend the cable, the
appropriate gauge of wire must be used for the length of the
extension.
You must use crimp connectors and heat-shrink to create a
water-resistant connection.
Distance Wire Gauge
3 m (9 ft. 10 in.) 3.31 mm² (12 AWG)
5 m (16 ft. 4 in.) 5.26 mm² (10 AWG)
6.5 m (21 ft. 3 in.) 6.63 mm² (9 AWG)
8 m (26 ft. 2 in.) 8.36 mm² (8 AWG)
Grounding the Radar
The radar (and voltage converter, if applicable) must be
connected to the appropriate type of ground using a 3.31 mm²
(12 AWG) copper wire (not included).
1
Route a 3.31 mm² (12 AWG) copper wire to a water ground
location and to the radar pedestal.
2
Connect the wire to the ground connector on the pedestal
( ) using the pre-installed crimp connector.
3
Coat the ground screw and crimp connector with marine
sealant.
4
Connect the other end of the wire to the water ground
location on the boat, and coat the connection with marine
sealant.
5
Select an option:
• If your radar was not packaged with a voltage converter,
no further grounding is necessary.
• If your radar was packaged with a voltage converter,
proceed to step 6.
6
Route a different 3.31 mm² (12 AWG) copper wire to water
ground location and to the voltage converter.
7
Loosen a screw on one corner of the voltage converter and
secure the copper wire to the screw.
8
Coat the screw and wire on the voltage converter with marine
sealant.
9
Connect the other end of the wire to the RF ground location
on the boat, and coat the connection with marine sealant.
Garmin Marine Network Considerations
This device connects to Garmin Marine Network devices to
share radar data with compatible devices on the network. When
connecting to a Garmin Marine Network device, observe these
considerations.
• A Garmin Marine Network cable must be used for all Garmin
Marine Network connections.
◦ Third-party CAT5 cable and RJ45 connectors must not be
used for Garmin Marine Network connections.
◦ Additional Garmin Marine Network cables and connectors
are available from your Garmin dealer.
• Although it is not recommended, you can use a field-
installable connector to create a custom-length Garmin
Marine Network cable if necessary. Follow the directions
provided with the connector.
Radar Operation
All functions of this radar are controlled with your Garmin
chartplotter. See the Radar section of your chartplotter's manual
for operating instructions. To download the latest manual, go to
www.garmin.com/support/.
Loading the New Software on a Memory Card
The device may contain a software-update memory card. If so,
follow the instructions provided with the card. If a software
update memory card is not included, you must copy the
software update to a memory card.
1
Insert a memory card into the card slot on the computer.
2
Go to www.garmin.com/support/software/marine.html.
3
Select Download next to “Garmin Marine Network with SD
card.”
4
Read and agree to the terms.
5
Select Download.
6
Select Run.
7
Select the drive associated with the memory card, and select
Next > Finish.
Updating the Device Software
Before you can update the software, you must obtain a
software-update memory card or load the latest software onto a
memory card.
1
Turn on the chartplotter.
2
After the home screen appears, insert the memory card into
the card slot.
4