GMR 404/406 marine radar installation instructions
© 2006–2010 Garmin Ltd. or its subsidiaries Garmin International, Inc. 1200 East 151st Street, Olathe, Kansas 66062, USA Tel. (913) 397.8200 or (800) 800.1020 Fax (913) 397.8282 Garmin (Europe) Ltd. Unit 5, The Quadrangle, Abbey Park Industrial Estate, Romsey, SO51 9LR, UK Tel. +44 (0) 870.8501241 (outside the UK) 0808 2380000 (within the UK) Fax +44 (0) 870.8501251 Garmin Corporation No. 68, Jangshu 2nd Road, Sijhih, Taipei County, Taiwan Tel. 886/2.2642.9199 Fax 886/2.2642.9099 All rights reserved.
Welcome Thank you for choosing the Garmin GMR 404/406. These instructions help you assemble and install the GMR 404/406 radar. To install your Garmin chartplotter, consult the installation instructions packaged with the chartplotter. Product Registration Help us better support you by completing our online registration today! Connect to our Web site at www.garmin.com/registration/.
Installation Installing the Scanner The following section covers the assembly and installation of the GMR 404 or GMR 406 marine radar. The GMR 404 and 406 only operate with components of the Garmin Marine Network, and MFDs (multifunction displays). See your Garmin dealer or the Garmin Web site for more details. To complete the installation, you need the appropriate fasteners, tools, and mounts. These items should be available at most marine dealers.
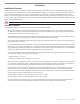
Step Install the Mounting Studs and Seals: 1. Remove the hatch on the front of pedestal by loosening the screw and lifting the hatch off of the hinges as shown in Figure 1. 2. Using a 5 mm Allen wrench, install the M10 x 71 mounting studs (Figure 2) in the pedestal matching the hole pattern that was selected. Tighten the mounting studs until they bottom out in the pedestal. DO NOT overtighten the studs because this may cause damage to the pedestal.
Step Mount the Antenna: 1. Remove the protective cover from the pedestal wave guide. 2. Verify that the antenna wave guide is aligned with the pedestal wave guide and slide the antenna onto the pedestal. 3. Secure the antenna to the pedestal using the 8 mm hex bolts and spring washers. The 8 mm bolts should be torqued to 70 in.lbs (6 ft.lbs) (.81 kgf.m).
Step Install the Cable Assembly Route the cable as needed, depending on the type of mount you are using. DO NOT cut the cable! It may be necessary to drill a 31.7 mm (1.25") hole for routing the power/network cable. Garmin provides a rubber cable grommet that can be used to cover the cable installation hole. The grommet does NOT provide a waterproof seal. To waterproof the grommet, apply a marine sealant. You can purchase additional cable grommets through Garmin or a Garmin dealer.
Step Connecting the scanner Connect the scanner power cable (Red and Black) to Voltage Converter output cable (Red and Black) using the supplied heat-shrink crimp connectors. DO NOT cut the scanner cable and DO NOT remove the in-line fuse located on the scanner power cable. After crimping the connections, heat the connectors to shrink the housing for a water resistant fit. Connect the scanner to the vessel’s water ground using an 8 gauge copper cable.
Step Connection the network: For a stand-alone network (chartplotter and radar only), attach the RJ-45 marine network cable to the RJ-45 socket on the back of the chartplotter. For an expanded network (chartplotter, radar, GMS 10), attach the RJ-45 marine network cable to an open RJ-45 socket on the GMS 10 network power expander. Tighten the RJ-45 locking ring clockwise until it is firmly sealed. NOTE: Each component of the expanded network must be installed according to its installation instructions.
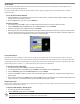
Radar Setup To take advantage of the GMR 404/406 features, the Garmin Marine Network may require a software update. A software update card is provided in the Marine Data Management Kit. The newly installed GMR 404 or 406 will not transmit until the radar is properly configured. Follow the instructions below to properly configure the radar. Turn on the Garmin Marine Network: 1. Press the Power key on the chartplotter. The scanner turns on with the network.
Specifications 4 ft Open-Array Antenna: Type: End fed slotted waveguide Horizontal Beamwidth: 1.8 degrees Horizontal Sidelobes: -23 dB within ±10 deg of main -30 dB outside ±10 deg of main Vertical Beamwidth: 24 degrees Antenna Gain: 29 dBi Polarization: Horizontal Input Return Loss Better than -20 dB Weight 12 lbs (5.4 kg) 6 ft Open-Array Antenna: Type: End fed slotted waveguide Horizontal Beamwidth: 1.
Antenna Rotation: 24 rpm and 48 rpm Maximum wind load: 100 kts Receiver Noise Figure: Less than 4 dB Environmental: Temp: 14 to 140º F (-10 to +60º C) Humidity: 95% @ 95 ºF (35 ºC) Rel Wind: 100 kts Waterproof to IEC 60529 IPX6 Range: 65.5 ft (20 m) minimum, 72 nm max Range discrimination: 65.
17.35″ 440.8 mm 7.87″ 200.0 mm 5.91″ 150.0 mm 5.51″ 140.0 mm L Model GMR 404 GMR 406 7.87″ 200.0 mm 12.34″ 313.5 mm 12.87″ 326.8 mm L 51.6" [1310 mm] 75.
Warnings and Important Information Failure to avoid the following potentially hazardous situations could result in an accident or collision resulting in death or serious injury. • • • Use this unit only as a navigational aid. Do not attempt to use the unit for any purpose requiring precise measurement of direction, distance, location, or topography. The radar scanner transmits electromagnetic energy.
Software License Agreement BY USING THE GMR 404/406, YOU AGREE TO BE BOUND BY THE TERMS AND CONDITIONS OF THE FOLLOWING SOFTWARE LICENSE AGREEMENT. PLEASE READ THIS AGREEMENT CAREFULLY. Garmin grants you a limited license to use the software embedded in this device (the “Software”) in binary executable form in the normal operation of the product. Title, ownership rights, and intellectual property rights in and to the Software remain in Garmin.
For the latest free software updates (excluding map data) throughout the life of your Garmin products, visit the Garmin Web site at www.garmin.com. © 2006–2010 Garmin Ltd. or its subsidiaries Garmin International, Inc. 1200 East 151st Street, Olathe, Kansas 66062, USA Garmin (Europe) Ltd. Unit 5, The Quadrangle, Abbey Park Industrial Estate, Romsey, SO51 9RL, UK Garmin Corporation No. 68, Jangshu 2nd Road, Sijhih, Taipei County, Taiwan www.garmin.com Part Number 190-00669-02 Rev.