
Manual


6-3
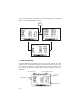
On the route number field, you may choose between routes 0 through 19 with
CLR. Next to this is a route action field which allows you to activate the route,
clear the route, copy the route to another location, or invert the order of the
waypoints in a route and activate it. The arrow keys allow you to scroll
through the list of waypoints in a route.
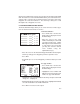
6.2 CREATING AND COPYING ROUTES
The Route Definition Page allows you to create new routes and to copy a
route to another location for later reference.
To Create a Route...
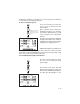
· Press RTE and, if needed, the
RTE softkey to display the Route
Definition Page.
· Move the cursor to the route
number field and press CLR until
you find an empty route. (HINT:
Although the route number field is
a cyclic field, to speed selection
you may also enter the desired
route number using the
alphanumeric keys.)
· Place the cursor on the first blank waypoint identifier field using the
arrow keys and type in a waypoint you wish to put in the route.
· Press ENT
· Repeat this process for each waypoint you want to add, up to a total
of 30.
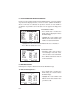
To copy a route...
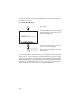
· Press RTE and, if needed, the
RTE softkey to display the Route
Definition Page.
· Highlight the route number field
with the cursor and select the route
number to copy from with CLR.
· Highlight the route action field with the arrow keys and press CLR until
“>Copy To>” is displayed.
· A third field now appears in the top right corner. Highlight this field and
select the destination route number with CLR.
· Press ENT. The route is now copied.