GPSMAP 500/700 Series and echoMAP 50/70 Series ™ ® Owner’s Manual February 2013 190-01556-00_0A Printed in Taiwan
All rights reserved. Under the copyright laws, this manual may not be copied, in whole or in part, without the written consent of Garmin. Garmin reserves the right to change or improve its products and to make changes in the content of this manual without obligation to notify any person or organization of such changes or improvements. Go to www.garmin.com for current updates and supplemental information concerning the use of this product.
Table of Contents Introduction.................................................................... 1 Device Views ............................................................................ 1 echoMAP 70 Series and GPSMAP 700 Series ..................... 1 Using the Touchscreen .................................................... 1 echoMAP 50 Series and GPSMAP 500 Series ..................... 1 Device Keys ..................................................................... 1 Tips and Shortcuts ...........
Viewing Tide Station, Current Station, or Celestial Information for a Different Date ........................................... 13 Viewing Information for a Different Tide or Current Station 13 Viewing Almanac Information from the Navigation Chart .... 13 Sonar............................................................................. 13 Full-Screen Sonar View ........................................................... 13 Split-Zoom Sonar View ............................................................
Setting the Keel Offset ........................................................ 23 Calibrating a Water Speed Device ...................................... 23 Setting the Water Temperature Offset ................................ 24 Communications Settings ........................................................ 24 NMEA 2000 and NMEA 0183 ............................................. 24 NMEA 0183 .................................................................... 24 NMEA 2000 ...............................
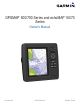
Introduction WARNING See the Important Safety and Product Information guide in the product box for product warnings and other important information. Zooms in to a chart or view. Scrolls, highlights options, and moves the cursor. Select Acknowledges messages and selects options. Back Returns to the previous screen. Device Views Mark Saves the present location as a waypoint. echoMAP 70 Series and GPSMAP 700 Series Home Returns to the Home screen.
To open the Navigation chart, select Charts > Navigation Chart. 2 Insert the memory card Á with the label facing to the right. 3 Press the card in until it clicks. 4 Close the door. Charts and 3D Chart Views The chartplotters have a basic imagery map. The charts and 3D chart views listed below are available on the chartplotter. The charts and views that are available depend on the map data and accessories used. You can access the charts and chart views by selecting Charts.
NOTE: Auto Guidance is available with premium charts, in some areas. 1 From the Navigation chart or Fishing chart, select a location. 2 If necessary, select Select. 3 Select Navigate To. 4 Select an option: • To navigate directly to the location, select Go To. • To create a route to the location, including turns, select Route To. • To use Auto Guidance, select Guide To. 5 Review the course indicated by the magenta line.
station indicator, the height of the tide at the station appears above the station indicator. Current direction indicators appear as arrows on the chart. The direction of each arrow indicates the direction of the current at a specific location on the chart. The color of the current arrow indicates the range of speed for the current at that location. When you move the cursor over the current direction indicator, the specific current speed at the location appears above the direction indicator.
When course over ground and heading information are provided by an activated AIS target, but rate of turn information is not provided, the projected course of the target is calculated based on the course over ground information. Showing AIS Vessels on a Chart or 3D Chart View Before you can use AIS, you must connect the chartplotter to an external AIS device and receive active transponder signals from other vessels. You can configure how other vessels appear on a chart or on a 3D chart view.
Chart Setup: See page 6. Overlay Numbers: See page 6. This might appear in the Chart Setup menu. Chart Appearance: See page 6. This might appear in the Chart Setup menu. 4 Select a layout. 5 Select a data field. 6 Select the type of data shown in the field. Navigation and Fishing Chart Setup Showing a Navigation Inset NOTE: Not all settings apply to all charts and 3D chart views. Some settings require external accessories or applicable premium charts.
Lane Width: Specifies the width of the navigation lane, which is the magenta line in some chart views that indicates the course to your destination. Other Vessels Settings on the Charts and Chart Views NOTE: These options require connected accessories, such as an AIS receiver or VHF radio. From a chart or 3D chart view, select Menu > Other Vessels. AIS List: Shows the AIS list (page 5). DSC List: Shows the DSC list (page 18). AIS Display Setup: See page 7.
You can select or to view additional information or to show the location on a chart. Courses CAUTION The Auto Guidance feature is based on electronic chart information. That data does not ensure obstacle and bottom clearance. Carefully compare the course to all visual sightings, and avoid any land, shallow water, or other obstacles that may be in your path. When using Go To, a direct course and a corrected course may pass over land or shallow water.
and avoid any land, shallow water, or other obstacles that may be in your path. When using Go To, a direct course and a corrected course may pass over land or shallow water. Use visual sightings, and steer to avoid land, shallow water, and other dangerous objects. NOTE: Auto Guidance is available with premium charts, in some areas. You must create a waypoint before you can navigate to a waypoint. 1 Select Nav Info > Waypoints. 2 Select a waypoint. 3 Select Navigate To.
6 7 8 9 • To navigate the route from the starting point used when the route was created, to the right of the original route, select Forward – Starboard. • To navigate the route from the destination point used when the route was created, to the left of the original route, select Backward – Port. • To navigate the route from the destination point used when the route was created, to the right of the original route, select Backward – Starboard. If necessary, select Done. A magenta line appears.
• To record the track plot based on a variance from your course, select Resolution > Change, and enter the maximum error allowed from the true course before recording a track point. Deleting All Saved Waypoints, Routes, and Tracks Select Nav Info > Manage Data > Clear User Data > All > OK. Combinations The Combination screen shows a combination of different screens at the same time.
You can display the total amount of fuel on-board either as a numeric display that shows the total fuel or as a graphic display that shows the level in each fuel tank. 1 Select Gauges > Engine > Menu > Gauge Setup > Fuel Display. Select an option: 2 • To display a numeric value for the total fuel level in all tanks, select Use Total Fuel Onboard. • To display a graphical representation of the amount of fuel in each tank, select Use Fuel Tank Levels.
Viewing Tide Station, Current Station, or Celestial Information for a Different Date 1 Select Nav Info > Tides & Currents. 2 Select Tides, Currents, or Celestial. 3 Select an option. • To view information for a different date, select Change Date > Manual, and enter a date. • To view information for today, select Change Date > Current. • If available, to view information for the day after the date shown, select Next Day.
• To show data from a 200 kHz sonar signal, select 200 kHz. This is useful mainly for more-shallow, inland waters. • To show data from an 77 kHz sonar signal, select 77 kHz. This is useful mainly for deeper waters and to see better fish arches in shallow water.. • To select a specific frequency, select Add, and enter the frequency. Turning On the A-Scope The a-scope is a vertical flasher along the right side of the fullscreen sonar view.
Radar Display Modes NOTE: Not all modes are available with all radar devices and all chartplotters. Select Radar, and select a mode. Cruising Mode: Shows a full-screen image of the gathered radar information. Harbor Mode: Intended for use in inland waters, this mode works best with short-range signals (2 nm or less). Offshore Mode: Intended for use in open waters, this mode works best with long-range signals.
Marking a Waypoint on the Radar Screen 1 From a Radar screen or the Radar overlay, select a location. 2 Select Create Waypoint. Viewing a List of AIS Threats From any Radar screen or the Radar overlay, you can view and customize the appearance of a list of AIS threats. From a Radar screen or the Radar overlay, select Menu > Other Vessels > AIS List. Showing AIS Vessels on the Radar Screen AIS requires the use of an external AIS device and active transponder signals from other vessels.
may differ from the automatic gain setting used for another mode. NOTE: Depending upon the radar in use, the gain setting configured for use in one radar mode may or may not be applied to other radar modes or to the Radar overlay. From a Radar screen or the Radar overlay, select Menu > Gain > Auto. The chartplotter sets the gain automatically once, based on average conditions, the range of the radar signal, and the selected radar mode.
Rings: Shows the range rings that help you to visualize distances on the radar screen. Nav. Lines: Shows the navigation lines that indicate the course you have set using Route To, Guide To, or Go To. Waypoints: Shows waypoints on the radar screen. Viewing the DSC List Front-of-Boat Offset You can add a vessel to your DSC list. You can make calls to a DSC contact from the chartplotter. 1 Select Nav Info > Other Vessels > DSC List > Add Contact.
2 Select a position-report call. 3 Select an option: • To switch to position report details, select . • To switch to a Navigation chart marking the location, select . Navigating to a Tracked Vessel 1 Select Nav Info > Other Vessels > DSC List. 2 Select a position-report call. 3 Select Navigate To. 4 Select Go To or Route To. Creating a Waypoint at the Position of a Tracked Vessel 1 Select Nav Info > Other Vessels > DSC List. 2 Select a position-report call. 3 Select Create Waypoint.
chartplotter. The weather data for each feature comes from reputable weather data centers such as the National Weather Service and the Hydrometeorological Prediction Center. For more information, go to www.xmwxweather.com. SiriusXM Equipment and Subscription Requirements To use XM WX satellite weather, you must have a compatible satellite weather receiver. To use SiriusXM satellite radio, you must have a compatible satellite radio receiver. Go to www.garmin.com for more information.
• To view the weather forecast for the previous 12 hours, select Previous Forecast or , and to view previous forecasts, up to 48 hours ago, in 12-hour increments, select Previous Forecast or again. Viewing a Marine Forecast or an Offshore Forecast 1 Select Weather > Forecast. 2 Pan the chart to an offshore location. The Marine Forecast or Offshore Forecast options appear when forecast information is available. 3 Select Marine Forecast or Offshore Forecast.
screen. Variations in the visibility shading show the forecast change in surface visibility. Select Weather > Visibility. Viewing Forecast Visibility Information for Another Time Period 1 Select Weather > Visibility. 2 Select an option: • To view the visibility forecast for the next 12 hours, select Next Forecast or , and to view forecasts up to 48 hours, in 12-hour increments, select Next Forecast or again.
System Settings Select Settings > System. Display: Adjusts the backlight brightness and color scheme. Beeper: Turns on and off the tone that sounds for alarms and selections. Auto Power: Turns the device on automatically when power is applied (page 22). Keyboard Layout: Sets the arrangement of the keyboard to an alphabetical or computer keyboard layout. Language: Sets the on-screen text language. Speed Sources: Selects the source of the speed data used to calculate true wind speed or fuel economy.
Setting the Water Temperature Offset Before you can set the water temperature offset, you must have a NMEA 0183 water-temperature sensor or a temperaturecapable transducer to measure water temperature. The temperature offset compensates for the temperature reading from a temperature sensor. 1 Measure the water temperature using the temperature sensor or temperature-capable transducer that is connected to the chartplotter.
Connecting a Wireless Device to the Chartplotter Before you can connect a wireless device to the chartplotter wireless network, you must configure the chartplotter wireless network (page 24). You can connect a wireless device to the chartplotter to share data. For example, you can connect an iOS® device to the chartplotter to share BlueChart Mobile data. 1 From the iOS device, select Settings > Wi-Fi. 2 Select the wireless network name you entered for the chartplotter network (page 24).
Adjusting the Distance from Shore CAUTION The Auto Guidance feature is based on electronic chart information. That data does not ensure obstacle and bottom clearance. Carefully compare the course to all visual sightings, and avoid any land, shallow water, or other obstacles that may be in your path. NOTE: Auto Guidance is available with premium charts, in some areas. The Shoreline Distance setting indicates how close to the shore you want the Auto Guidance line to be placed.
3 Select an option: • To create a new file, select Add New File, and enter a name. • To add the information to an existing file, select the file from the list. The file name is saved with a .adm extension. Copying Waypoints, Routes, and Tracks to or from all Chartplotters on a NMEA 2000 Network You can transfer information for waypoints, routes, and tracks from one chartplotter connected to a NMEA 2000 network to every other chartplotter connected to the network.
Type Receive Sentence Description Type PGN Description GPGGA GGA: Global positioning system fix data 129283 Cross track error GPGLL GLL: Geographic position (latitude and longitude) 129285 Navigation route and waypoint info GPGSA GSA: GNSS DOP and active satellites GPGSV GSV: GNSS satellites in view GPRMB RMB: Recommended minimum navigation information 127250 Vessel heading GPRMC RMC: Recommended minimum specific GNSS data 127489 Engine parameters: Dynamic GPRTE RTE: Routes GPVTG V
Index A aerial photos 4 AIS 4, 5, 7 alarm 5 distress signal device 5 radar 16 SART 5 targeting 4, 5 threats 5, 16 turning on 26 vessels 5 alarms 25 anchor drag 25 arrival 25 collision 5 deep water 14 engine 11 gauges 11 navigation 25 off course 25 shallow water 14 sonar 14 water temperature 14 weather 25 anchor drag alarm 25 animated currents, tides 3 arrival alarm 25 Auto Guidance 8, 25 line 25 shoreline distance 26 autopilot 8 B backlight 1 buoy reports 22 C celestial information 12, 13 charts 2, 4–6 ap
settings 22–25 radar display 17 system information 23, 26 shoreline distance 26 SiriusXM 20 SiriusXM Satellite Radio 22 software, updating 27 sonar 13 a-scope 14 alarms 14 appearance 14 bottom lock 13 cone 7 depth 13 depth line 14 depth scale 13 frequencies 13 gain 13 interference 14 noise 14 overlay numbers 14 recording 14 scroll speed 14 suspended targets 14 views 13 waypoint 13 whiteline 14 zoom 13 SOS 8 suspended targets 7 symbols 4 system information 23, 26, 27 T tide stations 3, 12, 13 indicators 4 t
www.garmin.com/support 913-397-8200 1-800-800-1020 0808 238 0000 +44 870 850 1242 1-866-429-9296 +43 (0) 820 220 230 +32 2 672 52 54 +45 4810 5050 +358 9 6937 9758 + 331 55 69 33 99 +49 (0)1805-427646-880 + 39 02 36 699699 0800 - 023 3937 035 - 539 3727 + 47 815 69 555 00800 4412 454 +44 2380 662 915 + 35 1214 447 460 + 34 902 007 097 + 46 7744 52020 Garmin International, Inc. 1200 East 151st Street Olathe, Kansas 66062, USA Garmin (Europe) Ltd.