
Cockpit Reference Guide


Garmin G1000 Cockpit Reference Guide for the Beechcraft 300/B300 Series
190-01344-00 Rev. B
Appendix
131
Flight
Instruments
Nav/Com/
XPDR/Audio AFCS GPS Nav
Flight
Planning Procedures
Hazard
Avoidance
Additional
Features Annun/Alerts Appendix Index
4)
Apply power to the system, check that the databases are initialized
and displayed on the power-up screen. When updating the terrain and
FliteCharts databases, a ‘Verifying’ message may be seen. If this message is
present, wait for the system to finish loading before proceeding to step 5.
5)
Acknowledge the Power-up Page agreement by pressing the ENT Key or
the right most softkey.
6)
Turn the large FMS Knob to select the AUX Page group on the MFD.
7)
Turn the small FMS Knob to select the System Status Page.
8)
Monitor the Sync Status in the Database Window. Wait for all databases to
complete synching, indicated by ‘Complete’ being displayed.
9)
Remove and reapply power to the system.
10)
Turn the large FMS Knob to select the AUX Page group on the MFD.
11)
Turn the small FMS Knob to select the System Status Page.
12)
Press the Display Database Selection Softkey to show database information
for each display (MFD1 DB, PFD1 DB, PFD2 DB). Verify the correct
database cycle information is shown for each database for each display.
Loading the Jeppesen Navigation Database as the Active Navigation
Database
NOTE: Loading the Jeppesen navigation database as the active database
prior to its effective date will result in the expiration date on the power-up
screen and the effective date on the AUX-System Status Page being displayed
in yellow.
NOTE: After the navigation database is loaded or copied, the top SD card
may be removed.
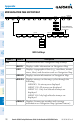
1)
With the system OFF, insert the SD card containing the new navigation database
version into the top card slot of the display (PFD1, PFD2 or MFD) to be updated
(label of SD card facing left).
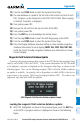
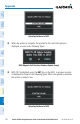
2)
Turn the system ON. A prompt is displayed in the upper left corner of the
display:
3)
Press the NO Softkey to proceed to loading the active database.
4)
A prompt similar to the following is displayed. Press the YES Softkey to update
the active navigation database.