
System Maintenance Manual

G1000/GFC700 System Maintenance Manual – C90A/C90GT/C90GTi King Air Page 4-25
190-00682-01 Revision F
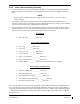
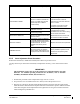
controls before reaching the stop.
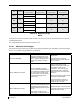
INVALID SERVO SPEED
The servo is unable to maintain the
required ~2.5 RPM during the test
(Speed drops below 2 RPM or
exceeds 3 RPM)
Repeat test again.
If the same result is received,
remove servo mount and check/set
clutch on stand.
If resetting clutch does not clear
message, replace servo motor.
TEST SPEED FAIL
Servo has not responded to the test
initialization command.
Repeat test again.
If message does not clear,
troubleshoot the servo and it’s wiring
for the source of the failure.
Repeat test when the source of the
servo failure has been corrected.
SERVO TEST TIMED OUT
Servo not responding for over 60
seconds during testing.
SERVO DATA TIMED OUT
The servo has failed to transmit load
cell sensor status.
LOAD CELL INVALID
A special test monitor has detected
an inequality between motor torque
and load cell torque greater than the
specified threshold. An out-of-
calibration load cell may be the
cause.
Replace servo motor and repeat test.
AIRBORNE STATUS
The G1000 system has detected
airborne status, (determined by true
airspeed) and has cancelled the test.
Verify the ADC is online.
Check pitot/static system is free of
obstructions and plumbing kinks.
Repeat test.
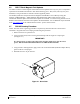
4.9.3 Servo Adjustment Fixture Procedure
Remove the GSM 85A (or GSM 86 if installed) Servo Mount as per Section 6.12.
The slip clutch torque values must be checked, and adjusted if necessary, to the values listed in Table
4-11.
IMPORTANT!
This adjustment requires the use of the Garmin servo adjustment fixture, P/N T10-
00110-01. For detailed operating instructions for the fixture, refer to GSA8X /
GSM85(A) Installation Manual, listed in Table 1-3.
1. Perform this procedure within a temperature range of 50 °F to 120 °F.
2. If a protective cover is installed on the servo mount, remove the protective cover.
3. Place the servo mount on the slip-clutch adjustment fixture and secure with the toggle clamps.
Install the fixture cable between the capstan under test and the fixture capstan. Remove the slack
in the cable using the tension adjustment knob. Tighten the two wing nuts on bottom of fixture
while holding the top thumbscrews.