
System Maintenance Manual

G1000/GFC700 System Maintenance Manual – C90A/C90GT/C90GTi King Air Page 3-45
190-00682-01 Revision F
3.9.5 SafeTaxi Configuration
SafeTaxi is loaded and configured on the G1000 by default and needs no more configuring. Section
3.9.8 installs the Terrain/Obstacle database card, which includes SafeTaxi database.
3.9.6 ChartView Configuration
Follow this procedure to re-activate the ChartView option. A ChartView Enable Card, as specified in the
General Arrangement Drawing listed in Table 1-2, will be required for this procedure.
NOTE
When the ChartView option is enabled for the first time (normally with the initial STC installation), the
G1000 writes its unique system ID to the physical card and locks the files to this unique ID. This
prevents the unlock card from ever being used to activate the ChartView feature in other G1000 systems.
The unlock card is forever tied to the specific aircraft in which it was used for the first time. For
situations where ChartView must be re-activated, this card must be used.
NOTE
The required ChartView databases are subscription-based and are to be procured by the installing agency
directly from Jeppesen. This procedure is only required if the ChartView option is purchased by the
customer.
NOTE
The G1000 can only be configured for FliteCharts or
ChartView but not both. Performing this procedure
will automatically disable the FliteCharts option. ChartView databases are required to be installed on the
terrain database cards to function (see Section 3.9.8).
1. Remove power from the PFD 1, PFD 2 and MFD by opening the PFD 1 PRI, PFD 1 SEC, PFD 2
and MFD circuit breakers.
2. A ChartView Enable card is required to activate this feature. Insert the ChartView Enable card in
the upper slot of the PFD 1.
3. While holding the ENT key on PFD 1, PFD 2 and MFD, restore power to the displays by closing
the PFD and MFD circuit breakers.
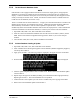
4. When the words
appear in the upper left corner of the displays,
release the ENT key.
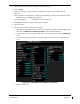
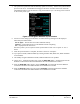
5. On PFD 1, go to the System Upload page using the FMS knob.
6. Activate the cursor. Use the small FMS knob to select ‘CONFIGURATION FILES’ in the
AIRFRAME field and press the ENT key.
7. Highlight the FILE field. Use the small FMS knob to select the “Enable ChartView” option
and press the ENT key. Once the option is selected the configuration files in the SECTION field
will be displayed. All files should be checked. If not, press the CHK ALL softkey.
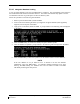
8. Press the LOAD softkey.
9. Monitor the status of the upload. When the upload is finished, press the ENT key to
acknowledge the upload complete confirmation.
10. View the SUMMARY field and ensure that the item is ‘COMPLETED’.
11. De-activate the cursor.
12. Power down the system and remove the ChartView Enable card from PFD 1.