FLUX S Smart Assembly EN NO NL SE DE Fl FR PL IT CZ ES GR PT CN DK JP Tacx
1. Check if everything is in the package "' Controleer of de inhoud van het pakket compleet is '"' Prufen Sie, ob der lnhalt der Verpackung vollstandig ist l' emballage - Verificare che la confezione contenga tutto Compruebe siesta todo en el paquete embalagem Verifiez que tout se trouve dans ~ r Verifique se esta tudo na Kontroller, at det hele er i pakken Ou ma kontrollere at alle komponenter befinner seg ipakken ,..
2. Lay the trainer down on its side 11 Leg de trainer op zijn kant m Legen Sie den Trainer auf die Seite i: Couchez le trainer au sol, sur le cote Appoggiare il trainer su un lato I Apoye el rodillo de entrenamiento sabre el lado - Deite o simulador de Lado Lffig trffineren ned pa siden Legg treneren ned pa siden Lagg trainern pa sidan Aseta vastus kyljelleen , - Pot6i trenaier na boku - ....
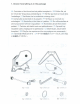
3. Place the cassette on the body by aligning the markers NL Plaats de cassette, let hierbij op markering voor het uitlijnen Ok Legen Sie die Kassette auf den Karper.
4.
5. Slide the front leg in the trainer and fix it with the 2 bolts f\ Schuif de voorpoot in de trainer en zet deze met de 2 bouten vast r Lassen Sie den Vorderful1 in den Trainer gleiten.
6.
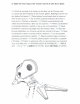
7. Select the needed quick release. Place the T2835 for 142x12 or 148x12 mm axles according to the instructions supplied with the axles. Use the fill ring in case of axle length 135 mm r- Plaats de T2835 bij een as van 142x12 mm of 148x12 mm volgens de instructies. Gebruik de vulring bi een aslengte van 135 mm -' Wahlen Sie den erforderlichen Schnellspanner aus. Setzen Sie die T2835 fur 142x12 oder 148x12 mm Achsen gemaf3 den bei den Achsen mitgelieferten Anweisungen ei n.
spessore ad anello in caso di lunghezza d'asse pari a 135 mm r- Seleccione la liberaci6n rapida que necesite. Coloque el T2835 para los ejes de 142x 12 mm o 148 x 12 mm conforme a las instrucciones suministradas junto con Los ejes. Utilice el anillo de llenado para longitudes de eje de 135 mm Escolha o sistema de aperto rapido necessario. Coloque o T2835 em eixos de 142x12 ou de 148x12 mm de acordo com as instru~oes fornecidas juntamente com os eixos.
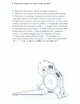
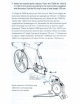
8. Place the bike in the trainer ~ Plaats de fiets in de trainer - Stellen Sie das Fahrrad auf den Trainer i:-r Placez le vela sur le trainer I Mettere la bici nel trainer ' Coloque la bicicleta en el rodillo de entrenamiento -:> Coloque a bicicleta no simulador Placer cyklen i trceningsudstyret Plasser sykkelen i sykkelrullen Placera cykeln pa trainer 1- Sijoita polkupyora vastukseen P Umiescic rower w trenazerze Umfstete jfzdnf kola do trenazeru Tono8ETriarE rn noonAaro aTo nponovmripLo ~ fJ 1-r.
CAUTION: disk surface can be hot. Do not touch when operating. LET OP: de schijf kan heet zijn. Niet aanraken tijdens gebruik 1 VORSICHT: Scheibe kann heir3 sein. Im Betrieb Beruhrungen vermeiden .. ATTENTION : la surface du d1sque peut etre brGlante. Ne la touchez pas durant l'operation ATTENZIONE: la superficie del disco puo essere calda. Non toccare durante il funzionamento PRECAUCION: la superficie del disco puede estar caliente.
Specifications Wireless Protocol: Frequency range RF Output Power Temperature Range Transmit Range Power supply Bluetooth 4.0 & ANT+ 2400-2483,5 MHz 5 dBm (typical) Operational -20 °C to+ 55 °C 10 m Only use supplied power cord FCC and IC Declarations Your device contains a low power transmitter. When device is transmitting it sends out Radio Frequency (RF] signals.
T2900S.
Quick Start Smart trainers acx
The possibilities For an interactive ride on a Tacx Smart trainer you may use the Tacx apps, but you can also opt for Zwift, Tra1nerRoad, K1nomap and Bkool software . As the trainer communicates over ANT+ and Bluetoolh it's possible to read out your performance data on a 2nd device on top of controlling il with the previous ly mentioned software . To ride with the Tacx Trainer software. or other compu t er software .
Control of trainers resistance
Compatibility Tacx Training app for smartphones iOS • Bluetooth 4.0 integrated smartphones: iPhone4s and newer, Android 4.3 and newer Tacx Training app tor tablets iOS •t ANT+ or Bluetooth 4.0 integrated tablets: iPad 3 and newer [BT only). Android 4.3 and newer [ANT+ or BT] T3CX Training app for desktops Windows and Mac desktops ..• ... , with ANT+ antenna No ANT+ or Bluetooth 4.
Tacx Software Workout library I ri cl. u cJ I n g t. h c n ,o '=· t po p u l J r c l I m b s. st.rue! ur1:d vvcJJ·kout:. and much more Training plans* 100+ Training plans to prepare every athlete for his goals Tacx films* D 1~:,cuvpr fi-Hnu us cl.a s~;1 C'::,, slc-!t~p climbs.
• ~. . :o..C?Y-'~fq!ld.r~rn't_he :.. , ,: \..J:.A'.pp'.:$.to.re: : .· ·..
Read performance data on 2nd device You may control the trainer with your phone, tablet or desktop and connect a 2nd device to read your power, speed and cadence.
(:nmn;:1t1b1l1tv • ANT+: all devices • Bluetooth: Bluetooth 4.0 or higher Whether to connecl this second device via ANT+ or Bluetooth depends on how your 151 device is connected . Over ANT+ you can connect as many devices as you'd like to read out your performance data. Over Bluetooth you can only connect one device.
Option 1 Option 2 When your 1st device is connected via When your 1st device Is connected via Bluetooth you can connect the other ANT+ you can connect the other devicelsl device(sl via ANT+ via either Blue tooth and/or ANT+ g ·,. .. , ........ _. ·- ..... ... . •·... , ,. " ···•... ... \, o· .. Cl" .. ,, ·,\,, .. . . ..• . / _ , ,, ..... ,, '•· ... .. ... ·•··.... 1 device , ,• , , , ,. .................................. .. , , ·....., 51 . a , "°', .
Tac Utility app Test the connections and download the latest firmware updates. • iPhone 4s and newer • Android 4.3 and newer ·- Please follow the steps below before you start the Utility app for Android: 1. Turn off all apps running in the background 2. Turn off Bluetooth and then turn it back on 3.
Frequently asked questions t I All trainers with a physical transmission [e.g a belt or roller] need to be calibrated. The trainer determines the resistance in the transm1ss1on: the tyre on the roll or the tension in the belt. This is used as a reference point to accuretely measure and apply the needed resistance. ,. • Realistic road simulation • Correct measurement of cadence and power • No slipping Calibrate the trainer via the app or software you use.
3rd party apps and software a o· 3rd Party apps Various training options 3,d Party software ANT+ antenna needed, Tacx Antenna available onl1ne and in stores ~ Apps with ANT+ FE-C or Bluetooth open, like: Zwift,TrainerRoad, Zwift, TrainerRoad, Sufferfest, Cycleops [PC only]. BKool. Kinomap, FulGaz, Sufferfest, Cycleops [PC only). BKool. ,. 0 11 ■ 0 11 11 ■ ■a■ T W{'bcitl.' f~r. p t::~P l1 f rnrnpat1b a■ 1tw,.H www tacx com/cornpat1hle-software • rnorr mlormJl1on Chec.
,Bike computers Bike computers Workouts according to ridden GPS tracks. Devices with ANT+ FE-C, like: Garmin Edge 520 & 1000.
Other language? The Quick Start guide is online available in 16 languages, go to NL SE DE Fl FR PL IT ES PT CZ GR CN DK JP Need help? Maybe you can find an answer on our website: Or contact our support team via Facebook, Twitter or e-mail. W @tacxsupport ~ www.facebook.com/tacxvr tX~ support@tacx.
T0854O 2018-04 Designed and produced in the Netherlands Tacx
English Tacx Warranty Conditions Thank you for buying this Tacx product. Tacx aims to provide the highest possible quality at all times. Nevertheless, should you have any complaints please notify us immediately. The following warranty conditions apply without prejudice to the stipulations in Tacx's General Terms and Conditions.
Warranty procedu re Consult the Tacx website or contact the support@tacx.com to analyse the problem (have it analysed); If the product proves to be defective after analysis then send the product, together with a copy of the proof of purchase and the fully completed service form to the Tacx Service Centre. The claim under warranty can only be accepted for processing if the proof of purchase and a fully completed service form are received.
English • Tests have revealed that the unit will not overheat, even when subject to extreme use. However, when subject to prolonged and intensive use, the enclosure around the brake may become very hot. Always allow the brake to cool down after use before touching it. • Ensure not to drop the brake during assembly as this can lead to an imbalance which may cause vibration. • Never open the brake unit as this may cause damage.
Specifications Wireless Protocol: Frequency range RF Output Power Temperature Range Transmit Range Power supply Bluetooth 4.0 & ANT+ 2400- 2483,5 MHz 5 dBm (typical) Operational -20 °C to + 55 ° C 10 m Only use supplied power cord FCC and IC Declarations Your device contains a low power transmitter. When device is transmitting it sends out Radio Frequency (RF) signals.
Support ' u C 0 u X G ------0 __,I 0... 0... J) --------0.. ---- ---.
Explore the world with the most complete app Tacx films Training plans Workout creator Unl1m1ted access 99 Training plans Create custom to tracks all over for different goals workouts with the the globe. and levels. workout creator. Live opponents GPS tracks Data analytics Ride alongside Upload your Analyze your thousands of cyclists st rava logs or data online at around the world. create new tracks. the cloud website.
J • • ' cloud.tacx.