
Owner's Manual


tempe
The tempe is an ANT+ wireless temperature sensor. You can
attach the sensor to a secure strap or loop where it is exposed
to ambient air, and therefore, provides a consistent source of
accurate temperature data. You must pair the tempe with your
device to display temperature data from the tempe.
Putting On the Heart Rate Monitor
NOTE: If you do not have a heart rate monitor, you can skip this
task.
You should wear the heart rate monitor directly on your skin,
just below your breastplate. It should be snug enough to stay in
place during your activity.
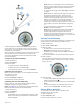
1
Snap the heart rate monitor module
À
onto the strap.
2
Wet both electrodes
Á
on the back of the strap to create a
strong connection between your chest and the transmitter.
3
If the heart rate monitor has a contact patch
Â
, wet the
contact patch.
4
Wrap the strap around your chest, and connect the strap
hook
Ã
to the loop.
The Garmin logo should be right-side up.
5
Bring the device within range (3 m) of the heart rate monitor.
After you put on the heart rate monitor, it is on standby and
ready to send data.
TIP: If the heart rate data is erratic or does not appear, you may
have to tighten the strap on your chest or warm up for 5–10
minutes.
Customizing Your Device
Setup Overview
The setup menu contains numerous ways to customize your
device. Garmin recommends that you take the time to
familiarize yourself with the settings for each feature. If you take
the time to customize your settings before your activity, you will
spend less time adjusting the watch during your activity.
Select the blue key, and select Setup.
NOTE: Any changes you make are saved to the active profile
(page 1).
System: Sets the GPS settings, arrow keys, and the device
language (page 10).
Data Pages: Customizes data pages and data fields
(page 10).
Sensors: Customizes the compass (page 10) and altimeter
(page 11) settings.
ANT Sensor: Sets up wireless accessories such as the heart
rate monitor or tempe (page 9).
Tones: Customizes the tones and vibrations (page 11).
Display: Adjusts the backlight and screen contrast (page 11).
Reset: Clears the trip data, sensor plots (page 15), waypoints,
or track log, or resets all of your settings (page 15).
Map: Customizes the map orientation and how items appear on
the map (page 11).
Tracks: Customizes the track recording settings (page 11).
Time: Customizes the appearance of the time page
(page 11).
Units: Changes the units of measure for data such as distance,
elevation, and temperature (page 11).
Pos. Format: Changes how your position data appears
(page 11).
Profiles: Changes the active profile and allows you to edit your
profiles (page 1).
Menu: Customizes the items that appear in the main menu
(page 11).
About: Shows information about the device and software
(page 11).
System Settings
Select Setup > System.
GPS Mode: Sets the GPS to Normal, or Demo Mode (GPS
off).
WAAS: Sets the device to use Wide Area Augmentation
System (WAAS) GPS signals. For information about WAAS,
go to www.garmin.com/aboutGPS/waas.html.
Hot Keys: Allows you to customize the hold function of the
arrow keys.
Language: Sets the text language on the device.
NOTE: Changing the text language does not change the
language of user-entered data or map data.
USB Mode: Sets the device to use mass storage mode or
Garmin mode when connected to a computer.
Customizing the Data Pages
You can customize the data pages for each profile.
1
Select the blue key.
2
Select Setup > Data Pages.
3
Select a category.
4
Select an option:
• To modify the data pages that appear when you are not
streaming NMEA 2000 data, select GPS.
• To modify the data pages that appear when you are
streaming NMEA 2000 data, select N2K Stream.
5
Select Add Page.
6
Follow the on-screen instructions to select the number of
data fields and the type of data to appear.
7
If necessary, select an existing data page.
8
Select an option:
• Select Edit, and change the data fields.
• Select Move Up or Move Down to change the order of
the data pages.
• Select Delete to remove the data page from the page
loop.
Compass Settings
Select Setup > Sensors > Compass.
Display: Sets the directional heading on the compass to
degrees or milli-radians.
North Ref.: Sets the north reference of the compass
(page 11).
Mode: Sets the compass to use either a combination of GPS
and the electronic sensor data when moving (Auto) or GPS
data only (Off).
10 Customizing Your Device