ELECTRIC CERAMIC HOB INSTRUCTION FOR INSTALLATION AND USE Model: CH30BF Model: CH60BF Model: CH77BF Model: CH90BF Important! Read these instructions for installation and use carefully. Keep these instructions for future reference. Any questions regarding the operation, maintenance service or warranty of the appliance should be directed to GASLAND, please contact us via email at: US market: Junskyamerica@outlook.com AU market: aussiebestsell@outlook.com UK market: campluxuk@outlook.
Safety Warnings Your safety is important to us. Please read this information before using your cooktop. Installation Electrical Shock Hazard • Disconnect the appliance from the mains electricity supply before carrying out any work or maintenance on it. • Connection to a good earth wiring system is essential and mandatory. • Alterations to the domestic wiring system must only be made by a qualified electrician. • Failure to follow this advice may result in electrical shock or death.
mains power supply (wall switch) and contact a qualified technician. • Switch the cooktop off at the wall before cleaning or maintenance. • Failure to follow this advice may result in electrical shock or death. Health Hazard • This appliance complies with electromagnetic safety standards. Hot Surface Hazard • During use, accessible parts of this appliance will become hot enough to cause burns.
the appliance should have a responsible and competent person to instruct them in its use. The instructor should be satisfied that they can use the appliance without danger to themselves or their surroundings. • Do not repair or replace any part of the appliance unless specifically recommended in the manual. All other servicing should be done by a qualified technician. • Do not use a steam cleaner to clean your cooktop. • Do not place or drop heavy objects on your cooktop. • Do not stand on your cooktop.
•A steam cleaner is not to be used. •The appliance is not intended to be operated by means of an external timer or separate remote-control system. Congratulations on the purchase of your new Ceramic Hob. We recommend that you spend some time to read this Instruction / Installation Manual in order to fully understand how to install correctly and operate it. For installation, please read the installation section.
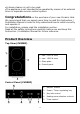
Top View (CH60BF) 1. max. 1800 W zone 2. max. 1200 W zone 3. max. 1800 W zone 4. max. 1200 W zone 5. Glass plate 6. Control panel Control Panel (CH60BF) 1. Heating zone selection controls 2. Power / Timer regulating controls 3. Keylock control 4. ON/OFF control 5. Timer control Top View (CH77BF) 1. max. 2200W(1000W) zone 2. max. 1200 W zone 3. max. 2000W(1100W) zone 4. max. 1200 W zone 5. Glass plate 6.
Control Panel (CH77BF) 1. Heating zone selection controls 2. Timer control 3. Power / Timer regulating controls 4. Keylock control 5. ON/OFF control 6. Dual Zone Top View (CH90BF) 1. max. 1200 W zone 2. max. 2300/1600/800 W zone 3. max. 2000/1100 W zone 4. max. 1200 W zone 5. max. 1800 W zone 6. Glass plate 7. Control panel Control Panel (CH90BF) 1. Cooking Zone indicator 2. Timer Indicator 3. Power/Timer regulating controls 4. Triple zone control 5. Keylock control 6. ON/OFF control 7.
Product Information The ceramic cooker hob can meet different kinds of cuisine demands because of resistance wire heating, micro-computerized control and multi-power selection. It’s an ideal really the optimal choice for modern families. Before using your New Ceramic Hob • Read this guide, taking special note of the ‘Safety Warnings’ section. • Remove any protective film that may still be on your ceramic hob.
Always lift pans off the ceramic hob – do not slide, or they may scratch the glass. Using your Ceramic Hob To start cooking • After power on, the buzzer beeps once, all the indicators light up for 1 second then go out, indicating that the ceramic hob has entered the state of standby mode. 1. Touch the ON/OFF show “-“ control,all the indicators 2. Place a suitable pan on the cooking zone that you hope to use. • Make sure the bottom of the pan and the surface of the cooking zone are clean and dry. 3.
3. For Model CH90BF-AU, select a heat setting by touching the “-“ or “+” control. Then touch “-“ or “+” to adjust the heating stage. • If you don’t choose a heat setting within 1 minute, the ceramic hob will automatically switch off. You will need to start again at step 1. • You can modify the heat setting at any time during cooking. 4.
2. Turn the whole cooktop off by touching the ON/OFF control. 4. Beware of hot surfaces • “H” showing means the cooking zone is hot to touch. It will disappear when the surface has cooled down to a safe temperature. It can also be used as an energy saving function if you want to heat further pans, use the hotplate that is still hot. Locking the Controls • You can lock the controls to prevent unintended use (for example children accidentally turning the cooking zones on).
Residual Heat Warning When the hob has been operating for some time, there will be some residual heat. The letter “ ”appears to warn you to keep away from it. Auto Shutdown Protection Another safety feature of the hob is auto shutdown. This occurs whenever you forget to switch off a cooking zone.
Touch and hold the “-“ or “+” control of the timer to decrease or increase by 10 minutes. 4. When the time is set, it will begin to count down immediately. The display will show the remaining time and the timer indicator will flash for 5 seconds. 5. Buzzer will beep for 30 seconds and the timer indicator shows “- - “ when the setting time finished. NOTE: The cooker will continue to cook, this timer function is a minute minder only, it does not turn the cooktop ON or OFF.
Hint: Touch the “-“ or “+” control of the timer once will decrease or increase by 1 minute. Touch and hold the ”-“ or “+” control of the timer will decrease or increase by 10 minutes. 4. Touch the “-“ control, if the “00” will show in the minute display, the timer is cancelled. 5. When the time is set, it will begin to count down immediately. The display will show the remaining time and the timer indicator flash for 5 seconds.
Setting the timer to turn more than one cooking zone off Model: CH77BF-AU, CH77BF-US, CH60BF, CH30BF-US 1. If more than one heating zone use this function, the timer indicator will show the lowest time. (e.g. zone 1# setting time of 3 minutes, zone 2# setting time of 6 minutes, the timer indicator shows “3”.) NOTE: The red dot next to power level indicator will flash. (set to 3 minutes) (set to 6 minutes) 2. When cooking timer expires, the corresponding cooking zone will be switch off automatically.
2. When cooking timer expires, the corresponding cooking zone will be switched off automatically. NOTE: If you want to change the time after the timer is set, you have to start from step 1. Power Management Power management function on Group A •If both zones are working on/above power stage 7, these two zones will be automatically switched on and off by turns, which was controlled by software.
• Using a lid will reduce cooking times and save energy by retaining the heat. • Minimise the amount of liquid or fat to reduce cooking times. • Start cooking on a high setting and reduce the setting when the food has heated through. Simmering, cooking rice • Simmering occurs below boiling point, at around 85˚C(185℉), when bubbles are just rising occasionally to the surface of the cooking liquid. It is the key to delicious soups and tender stews because the flavours develop without overcooking the food.
Heat Settings The settings below are guidelines only. The exact setting will depend on several factors, including your cookware and the amount you are cooking. Experiment with the cooktop to find the settings that best suit you.
Boilovers, melts, and hot sugary spills on the glass Spillovers on the touch controls Remove these immediately with a fish slice, palette knife or razor blade scraper suitable for ceramic glass cooktops, but beware of hot cooking zone surfaces: 1. Switch the power to the cooktop off at the wall. 2. Hold the blade or utensil at a 30°angle and scrape the soiling or spill to a cool area of the cooktop. 3. Clean the soiling or spill up with a dish cloth or paper towel. 4.
The touch controls are difficult to operate. The glass is being scratched. Some pans make crackling or clicking noises. There may be a slight film of water over the controls or you may be using the tip of your finger when touching the controls. Rough-edged cookware. Make sure the touch control area is dry and use the ball of your finger when touching the controls. Unsuitable, abrasive scourer or cleaning products being used.
Installation Selection of installation equipment Cut out the work surface according to the sizes shown in the drawing. For the purpose of installation and use, a minimum of 50mm(2 in) space shall be preserved around the hole. Be sure the thickness of the work surface is at least 30mm(1 1/5 in). Please select heat-resistant work surface material to avoid larger deformation caused by the heat radiation from the hotplate.
Note: The safety distance between the hotplate and the cupboard above the hotplate should be at least 760mm(30 in). A B C D E 760mm 50mm mini 20mm mini Air intake Air exit 5mm 30 in 2 in mini 4/5 in mini Air intake Air exit 1/5 in Before locating the fixing brackets The hob should be placed on a stable, smooth surface (use the packaging). Do not apply force onto the controls protruding from the hob.
Adjust the bracket position to suit for different work surface’s thickness. Cautions 1. The ceramic cooker hob must be installed by qualified personnel or technicians. We have professionals at your service. Please never conduct the operation by yourself. 2. The ceramic cooker hob shall not be mounted to cooling equipment, dishwashers and rotary dryers. 3. The ceramic cooker hob shall be installed such that better heat radiation can be ensured to enhance its reliability. 4.
Connecting the hob to the mains power supply The power supply should be connected in compliance with the relevant standard, or a single-pole circuit breaker. The method of connection is shown below. 1. If the cable is damaged or needs replacing, this should be done by an after-sales technician using the proper tools, so as to avoid any accidents. 2.
This appliance is labeled in compliance with European directive 2012/19/EU for Waste Electrical and Electronic Equipment (WEEE). By ensuring that this appliance is disposed of correctly, you will help prevent any possible damage to the environment and to human health, which might otherwise be caused if it were disposed of in the wrong way. The symbol on the product indicates that it may not be treated as normal household waste.