
Full Product Manual


5
Warning
1. To reduce the risk of fire, use only metal ductwork.
2. This appliance must be grounded. In the event of an electrical short circuit, grounding reduces
the risk of electric shock by providing an escape wire for the electric current. This appliance is
equipped with a cord having a grounding wire with a grounding plug. The plug must be
plugged into an outlet that is properly installed and grounded.
Warning: Improper grounding can result in a risk of electric shock. Consult a qualified electrician if
the grounding instructions are not completely understood or if doubt about whether the appliance
is properly grounded exists. Do not use an extension cord. If the power supply cord is too short,
have a qualified electrician install an outlet near the appliance.
Caution: To reduce risk of fire and to properly exhaust air, be sure to duct air outside.
Do not vent exhaust air into spaces within walls or ceilings or into attics, crawl spaces, or garages.
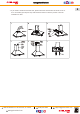
Install The Hood
Note 1: On stainless steel hoods, carefully remove the plastic protective film from all exterior
surfaces of the hood and chimney prior to final installation.
Note 2: At least two people will be required to mount the hood.
Minimum hood distance above the cooker must not be less than 25 /”.
1. Fix the duct to the air outlet with 2 screws ST3*6 as shown on PIC. 1.
2. Fix the first chimney on the range hood body with 2 screws ST3*6 on the back as shown on PIC. 2.
3. Unscrew the 4pcs M4*10 screw on top and use them to fix the air outlet base on the air system
top.
4. Please decide the position that you want to hang on the wall. Fix the hood mounting bracket on
the bracket and make it balance. Take off the filter and mark the 2 fixing holes from the body
back to the wall. Take down the hood body from the hood mounting bracket. And fix the 2
fix the 2 screws ST4.2*30 from the hood body back to the wall as shown on PIC. 3.
PIC. 4.
6. Fix the position for chimney mounting bracket and fix it to the wall with 2pcs plastic screws
bracket with 2 screws M4*6 as shown on PIC. 5.
(844) 538-7890 support@gaslandchef.com
www.gaslandchef.com
3330-A Marathon Ct Charleston, SC 29418