RANGEHOOD SERIES WALL MOUNTED Medium GRHM Large GRHL CEILING MOUNTED Island GMHIS Important: Retain these instructions for future use.
WARRANTY TERMS & CONDITIONS This warranty is not transferable to a subsequent purchaser if the product is sold by the original purchaser during the warranty period. This warranty does not apply to any defect, deterioration, loss, injury or damage occasioned by or as a result of misuse or abuse, negligent handling or storage, normal wear and tear or if the product has not been installed and used in accordance with S.G.A.
Installation - OUTDOOR USE ONLY Read all instructions before installing and operating this Rangehood. The following situations are considered to provide the natural ventilation required for an outdoor domestic barbecue or patio heater to be used: This Rangehood is designed for use above an outdoor domestic gas (propane/natural) barbecue. • Four open sides with a roof or overhead cover. • Four enclosed sides (walls) without a roof or overhead cover.
Installation - OUTDOOR USE ONLY Balconies & Verandas An outdoor barbecue or rangehood may be installed and used on a balcony or veranda if, by location and use, it will not cause a hazard and the manufacturer’s instructions allow for such use. It may also be necessary to consult local building laws before installing or using a gas barbecue on a balcony or veranda.
IMPORTANT SAFETY NOTICE • Disconnect the power supply when changing light bulbs. • Remove any plastic coating from the product before use. • This appliance is not intended for use by persons (including children) with reduced physical, sensory or mental capacities, or lack of experience and knowledge, unless they have been given supervision or instruction concerning use of the appliance by a person responsible for their safety.
PRIOR INSTALLATION - IMPORTANT NOTICE Please read the entire instruction manual before installing the Rangehood. The socket must be accessible and enable the end user to isolate the Rangehood from the power for the purpose of internal cleaning or maintenance. The installation in this manual is intended for qualified installers, service technicians or persons with similar qualified backgrounds. DO NOT attempt to install this appliance yourself.
RANGEHOOD INSTALLATION Before Installing Please consider the following before commencing to install your rangehood. Your rangehood will need to be ducted to ensure it operates and complies with local and national regulations. Duct Mounting Options You will need some additional parts to complete these installations. All motors need to be ducted individually and the included expanding duct is 150mm diameter.
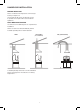
RANGEHOOD INSTALLATION The ideal position of the Rangehood is as follows: 1. Height above cooking surface – 1200mm 2.
DUCTING All motors need to be ducted individually to ensure air flow and suction is adequate and meets all regulations. WARNING - FIRE GRHM Medium – 2 Ducts 150mm Ø GRHL Large – 3 Ducts 150mm Ø NEVER Exhaust air or terminate duct work into spaces between walls, crawl spaces, ceilings, attics or garages. All exhaust must be ducted to the atmosphere.
INSTALLING - MEDIUM WALL MOUNT rangehood 3. Your rangehood is very heavy. Please use suitable fixings and hole size for this weight. Mounting bracket is attached and part of the medium rangehood motor cover. Medium – 50Kg Note: Rangehood must be level, if not rangehood will not operate correctly. Large – 80Kg 1. Using a tape measure mark the centre hole (A) on your wall. This mark should be in the centre of your cooking surface and 1582mm above your cooking surface. 4.
INSTALLING - LARGE WALL MOUNT rangehood WALL BRACKET FITTING Note: Bracket must be level, if not rangehood will not operate correctly. 1. Lift and position the Rangehood so that the wall bracket slides into all lifting holes on the top wall side of the motor box. 1. Using a tape measure mark the centre bottom hole (A) on your wall. This mark should be in the centre of your cooking surface and 1562mm above your cooking surface. 2.
INSTALLING - MEDIUM & LARGE WALL MOUNT RANGEHOOD DUCTING Flue Surround 1. Remove all tape from the ducts butterfly flaps and ensure they move up and down freely. Provided are 2 x flue surrounds both 400mm high. These are used to finish and cover the motor box and installed ducting. 2. Position the butterfly flaps up. 1. Lift and fit bottom flue surround, this fits into the groove in the Rangehood flat top. 3. Position the ducting over the top of the collection box and butterfly flaps.
INSTALLING - ISLAND CEILING MOUNT WALL BRACKET DUCTING Note: Bracket must be level. If not Rangehood will not operate correctly. 1. Remove all tape from the ducts butterfly flaps and ensure they move up and down freely. 1. Using a plumb bob mark on the ceiling the centre of your cooking surface. 2. Position the butterfly flaps up. 3. Position the ducting over the top of the collection box and butterfly flaps. Note: If unsure about the ducting please contact a Rangehood installer. 2.
Read all instructions before installing and operating this appliance. IMPORTANT SAFETY NOTICE Read all instructions in this manual before operating the appliance. Save these instructions for future reference. Always leave safety grills and filter in place. Without these components, operating blowers could catch on to hair, fingers and loose clothing. NEVER dispose cigarette ashes, ignitable substances or any foreign objects in to the blowers. NEVER leave cooking area unattended.
SPECIFICATIONS Medium - GRHM 609mm 686mm 395 - 400mm 395 - 400mm 76mm 1200mm 800mm Large - GRHL 609mm 966mm 395 - 400mm 395 - 400mm 76mm 1480mm 800mm 15
SPECIFICATIONS Island - GMHIS 330mm 530mm 395 - 400mm 395 - 400mm 76mm 1200mm 800mm Description Medium - GRHM Finish Marine grade stainless steel #316 Large - GRHL Size (mm) 1200 W x 800 D Total Height 515mm - Not including flue covers Height Above Cooking Surface 1200mm - Minimum Air Volume, Gross 2000m3 Noise ≤ 90db Motors - Electric induction Lighting - Cool white 1480 W x 800 D Island - GMHIS 1200 W x 800 D 1250mm - Maximum 3000m3 2000m3 2 3 2 4 x Rectangle 18 LED 6 x Rect