
Install Instructions


GASTITE DIVISION, TITEFLEX CORPORATION / 1116 Vaughn Parkway / Portland, TN 37148
800.662.0208 / www.gastite.com / gastite@gastite.com
47
SECTION 4: INSTALLATION PRACTICES / JANUARY 2019
4.2.3 XR3 FITTING TO FLASHSHIELD™ CSST (MULTI-LAYER JACKET)
(WITHOUT STRIPPING TOOL)
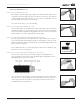
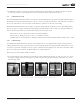
STEP 1 CUT-TO-LENGTH (FIG. 4-15)
Cut tubing to desired length using tubing cutter. Cut should be centered in a
corrugation valley. Use light roller pressure with extra rotations in one direction
to leave tubing round and free of burrs on cut. To ensure a quality flare, all cuts
should be made on a straight section of tubing.
Note: Tube ends are sharp, use care when handling.
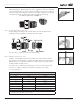
STEP 2 CUT & STRIP JACKET LAYERS (FIG. 4-16)
Using a utility knife, cut through all three jacket layers back to the second valley
from tubing end. Do not cut the jacket layers in such a way that the steel tubing
end is scored. (is could affect seating). Remove the short section of jacket layers
which will expose one full corrugation-valley of the tubing.
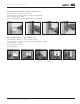
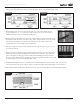
STEP 3 LOCATE AND MARK 4TH CORRUGATION PEAK (FIG. 4-17)
e outer poly layer needs to be marked and cut at peak of 4th crown to expose a
section of the metallic shield. Temporarily place one bushing into location on the
CSST (see schematic). e area between the two back bushing ridges indicates the
peak of the 4th corrugation.
Note or mark this point (top of 4th corrugation) as the location at which the outer
black layer is to be cut and stripped.
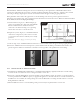
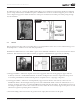
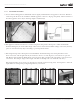
STEP 4 CUT & STRIP OUTER JACKET LAYER (FIG. 4-18, FIG. 4-19)
Cut the outer jacket at the peak of the 4th corrugation as identified in the
prior step. Remove outer jacket section. e final stripped configuration of the
FlashShield jacket layers looks as shown.
Note: Cut the outer jacket carefully to avoid cutting through the aluminum shield during
this outer jacket cut. Cutting through the aluminum shield below the point of the outer
jacket cut/strip will reduce the effectiveness of the fitting-to-shield electrical continuity,
and FlashShield’s electrical performance.
Fig. 4-15
Fig. 4-16
Fig. 4-17
Fig. 4-18
Fig. 4-19