Operating Instructions Design Stand Mixer Advanced Pro Art.-No.
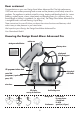
Carefully read all provided instructions before you start running the appliance and pay regard to the warnings mentioned in these instructions. Table of Contents Knowing the Design Stand Mixer Advanced Pro...................................................31 Important safegards...........................................................................................32 Important safegards for all electrical appliance.................................................
Dear customer! Congratulations on your new Design Stand Mixer Advanced Pro! The high performance 1000 watt motor makes processing food an ease and the planetary mixer evenly mixes all ingredients. The appliance is perfectly suited for mixing, beating and blending foods (i.e. instant pudding, cocktail sauces, cream, crepe batter) and kneading pastry (i.e. shortcrust pastry or bread dough) or folding in ingredients (i.e. egg white).
Important safeguards • Carefully read all instructions before operating the Design Stand Mixer Advanced Pro for the first time and save for future reference. • Remove and safely discard any packaging material and promotional labels before using the Design Stand Mixer Advanced Pro for the first time. • To eliminate a choking hazard for young children, remove and safely discard the protective cover fitted to the power plug of this appliance.
• Ensure the mixer motor head is locked into the horizontal (closed) position when not in use and before storing. • Always ensure the control dial is in the ‘Off’ position, the power is switched off at the power outlet and the power cord is unplugged from the power outlet before attempting to move the stand mixer, before assembling or disassembling, when not in use and before cleaning or storing. • Do not move the stand mixer whilst in operation. • Do not leave the stand mixer unattended when in use.
• Always lower the motor head with the assembled processing tool first, then attach the splash guard and then turn on the appliance. This way you avoid splashing. • ATTENTION: Never use any other bowls then the provided. Ensure the bowl is firmly attached before you start operating the appliance. Operating Before first use Remove all promotional materials and packing as well as any foreign objects, but do not remove the model label.
The splash guard can now be assembled if required. Slide the main ring into position on top of bowl, then assemble the pour spout. NOTE: When ingredients are in the mixing bowl, the scraper beater may make a slight noise as it scrapes the sides and bottom of the bowl. This is normal and should not cause concern. Do not turn the stand mixer on with the scraper beater in place if the mixing bowl is empty. This will cause the scraper beater to make a loud noise as it scrapes the bowl.
Adjusting the mixing time The count-up timer The count-up timer is especially useful to gauge mixing time. You can monitor the time it takes to thoroughly mix the ingredients, so that the next time you mix the same ingredients you can set the count-down timer for the specific time. The count-up timer will automatically begin counting up as soon as the dial is rotated from ‘Off’ to one of the speeds. When the dial is turned to „Pause“ the total time will be displayed on the LCD and will flash.
To continue mixing in the ‘count-down timer’ mode, simply rotate the dial back into one of the mixing speeds or alternatively to the “Off” position to reset the timer to 0:00. Electronic protection cut-off – Current overload The stand mixer is equipped with an electric protection cutoff and will automatically stop operating if the motor is stalled or overloaded. This is normally a result of excessive ingredients being processed at one time.
7. Lower the mixing arm by depressing the tilt back hinge button and pushing the mixing arm down until it locks into the horizontal (closed) position. WARNING: Avoid contact with beater/dough hook/whisk during operation. Keep hands, hair, clothing, spatulas and other utensils away from beater/dough hook/whisk to prevent personal injury or damage to the mixer. Cleaning after use 1.
Tips for using Using the mixing tools The appliance will supplied with 4 mixing tools: Dough hook: for heavy dough e.g. bread- or pizza dough. Whisk: for whipping (e.g. eggs, cream) and aerating (e.g. egg whites, meringue). Flat beater: for folding and beating (e.g. cake and biscuit mix, haevy butter, pastry) and for creaming (e.g. butter and sugar, icing). Scraper beater: for making fluffy, light dough, to froth up eggs, making whipped cream, egg white, sponge, other airy dough.
Using the programmes programme- / speed levels Example for using OFF Assembling and disassembling the mixing tools. PAUSE While mixing, at any stage, you can rotate the control dial to the “pause” setting (see:´Pause modus`). KNEADING Starting a mixing process, mixing dry ingredients or to fold liquids into dry dough. Slow mixing, making yeast dough or other heavy dough, processing potatoes and other vegetables, to fold butter into dough and for mixing liquid dough (e.g. crêpe dough).
• WARNING: Do not process hot food. Wait for the food to cool down. The rising steam and condensation on the appliance can damage the appliance. • Use the whisk for beating the white of eggs and ensure the bowl is dry and clean. Slowly arise the speed up to programme ´LIGHT MIXING` and check the consistency of the eggs. The white of egg is ready when it is stiff and shiny and when it sticks to the whisk taking the whisk out of the bowl.
Technical specifications Model: Art.-No.: 40979 Design Stand Mixer Advanced Pro Power supply: 230-240 V AC, 50 Hz Power consumption: 1.000 W Length of power cord: ca. 1 m Weight: 8 kg Dimensions: ca. 41,5 x 20,0 x 35,5 cm (width x depth x height) Capacity bowl: 4,7 Litre Certification: Troubleshooting Problem Easy solution Machine will not work when switched “ON” Always ensure the speed control dial is in the “Off” position before start.
´E2` error message is flashing on the count-up/down timer display. This may indicate that the motor has been stressed by overheating with excessive load. The mixer is fitted with a selfresetting safety device which safeguards against overheating on the motor with excessive loads. If overheating occurs, the mixer will automatically activate the overheating protection device and the motor will switch itself off.
Variations: Chocolate Biscuits 1 quantity Butter Biscuit mixture 2 tablespoons cocoa Step 5: Sift flour, baking powder and cocoa together. Orange Biscuits 1 quantity Butter Biscuit mixture 1 tablespoon finely grated orange rind Step 3: (Omit vanilla essence) add sugar, orange rind and egg, cream until light and fluffy. Lemon Biscuits 1 quantity Butter Biscuit mixture 3 teaspoons finely grated lemon rind Step 3: (Omit vanilla essence) add sugar, lemon rind and egg, cream until light and fluffy.
Gingerbread Biscuits (Makes 20) 125g butter, softened 1/3 cup brown sugar 1/3 cup golden syrup 1 x 60g egg, lightly beaten 2¼ cups (340g) plain flour 1 tablespoon ground ginger 1 teaspoon baking powder 1 teaspoon bicarbonate of soda extra flour, for kneading 1. 2. 3. 4. Operate according to the instructions ´Operating`. Pre-heat oven to 180ºC. Assemble mixer using scraper beater. Using Creaming/Beating setting, beat butter, sugar and syrup until light and creamy, about 3 minutes. 5.
9. Let dough rest 10 minutes. 10. Remove splash guard, rise the mixing arm and take the dough out of the bowl. 11. On floured board, fold dough over 3 or 4 times to knead slightly. For 1 large pizza baked in a 38 x 25 x 2 cm backing pan, roll dough out to about that size, and transfer to greased pan. Gently push dough out to cover pan and form crust edge up sides of pan. For 2 thin crust pizzas (about 30 cm diameter), divide dough in half. 12.
One Crust Standard Pie Crust (Makes 1 (23 cm) pie crust) 1 cup (approx. 120g) all-purpose flour 1/2 teaspoon salt 1/4 cup (approx. 55g) Palmin Soft 1 tablespoon butter or margarine, well chilled 3 tablespoons cold water 1. 2. 3. 4. 5. 6. 7. 8. 9. Operate according to the instructions ´Operating`. Assemble the dough hook. Add flour, salt, Palmin Soft, and butter to bowl, lower the mixing arm .
Chocolate Cake 1½ cups self-raising flour ½ cup cocoa 1½ cups caster sugar pinch of salt 150g butter or margarine, at room temperature 2 eggs 1 cup milk 1. 2. 3. 4. 5. 6. 7. 8. Operate according to the instructions ´Operating`. Preheat oven to 180 °C, grease and line a 23cm cake tin. Assemble the whisk. Add eggs, butter and sugar to bowl, lower the mixing arm. Attach the splash guard to the bowl and process until creamy. Slowly rise speed until reaching medium speed level (´CREAMING BEATING`).
4. 5. 6. 7. 8. Operate according to the instructions ´Operating`. Assemble the whisk. Add 2 egg yolks and half the quantity of sugar, lower the mixing arm. Attach the splash guard to the bowl and beat for 30 seconds until creamy. Slowly rise speed until reaching ´AERATING / WHIPPING`. Lower speed and add turn by turn sideways cream and continue to mix for a further 15 seconds slowly rising the speed. 9. Lower speed and slowly add chocolate mixture. Slowly rise speed and mix for 20 seconds. 10.
Basic Waffle recipe (Makes 1-2 waffles) 1 egg 4 tablespoons unsalted butter, melted and cooled 1 heaped tablespoon sugar 1 small pinch salt 100ml milk (round about) 6 heaped tablespoon flour 1. 2. 3. 4. 5. 6. 7. 8. Operate according to the instructions ´Operating`. Assemble the whisk. Add melted butter and egg, sugar and salt to bowl Lower mixing arm, attach splash guard and mix until creamy. Slowly rise speed until reaching high speed ´AERATING / WHIPPING`. Lower speed and add flour sideways.
7. Turn off the appliance, remove splash guard, rise the mixing arm disassemble whisk and assemble beater. Lower the mixing arm, attach the splash guard and add flour sideways. 8. Beat until smooth. In separate bowl beat the egg whites until stiff peaks form. 9. Turn off the appliance, remove splash guard, rise the mixing arm, add egg whites to mixture. 10. Lower the mixing arm, attach the splash guard and slowly fold the egg whites into the batter.
GASTROBACK GmbH Gewerbestraße 20 . D-21279 Hollenstedt / Germany Telefon +49 (0)41 65/22 25-0 . Telefax +49 (0)41 65/22 25-29 info@gastroback.de . www.gastroback.