
Operating instructions


36
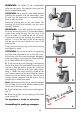
1. Take the worm housing into the right hand and
insert with your left hand the worm inside the worm
housing. (Picture E) The side of the worm with the
plastic end has to face the worm housing when
putting it inside the worm housing. The worm is
correctly assembled when the plastic end of the
worm stands a few millimetres out of the worm
housing. Take the adaptor disc. The small end with
the recess has to face the worm when attaching. If
necessary turn the adaptor disc a little bit until the
arresting pin of the worm housing locks precisely
into the corresponding recesses of the adaptor
disc.
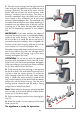
IMPORTANT: If the tools overlap the edges of
the worm housing the worm is not placed properly
inside of the worm housing. Turn the worm a lit-
tle bit to make it fit inside but do not use force. If
mounted correctly the adaptor disc is aligned with
the front of the worm housing and the axis of the
worm stands out 2 mm of the adaptor disc.
Place the sausage attachment on the worm housing
and fit the closure ring over the sausage attach-
ment. Firmly screw the closing ring on the worm
housing and tighten by hand.
ATTENTION: Do not use any tools, for tightening
the screw and pay attention not to cant the screw.
If the screw cants the screw thread gets damaged.
If the screw does not turn easily put some sunflower
oil (or other edible oil) on the screw.
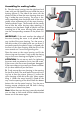
2. Firmly secure the worm housing in the opening
for the drive shaft. The small end of the worm hous-
ing has to face the mincer (picture F). Incline the
worm housing a little bit to the right, when assem-
bling it. When the worm housing is fitted all the
way into the opening of the drive shaft the release
button sinks into the motor housing. Turn the worm
housing counter clockwise until the shaft is facing
upright and is locked into place.
Note: When the worm housing is securely attached
you can hear a click sound and the release button
comes out of the recess again.
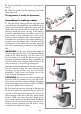
3. Press the feed pan onto the worm housing (pic-
ture G).
4. Place the pusher into the opening of the feed
chute (picture H).
Theapplianceisreadyforoperation.
F
G
H
I