GASTROBACK ® Bedienungsanleitung Design espresso MasChine aDvanCeD ConTrol Art.-Nr. 42636 Design Espresso Maschine Advanced Control Read all provided instructions before first usage! Model and attachments are subject to change! Downloaded from www.Manualslib.
Carefully read all provided instructions before you start running the appliance and pay attention to the warnings mentioned in these instructions. Table of Contents Knowing Your Design Espresso Machine Advanced Control.................................... 42 Important Safeguards.......................................................................................... 44 Important Safeguards for all Electrical Appliances.............................................. 47 High Temperatures—Risk of Burns........
Dear Customer! Congratulations! Commercial features and performance, in a domestic foot print come with your new Gastroback Design Espresso Machine Advanced Control. Espresso perfection, requires precision temperature and pressure control, consistently, every time. At the heart of this machine is its Dual Stainless Steel Boiler heating system. The brew boiler, for the espresso shot, extracts to within +/- 1'C and a separate steam boiler, which offers instant and powerful steam on demand.
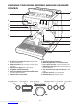
Knowing Your Design Espresso Maschine Advanced Control G A B H C I D J E F K A L M A T op fill 2.5 litre removable water tank with integrated water filter and backlit level indicator. B Backlit LCD interface displays current settings and simplifies programming functions. C Espresso pressure gauge monitors extraction pressure. D Integrated & removable 58mm tamper E Actively heated 58mm group head with embedded element for thermal stability during extraction.
Accessories: N O P O P Q S R N Stainless steel frothing jug O Single wall filter baskets (1 & 2 cup) P Dual wall filter baskets (1 & 2 cup) Q Cleaning disc R Espresso cleaning tablets S Cleaning tool LCD INTERFACE Programmable Functions: • Shot Temp • Shot Volume - 1 & 2 cup • Pre-Infusion • Auto Start 43 Downloaded from www.Manualslib.
Important Safeguards Carefully read all instructions before operating this appliance and save for further reference. Do not attempt to use this appliance for any other than the intended use described in these instructions. Any other use, especially misuse, can cause severe injuries or damage by electric shock, heat or fire. Any operation, repair and technical maintenance of the appliance or any part of it other than described in these instructions may only be performed at an authorised service centre.
objects on the appliance or any part of it. Take care that no one will pull the appliance by the power cord. • Remove and safely discard any packaging material and promotional labels or stickers before using Design Espresso Machine Advanced Pro G for the first time. • To eliminate a choking hazard for young children, remove and safely discard the protective cover fitted to the power plug of this appliance. • Do not place the appliance near the edge of a bench or table during operation.
• Do not leave the appliance unattended when in use. • Do not touch hot surfaces. Use handles or knobs. Allow the appliance to cool down before moving or cleaning any parts. • Do not place anything, other than cups for warming, on top of the the appliance. • Always switch off the appliance by pressing the POWER button to ›off‹ and unplug if appliance is to be left unattended, if not in use, before cleaning, before attempting to move the appliance, disassembling, assembling and when storing the appliance.
– by clients in hotels, motels and other residential type environments; – bed and breakfast type environments. Important Safeguards for all Electrical Appliances The appliance is heated electrically. Place the appliance near a suitable wall power socket to connect the appliance directly to a protected mains power supply with protective conductor (earth/ground) connected properly.
anything other than its intended use. Do not use in moving vehicles or boats. Do not use outdoors. Misuse may cause injury. CAUTION: To ensure continued protection against risk of electric shock, connect to properly earthed outlets only. High Temperatures – Risk of Burns • The Design Espresso Machine Advanced Pro G is designed for brewing espresso and coffee.
FEATURES OF YOUR Design Espresso maschine Advanced Control TRIPLE HEAT SYSTEM Additional features Dual Stainless Steel Boilers LCD Interface Dedicated espresso and steam boilers for simultaneous milk texturing and espresso extraction at the optimum temperature. Displays current settings and simplifies programming functions. High Volume Instant Steam Actively Heated Group Head Dedicated 950ml steam boiler delivers instant and continuous steam.
Operating • A pumping sound will be heard indicating empty boilers are being filled with water for the first time. WARNING:Both the STEAM LEVER and HOT WATER dial must be in the CLOSED position for the machine to enter START UP mode. • Machine will reach operating temperature and go into STANDBY mode. BEFORE FIRST USE When the machine has reached STANDBY mode, run the following 3 steps: Flushing The Machine Machine Preparation 1. Press 2 Cup button to run water through group head. 2.
power save MoDe 3. Clock Displays current time. (default set 12.00am if time has not been set). The machine will enter POWER SAVE mode after remaining idle for 1 hour and turn off completely if not used for a continuous 4 hour period. at Pressing any button during POWER SAVE (except POWER), or operating the STEAM LEVER or HOT WATER dial will cause the machine to enter START UP mode. Pressing the POWER button during POWER SAVE will turn the machine off.
hot water The machine will stop after 2 CUP volume has been extracted and will return to STANDBY mode. For instant hot water, rotate the HOT WATER dial to OPEN position. The Hot Water LED will be On. Manual The MANUAL button allows you to control the espresso pour volume to suit your preference. Press MANUAL button once to start the espresso extraction. The extraction will start using the low pressure pre-infusion. Press MANUAL button again to stop extraction.
shoT voluMe exTraCTion TeMperaTure Press MENU button until SHOT TEMP icon flashes. The LCD will display the current shot temperature setting. 1 Cup volume programming Press MENU button until SHOT VOL icon flashes and 1 CUP is displayed on the LCD screen. Press 1 CUP button to start espresso extraction. Press 1 CUP again once desired volume of espresso has been extracted. The machine will beep twice to indicate the new 1 CUP volume has been set.
auTo sTarT Auto start - TIME To use AUTO START, first ensure clock has been set. Set Auto Start to ON (refer to AUTO START ON/OFF instructions). auto start on/oFF Press MENU button until AUTO START icon flashes and the current Auto Start time is displayed on the LCD screen. Press MENU button until AUTO START icon flashes and the current Auto Start setting (ON or OFF) is displayed on the LCD screen. Press UP or DOWN arrow to adjust AUTO START to the desired time.
resetting Default settings Press UP or DOWN arrow to adjust the time. The machine has the following default settings: 1. 2. 3. 4. 5. Temperature – 93°C Pre-Brew Infusion – PP60, PT5 seconds Auto Start - OFF Auto Start Time - 7.00am Audio - LO To reset machine to original default settings, first ensure machine is switched off. Press and hold 1 CUP & 2 CUP buttons and then press the POWER button. The LCD will display REST. All programmed settings will be reset to the original default setting.
Press & Hold - MANUAL Press & hold the MANUAL button to deliver water to the group head at low pre-infusion pressure. When MANUAL button is released, water will continue at the full 9 Bars of pressure. Press MANUAL button again to stop extraction . This function can be used to manually control the pre-infusion duration. aDvanCeD prograMMing Pre-Infusion Programming We recommend a range of between 50-65 as being optimum. Press EXIT to return to STANDBY mode.
hoT waTer leD Flashing at sTarT up The machine will not enter START UP mode when the HOT WATER dial is in the OPEN position and the HOT WATER LED is flashing. Move the HOT WATER dial to the CLOSED position for the machine to enter START UP mode. hoT waTer leD Flashing Press EXIT to return to STANDBY mode. The HOT WATER LED will flash when the HOT WATER function has been operating for longer than 1 minute.
For information on how to clean the machine, refer to the Cleaning Cycle instructions on. dless of the grind, dose, tamp pressure or freshness. COFFEE MAKING TIPS & PREPARATION PRE-HEATING Use the 1 cup filter basket when brewing single cups and the 2 cup filter basket when brewing two cups, stronger single cups or mugs. Heating your cup or glass A warm cup will help maintain the coffee’s optimal temperature.
the filter basket and/or the grind is too coarse. This is an UNDER-EXTRACTED shot. • If the espresso starts to drip but doesn’t flow after 15 seconds, then you have either over dosed the filter basket and/or the grind is too fine. This is an OVER-EXTRACTED shot. A great espresso is about achieving the perfect balance between sweetness, acidity and bitterness. • As a guide to dose, the top edge of the metal cap on the tamper should be level with the top of the filter basket after the coffee has been tamped.
• Bewegen Sie den Dampfwahlschalter in die CLOSED-Position vor dem Herausnehmen der Milchschaumdüse aus der Milch. • Set ver to steam damp tap water. • Place the jug or a 500ml container beneath the group head. the jug to one side, lift the steam lepurge out any residual milk from the wand and wipe steam wand with a cloth. • Press MENU button until CLEAN CYCLE icon flashes and PUSH is displayed on the LCD screen. • Tap the jug on the bench to collapse any bubbles.
CLEANING THE DRIP & STORAGE TRAY STEAM LEVER is in the CLOSED position and clean using the pin on the end of the cleaning tool. The drip tray should be removed, emptied and cleaned after each use or when the drip tray indicator is showing Empty Me! • If steam wand remains blocked, remove the tip using the integrated spanner in the cleaning tool and soak in hot water. Screw tip back onto the steam wand using the integrated spanner in the cleaning tool. Remove grill from the drip tray.
TROUBLESHOOTING Problem POSSIBLE CAUSES WHAT TO DO The Hot Water LED flashes Hot Water dial is Open. when the machine is turned On Turn the Hot Water dial to the CLOSED position. The Steam LED flashes when Steam Lever is Open. the machine is turned On Move the Steam Lever to the CLOSED position. Water does not flow from the group head Machine has not reached Allow time for the machine operating temperature. to reach operating temperature. The POWER light will stop flashing when machine is ready.
Problem POSSIBLE CAUSES WHAT TO DO Espresso only drips from the Coffee is ground too finely. Use slightly coarser grind. portafilter spouts, restricted Too much coffee in the filter Lower dose of coffee. flow basket. Coffee tamped too firmly. Tamp between 15-20kgs of pressure. The Dual Wall filter basket Use the fine pin on the cleamay be blocked. ning tool to clear the outlet hole on the under side of the filter basket. Espresso runs out too quickly The coffee is ground too Use slightly finer grind.
STORage Before storing, press the POWER-button to off, turn the steam dial to off and unplug. Remove unused beans from the hopper, empty the water tank and the drip tray. Ensure the machine is cool, clean and dry. Insert all accessories into position or into the storage tray. Store upright. Do not place anything on top. WARNING: Do not immerse power cord, power plug or aplliancein water or any other liquid. Tthe water tank should never be removed or completely emptied during decalcifying.
coffee-Recepies 65 Downloaded from www.Manualslib.
Espresso Macchiato Intense and aromatic, an espresso or short black as it’s also known uses about ¼ oz of ground espresso. It is served in a small cup or glass to a level of approximately 1 oz. A shot of espresso served short in a 2½ oz demitasse and stained with a dash of finely textured milk. Café Mocha A glass of textured milk laced with melted cocoa or chocolate syrup and an espresso shot. Top sprinkled with dark chocolate shavings.
GASTROBACK GmbH Gewerbestraße 20 . D-21279 Hollenstedt / Germany Telefon +49 (0)41 65/22 25-0 . Telefax +49 (0)41 65/22 25-29 20120515 info@gastroback.de . www.gastroback.de Downloaded from www.Manualslib.