Operating Instructions Design Coffee aroma pro Art.-No.
Carefully read all provided instructions before you start running the appliance and pay attention to the warnings mentioned in these instructions. Table of Contents Knowing Your Design Coffee Aroma Pro............................................................... 24 Important Safeguards.......................................................................................... 25 Important Safeguards for all Electrical Appliances..............................................
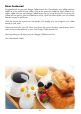
Dear Customer! Congratulations on your new Design Coffee Aroma Pro, Gastrobacks new coffee machine. Wake up to the smell of fresh coffee. Only a few steps are needed to brew coffee an excellent coffee with your new Design Coffee Aroma Pro. By using the Auto On Function your coffee will be right on time for breakfast or lunch. With the aroma button you can choose between strong or mild flavor. With the easy-to-use controls and the backlit LCD display, you can program your coffee exactly to your taste.
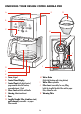
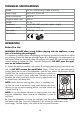
Knowing Your design coffee aroma pro E A G B C H I J D F K A Cover, hinged B Control Panel Display c Control Panel with digital control, programmable Auto On Function, aromaadjustment , Clock D Glass Carafe with Lid and Handle E Housing, Aluminium diecast F Base G Longlife Durable Filter (stainless steel, gold-coloured) removable – no paper filters needed H Water Drain (High-End-Membran with rising buttons) I Water Filter replacable J Filter Insert removable, for easy filling, holds the
Important Safeguards Carefully read all instructions before operating this appliance and save for further reference. Do not attempt to use this appliance for any other than the intended use described in these instructions. Any other use, especially misuse, can cause severe injuries or damage by electric shock, heat or fire. Any operation, repair and technical maintenance of the appliance or any part of it other than described in these instructions may only be performed at an authorised service centre.
• This appliance is not intended for use by persons (including children) with reduced physical, sensory or mental capabilities, or lack of experience and knowledge, unless they have been given supervision or instruction concerning use of the appliance by a person responsible for their safety. Children must be supervised to ensure that they do not play with the appliance or any parts of the appliance or the packaging. Do not leave the appliance unattended, when it is in reach of young children.
• Never use the appliance without water in the water tank. • If liquid is spilled into the housing of the appliance or is running out under the appliance during the brewing, then turn off the power immediately by unplugging the power cord from the power outlet. Let the appliance cool to room temperature and empty the water tank completely. Submit the appliance to a specialised service centre for a thorough check. However, condensation may drip and run down at the back of the appliance with the lid open.
• Do not operate the appliance with a damaged cord or plug or after the appliance malfunctions, or has been damaged in any manner. Immediately cease use and contact an authorised service center for examination, repair or adjustment. • Do not apply any force during operation to prevent damage to the components. • DO NOT place the appliance or power cord in an automatic dishwasher. • Do not leave any food dry on the appliance. Always clean the appliance after each use (See: ›Care and Cleaning‹).
• This appliance is not intended for use by persons (including children) with reduced physical, sensory or mental capabilities, or lack of experience or knowledge, unless they have been given supervision or instruction concerning use of the appliance by a person responsible for their safety. • Children should be supervised to ensure they do not play with the appliance.
Technical Specifications Model: Art. No. 42705 Design Coffee Aroma Pro Power supply: 220-240 V, 50/60 Hz Power consumption: 1000 W Length of power cord: 108 cm Weight: 3.5 kg Dimensions: 210 x 230 x 360 mm (width x depth x height) Watertank capacity: 1.
3. After all parts are washed for the first time, pour cold water up to the 12 cup level mark in the water reservoir. Brew it through the coffeemaker as instructed in BREWING Coffee, but do not add coffee grounds to the Longlife Durable Filter. When done, turn off the coffeemaker and discard the water from the carafe. Operating the control panel Audio signals 1. When the unit is plugged in, one beep can be heard. 2. When the coffee has finished brewing, three beeps can be heard. 3.
We strongly recommend, performing and attending a normal brewing cycle to learn, how to operate your coffeemaker correctly, before using automatic operation. In this way you will recognize problems, arising from the handling your coffeemaker. Note: Automatic operation is only possible, when the clock and start time are adjusted. WARNING: Special care is necessary, when leaving any electrical appliance unattended while connected to the power supply and during operation.
Brewing coffee WARNING: Always special care is necessary, when using any electrical appliance for heating water, to avoid risks of overheating, fire and electric shock. DO NOT leave the appliance unattended when it is in reach of young children. Always ensure that the appliance is assembled completely and correctly, before switching ON (ON/OFF button) the appliance. Do not move the appliance during or immediately after operation.
3. Place either the permanent Longlife Durable Filter or a size 4 paper filter (not included) into the brew basket (see Fig. 4) 4. Add ground coffee. The amount of coffee you use is a matter of personal taste (we recommend one heaping tablespoon for every two cups). Try different amounts of ground coffee per cup until you brew your perfect cup of coffee. You can also try using the paper filter along with the Longlife Durable Filter. 5. Close the cover.
Useful Tips You can easily learn how to prepare a good coffee. In this chapter you will find some hints for this purpose. Generally, coffee is the best and freshest shortly after brewing. Tip: Choose the taste of your coffee according to your own particular liking. The coffee brand and the way of grinding the coffee (fine or coarse) are essential for the results. Just give it a try! Store your coffee (powder or whole beans) in a closely shut container on a cool, dry place.
Cleaning the coffeemaker and accessories 1. Always unplug the appliance and allow cooling down before cleaning. 2. Open the cover of the coffeemaker, grasp the filter basket and the water filter at the tabs, and pull them out. Clean the coffee supply area of the filter basket thoroughly. The fine holes of the long-life filter must be clear.
2.. Open the lid of reservoir, and pull out the water filter (Fig. 6) 3. Open the water filter, pull out the old filter, discard and replace with a new one (Fig. 7). 4. Place the water filter with new filter into the reservoir. Cleaning the filter basket WARNING: Do not lift the cover of the coffeemaker during or immediately after the brewing cycle. Even if the water reservoir seems to be empty, hot water and steam could spit out of the holes in the middle of the cover and cause scalding.
Decalcifying your coffeemaker CAUTION: Do not immerse the warming plate or main housing in water or any other liquid Do not poke around in the water reservoir to avoid damage. Just rinse with cold water periodically. Do not operate the appliance without the filter basket properly in place. Do not use any aggressive chemicals or decalcifier. The build-up of lime in drip coffeemakers is normal and is caused by the minerals commonly found in drinking water.
clean, and dry surface, where it is save from inadmissible strain (e.g. fall, shock, frost) and out of reach of young children. The power cord may never be knotted, twisted or squeezed. Do not place any hard or heavy objects on the appliance or any part of it. Do not pull or strain the power cord. Do not let the plug or power cord hang over the edge of the surface. Ensure that no one can pull the appliance by the power cord. 1. Insert the filter basket properly and close the cover.
GASTROBACK GmbH 20140317 Gewerbestraße 20 . 21279 Hollenstedt / Germany Telefon +49 (0)41 65/22 25-0 . Telefax +49 (0)41 65/22 25-29 info@gastroback.de . www.gastroback.