
Design Bistro Oven Pro 18L Owner's manual


grill or oven). Do not place the appliance on the power cord. If the power cord warms
up during operation or is likely to be damaged, it must be replaced by an authorised
service centre. Do not attempt to repair the power cord!
• Do not immerse the Design Bistro Oven Pro 18 L or power cord in water or any other liquid.
Do not spill or drip any liquids on the Design Bistro Oven Pro 18 L or power cord to avoid
risk of fire and electric shock. When liquids are spilled on the exterior of the appliance,
immediately turn the appliance OFF, unplug the power cord and dry the appliance.
• Do not place the appliance in an automatic dishwasher.
First use
Unpack the appliance carefully and check, if there are any parts damaged or missing.
CAUTION: It is important to carefully remove all packing and shipping materials as well
as any price-tags, but do not remove any warning or model labels on the appliance.
Ensure that there are no foreign objects (i.e. packing materials) inside the Design Bistro
Oven Pro 18 L before operating the appliance. Wash all parts as instructed in the ´Care
and Cleaning` section and insert the crumb tray.
The heating elements were oiled during manufacture and these will therefore smoke
slightly when the oven is first used. This is entirely safe and will stop after a few minutes.
However, so that the food does not taste of this smoke, we recommend that you take the
following action before using the appliance for the first time.
If the burnt smell occurs again on later use, clean the oven (see: ‘Care and Cleaning’). If
the burnt smell persists stubbornly even after thoroughly cleaning the appliance, return
the appliance to an authorised service centre for examination and repair.
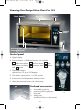
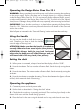
1. Connect the power cord to the power outlet and press the function button. The function
button and the function/time and temperature switch will illuminate in blue.
2. Turn the function/time and temperature switch to heat from below.
3. Press the temperature button. The temperature button and the function/time and temperature
switch will illuminate in blue. Set the temperature to 235 degrees.
4. Press the time button. The time button and the function/time and temperature switch
will illuminate in blue. Set the cooking time to 15 minutes.
5. Press the select/start-and stop button. The select/start-and stop button will illuminate
in green. The symbol and the temperature begin flashing to indicate that the appliance
is being preheated. Once the set temperature has been reached, the timer starts counting
down. The remaining cooking time will be shown in the display.
Note: The count down of the cooking time only starts after the preheating is finished.
Reduce the cooking time accordingly or place the food in the oven after the preheating
is finished.
Once the cooking time set has elapsed, the oven will switch off automatically.
27
42811_manual.qxp 10.07.2008 07:51 Seite 27